
DLT Registration Process for sending Bulk SMS in India
DLT Registration is mandatory as per TRAI notification for sending Bulk SMS in India. In this article we will look into the DLT Registration Process for sending Bulk SMS in India in different platforms such as Vodafone, Videocon, Jio, Airtel, and also the process of adding registered DLT details into Fast2SMS account.

DLT Registration Process in Vodafone
1. Visit the link – https://www.vilpower.in/signup/
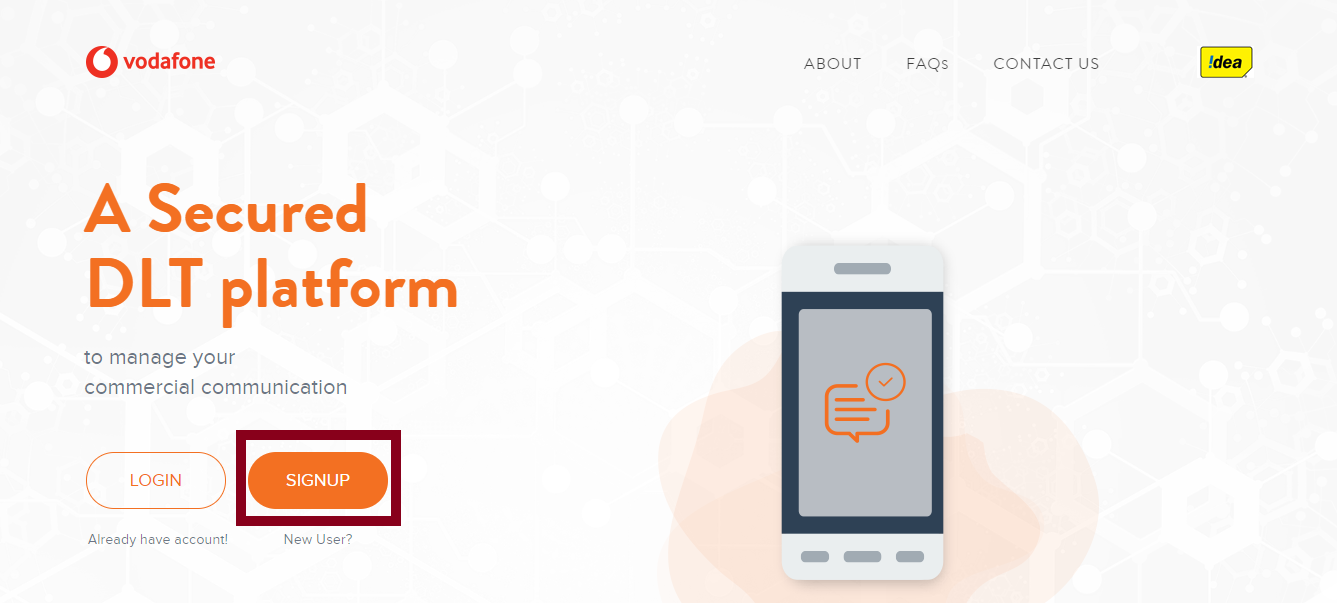
The page will be displayed as shown in the image below. Click on the Signup button to register in the Vodafone DLT platform.
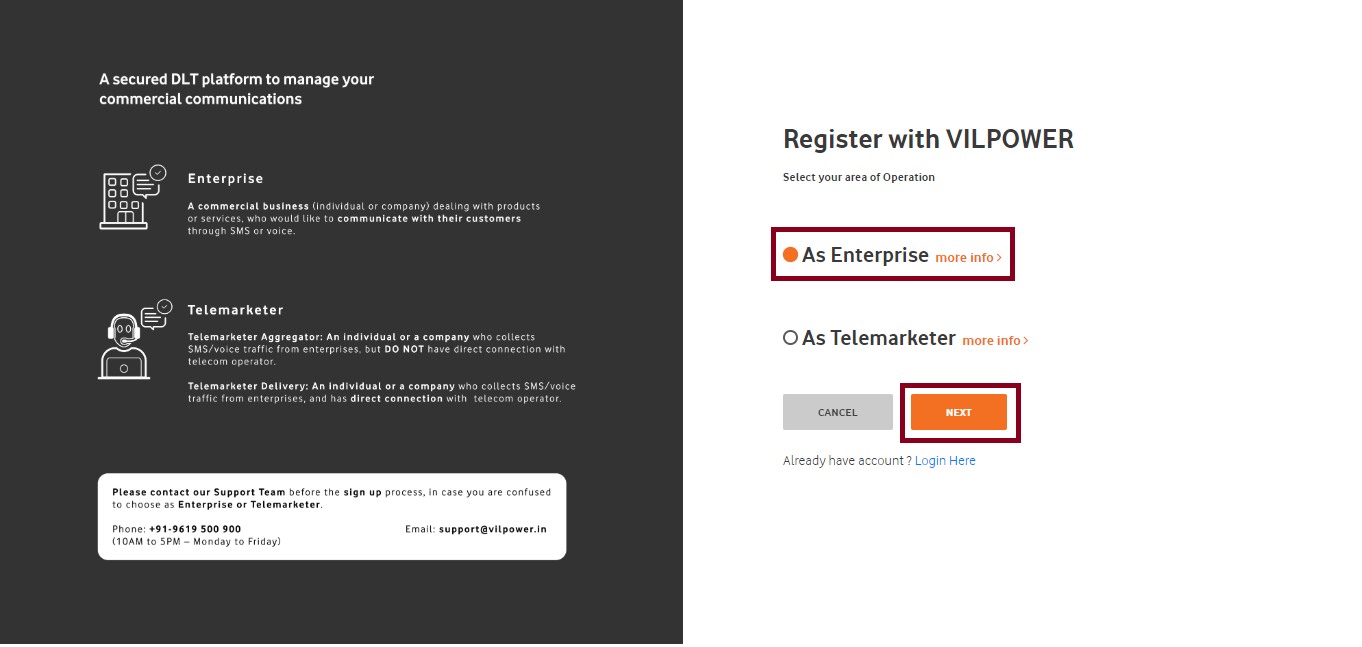
2. Upon clicking the Signup button, you will be re-directed to the next page and asked to choose one option between the two. Select the appropriate option and click on the Next button.
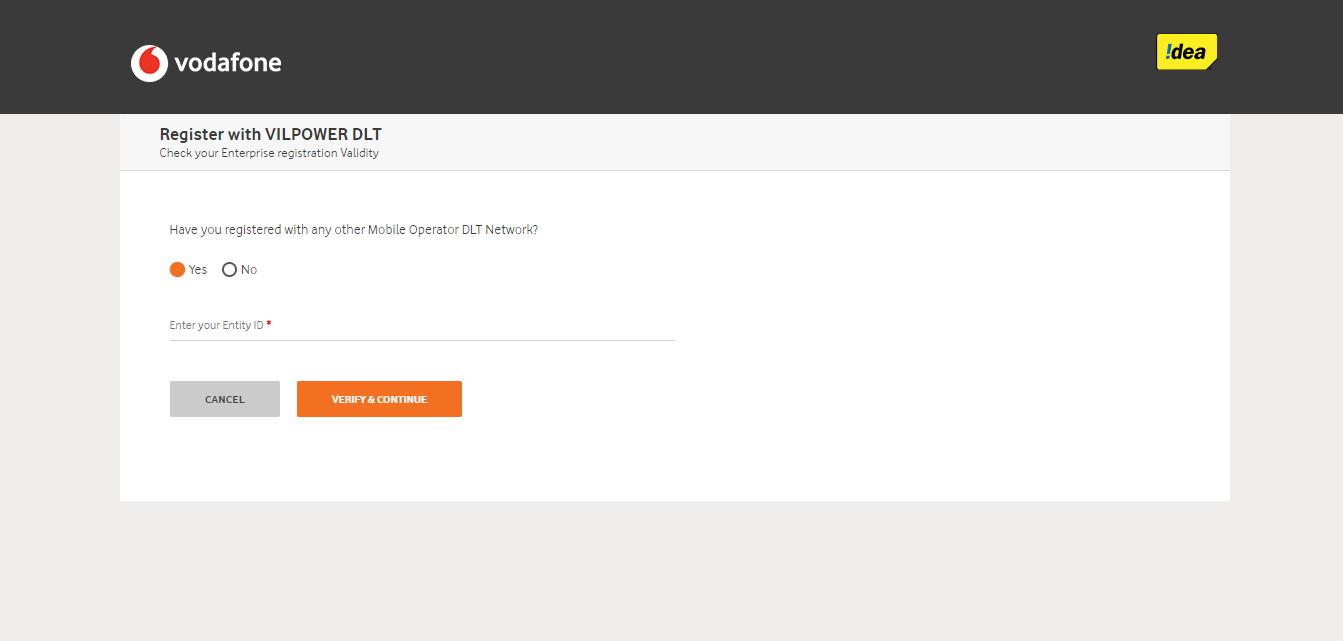
3. After clicking on the Next button, another page will get displayed asking whether you have registered with any other mobile operator DLT network.
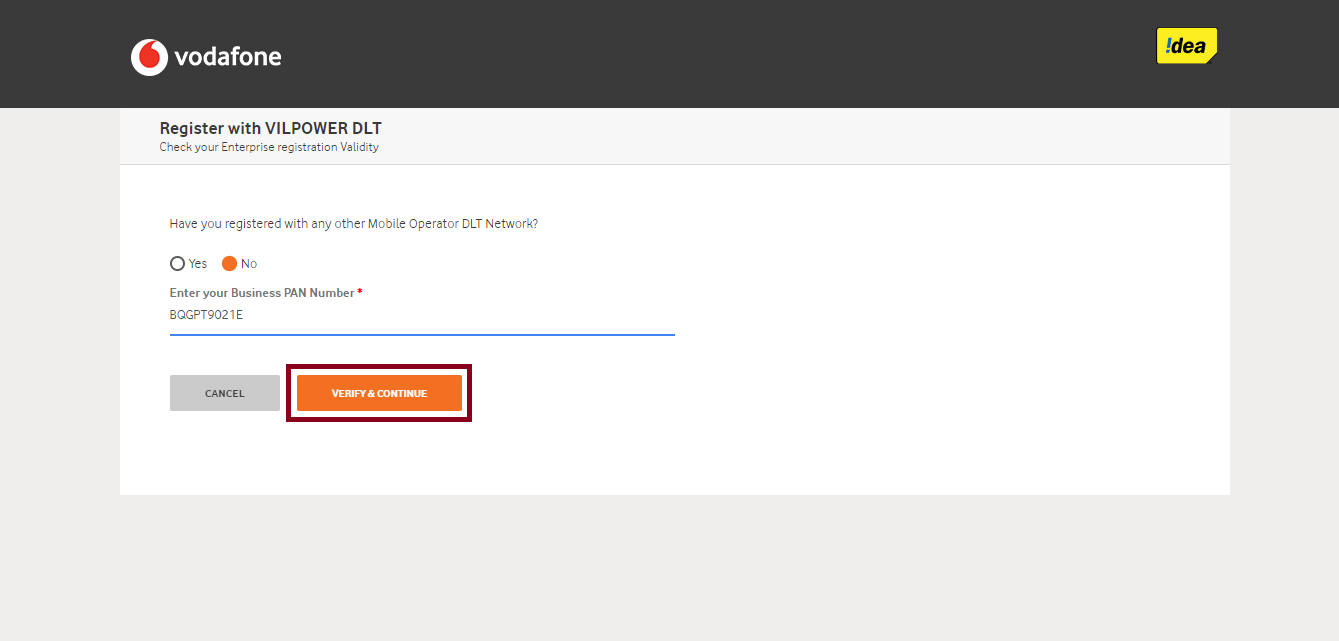
4. If you have not registered with any other “DLT SMS” mobile operator then select the ‘No’ button and then you will be asked to enter your Business PAN number. Enter your PAN card number and then click on the button ‘Verify and Continue‘.
5. After clicking on the Verify and Continue button, next window will appear asking you to sign up for a business account. Here, you need to select your business type, enter your name, email id, password, mobile number and then click on the ‘I agree to VIL terms and conditions’ checkbox.
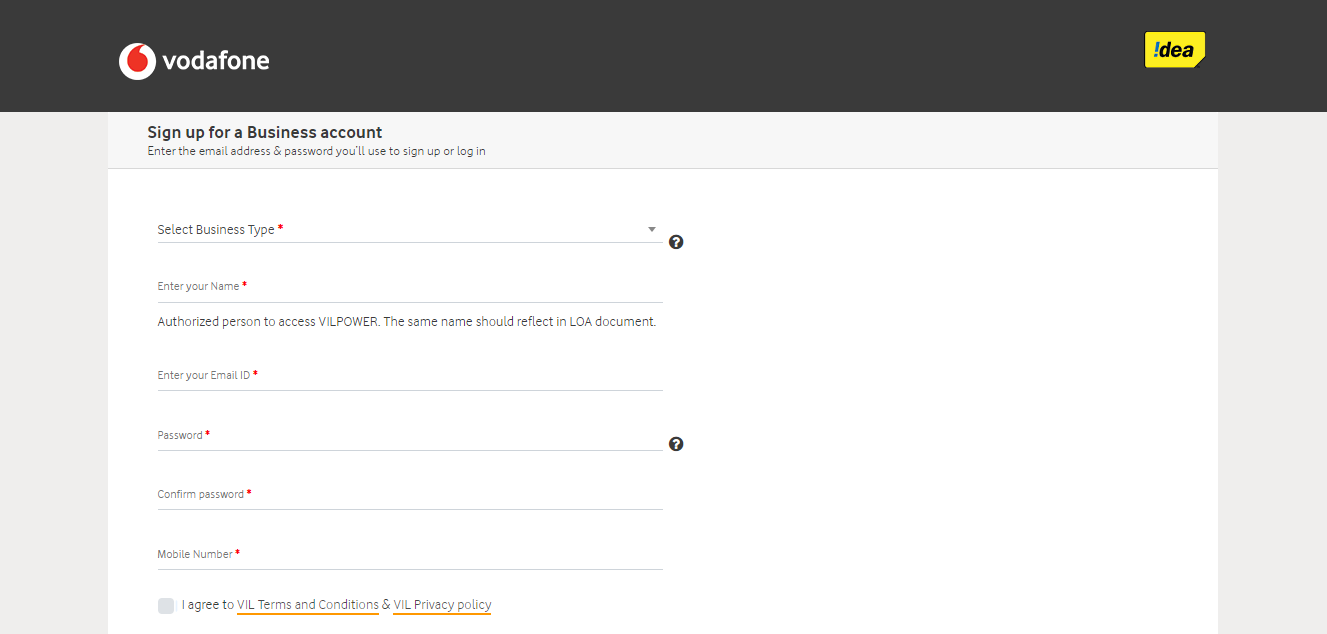
6. After entering all the details, click on the Continue button to proceed with the registration.
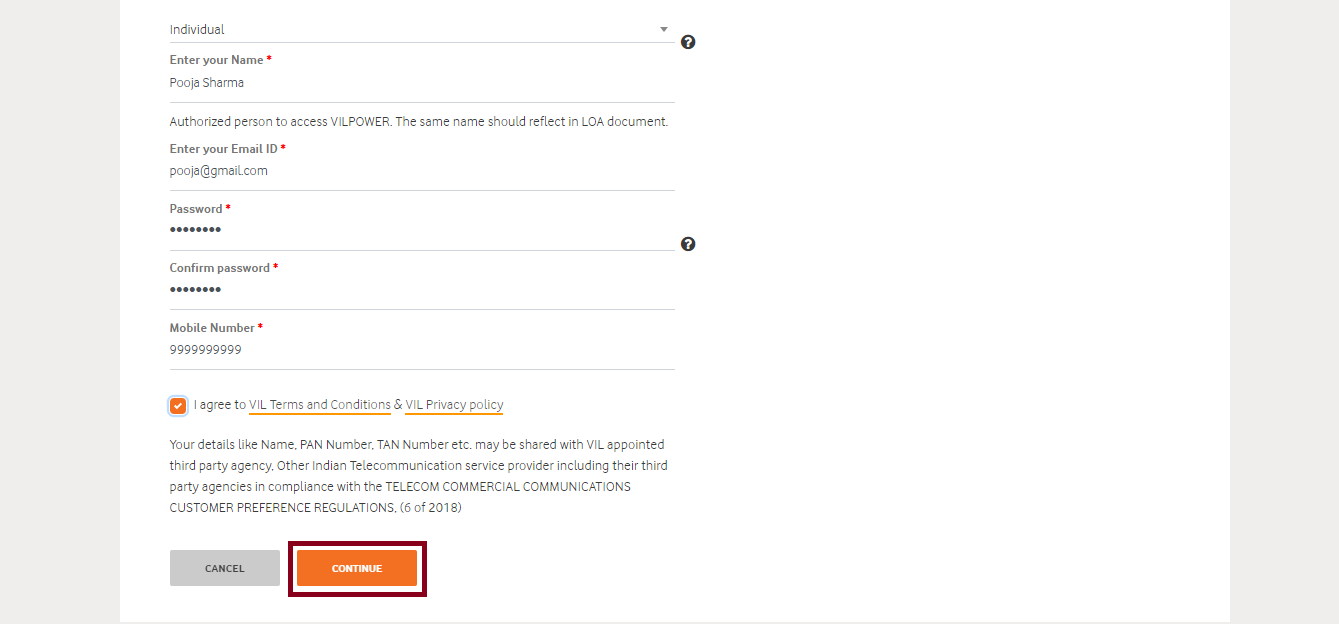
7. As you click on the Continue button, OTP will appear on your registered mobile number. Enter the OTP and click on the Verify button.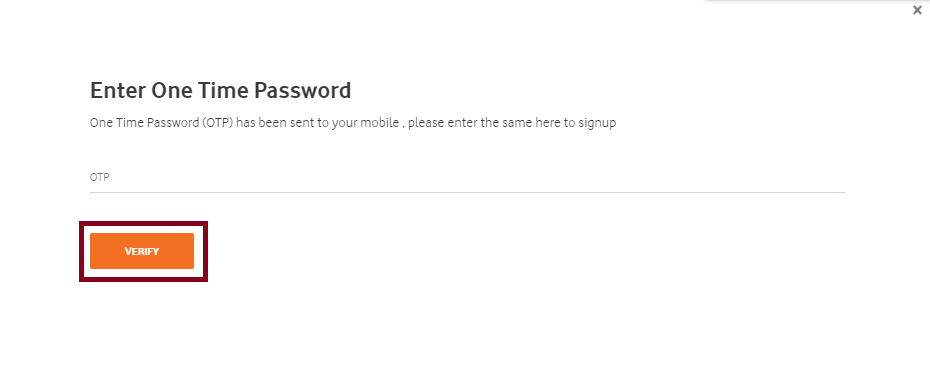
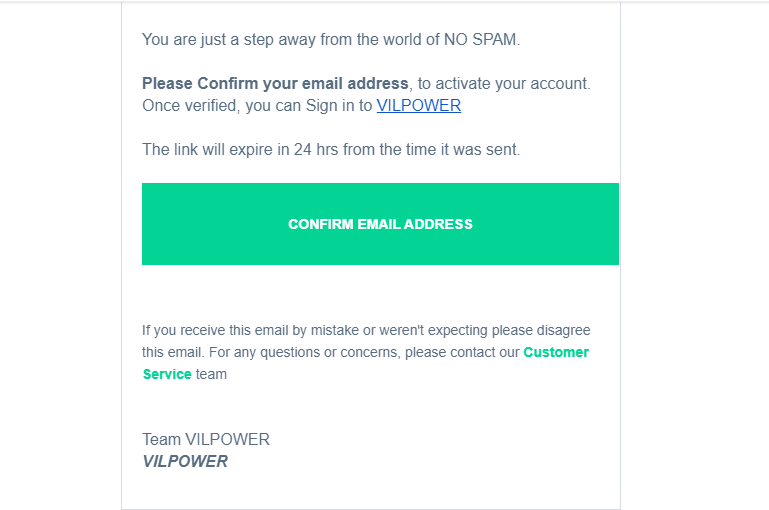
8. A verification link will be emailed to you. You need to click on the link in your email inbox to complete the sign up process.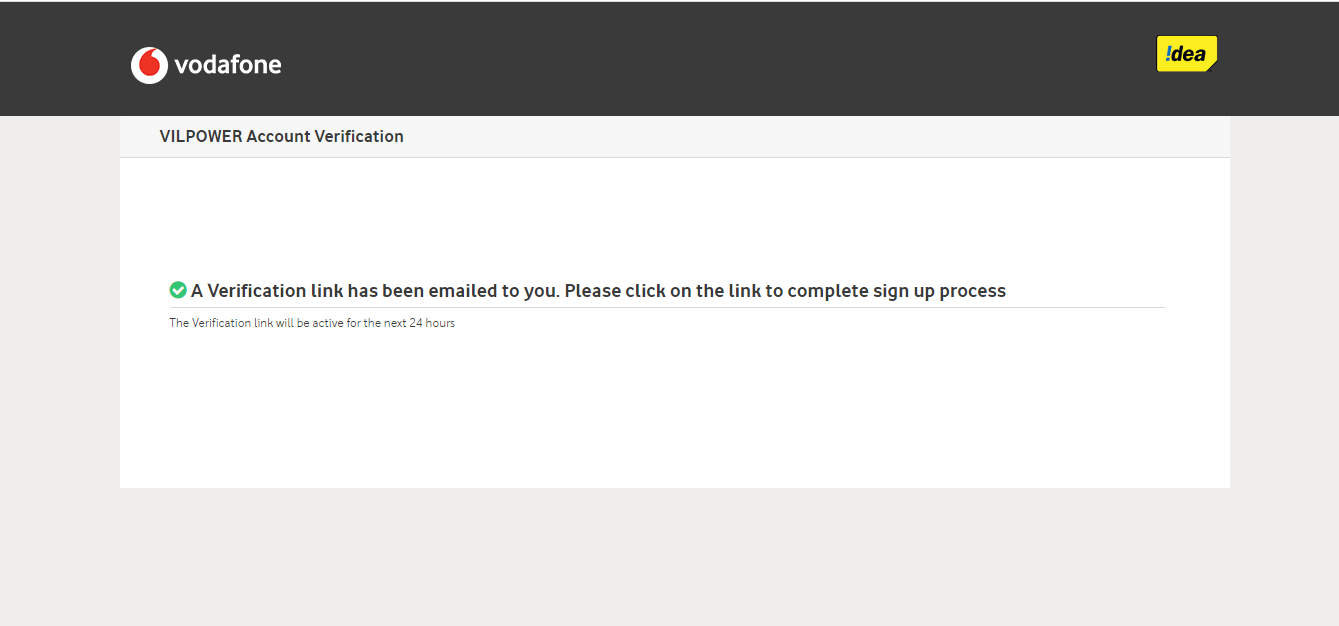
9. The verification link will be displayed in your email inbox as shown in the image below. Click on the ‘Confirm Email Address‘ box to complete your account verification.
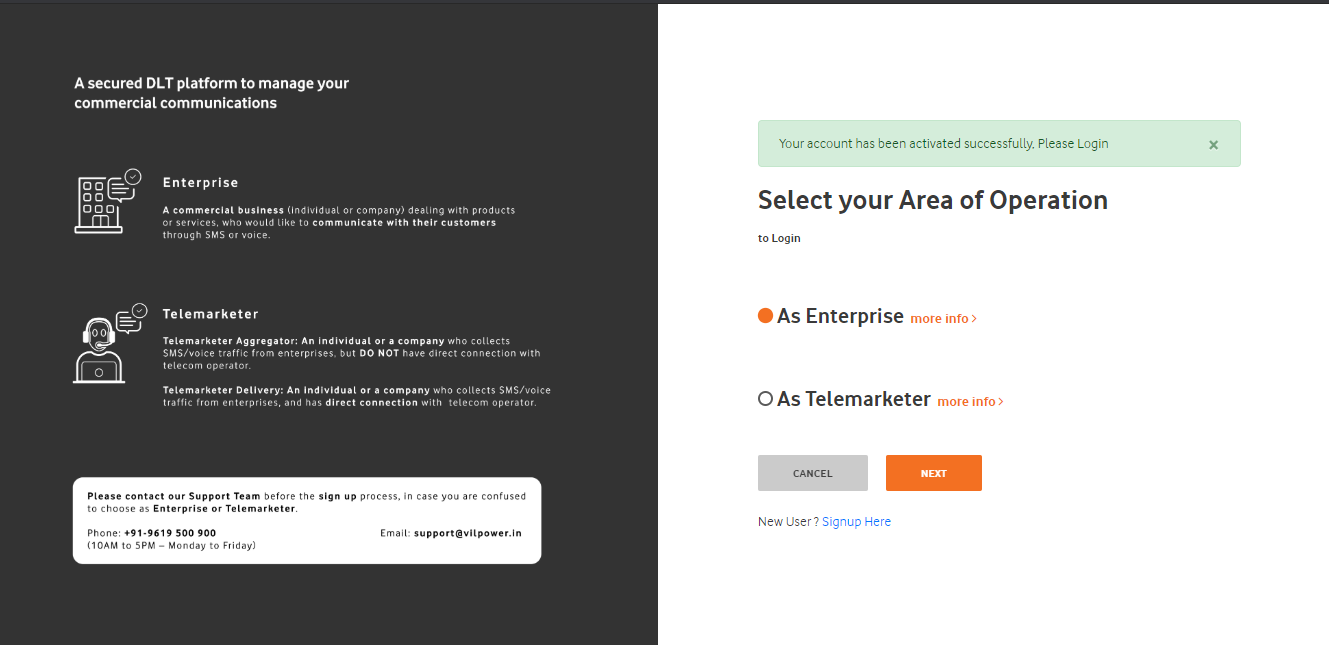
10. As you click on the ‘Confirm Email Address’, a message will be displayed on your screen that ‘Your account has been activated successfully, Please Login’. Select the appropriate option between Enterprise and Telemarketer and then click on the Next button.
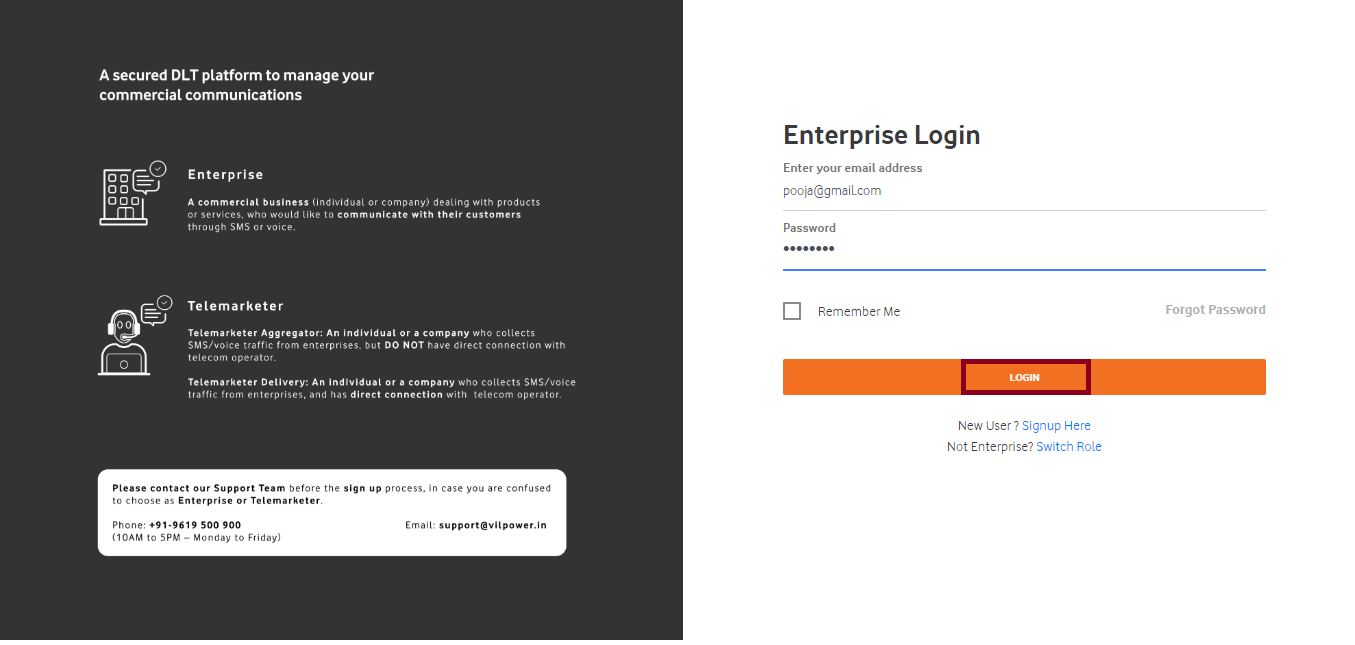
11. As you click on the Next button, another window will get opened asking you to enter your email address and password. After entering the details, click on the Login button.
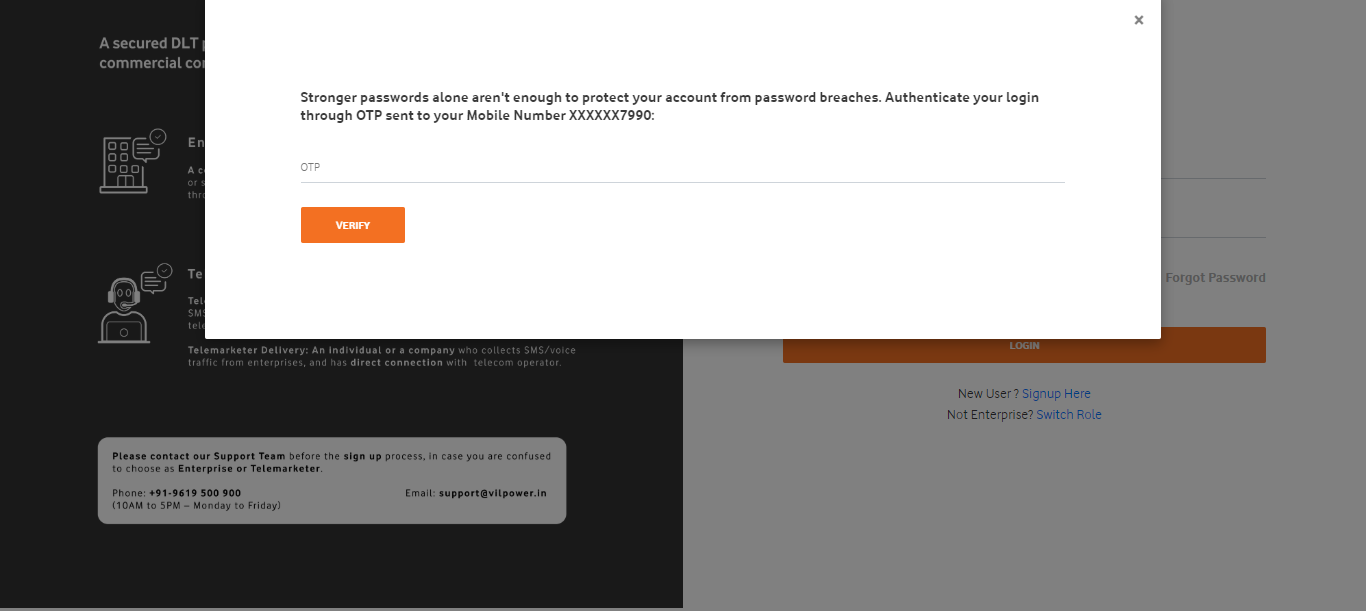
12. As you click on the Login button, another window will appear where you need to enter OTP received on your registered mobile number. Enter the OTP and click on Verify.
13. A window will get displayed where you need to enter your business details. As you click on the, ‘Select Industry Type’ field, a number of options will get displayed such as Individual, Sole Proprietorship, Partnership, Private/Public Company Ltd, etc. In the next field, different categories of sectors like Finance, Retail, Health, etc. will be displayed. Select your Business type and Industry from the list and then enter further details. After entering your Business PAN card, Business established date, name and alternative email id, click the Continue button.
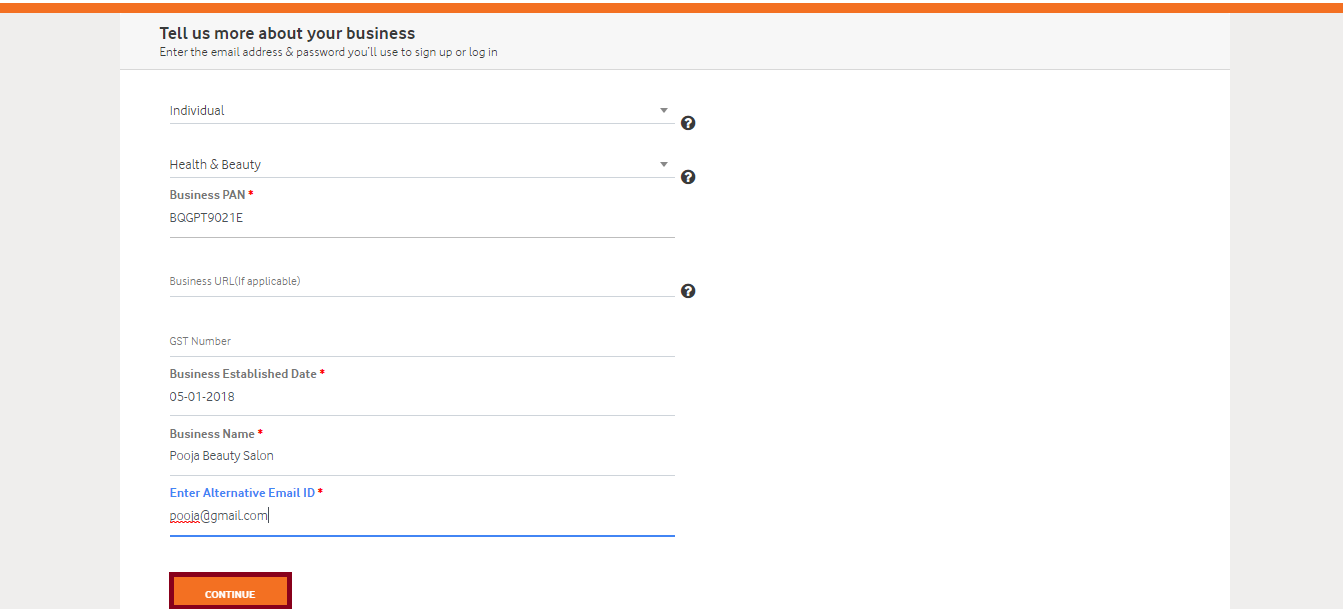
14. As you click on the Continue button, another window will get displayed where you need to enter your Business Address details. Enter all the details and then click on the Continue button.
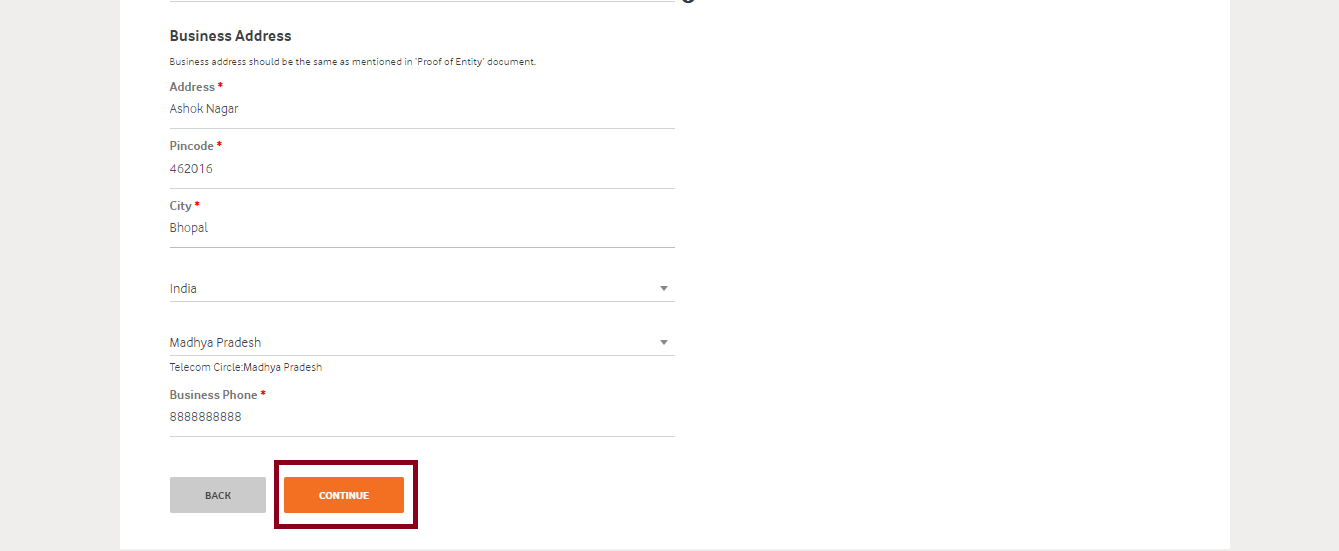
15. As you click on the Continue button, next window will appear where you need to upload your identity documents for verification. Click on the Upload Document to attach your PAN Card and then click on the Continue button.
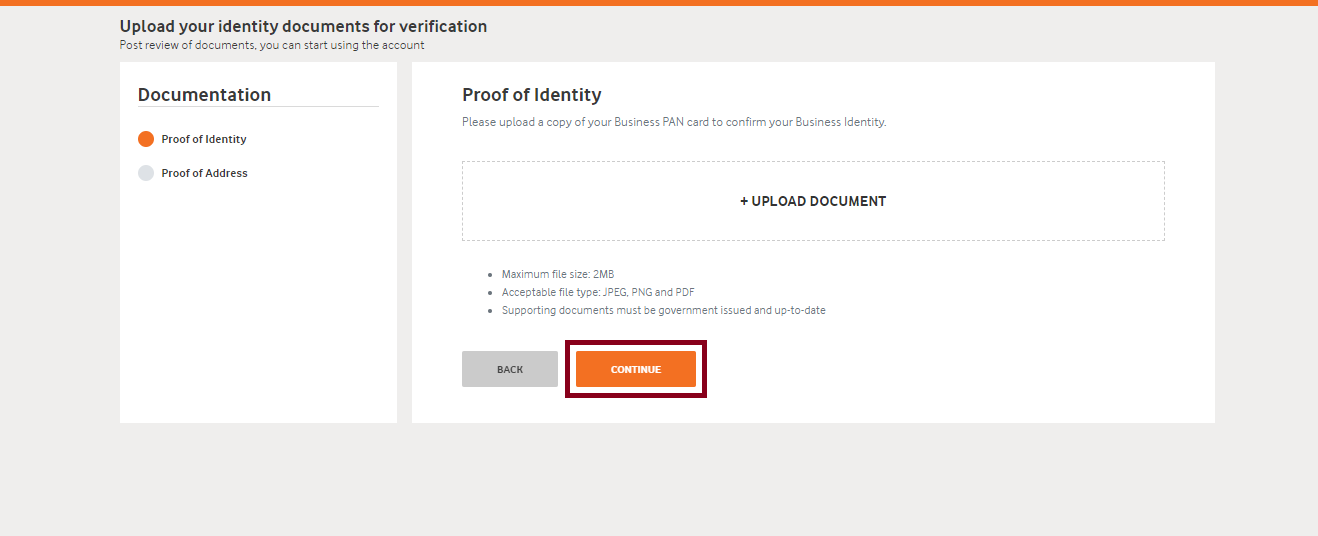
16. As you can see, a message will be displayed at the top of the screen that ‘Proof of Identity Added successfully’.
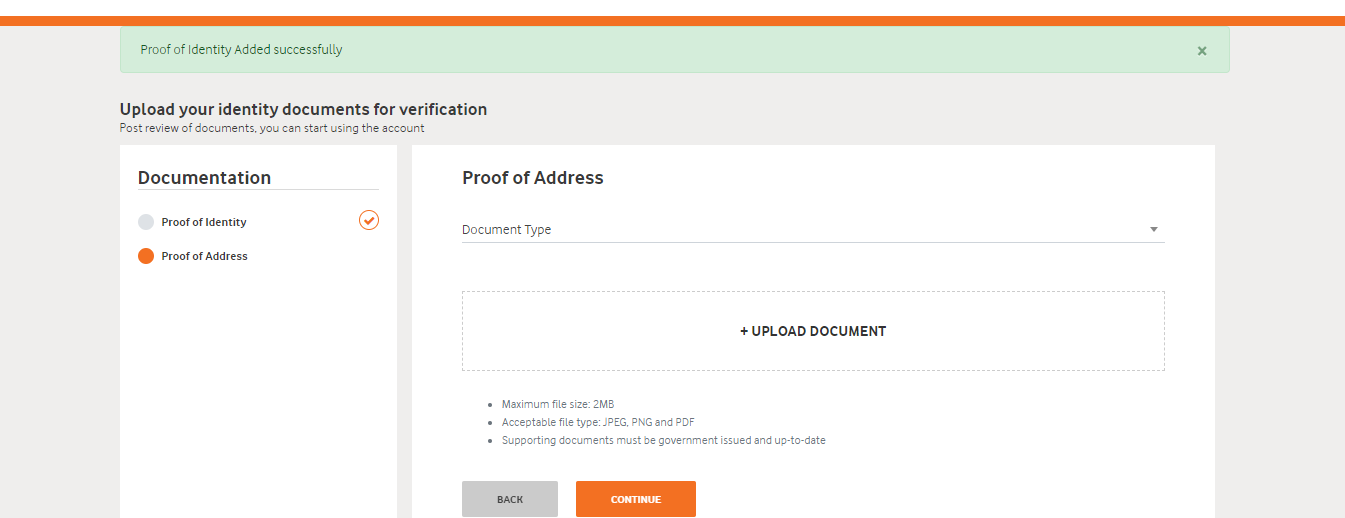
17. Next, you need to upload document for the Address Proof. Select the Document Type from the list of options such as Driving License, Voter ID, Passport, attach the document and then click on the Continue button to proceed further.
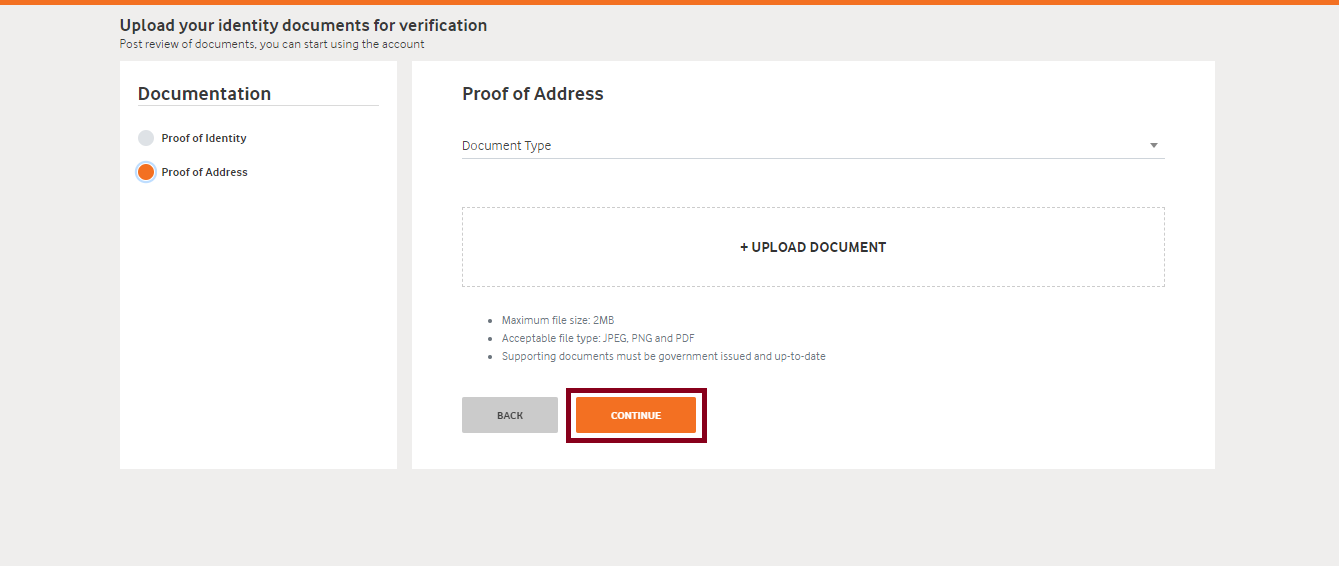
18. After you have uploaded the document, a message will appear on the screen that your document is added successfully as shown in the image below. Here, you need to select the Telemarketer(Bulk SMS Service Provider) from which you want to purchase Bulk SMS Service and after entering the Telemarketer ID, click on the Verify button.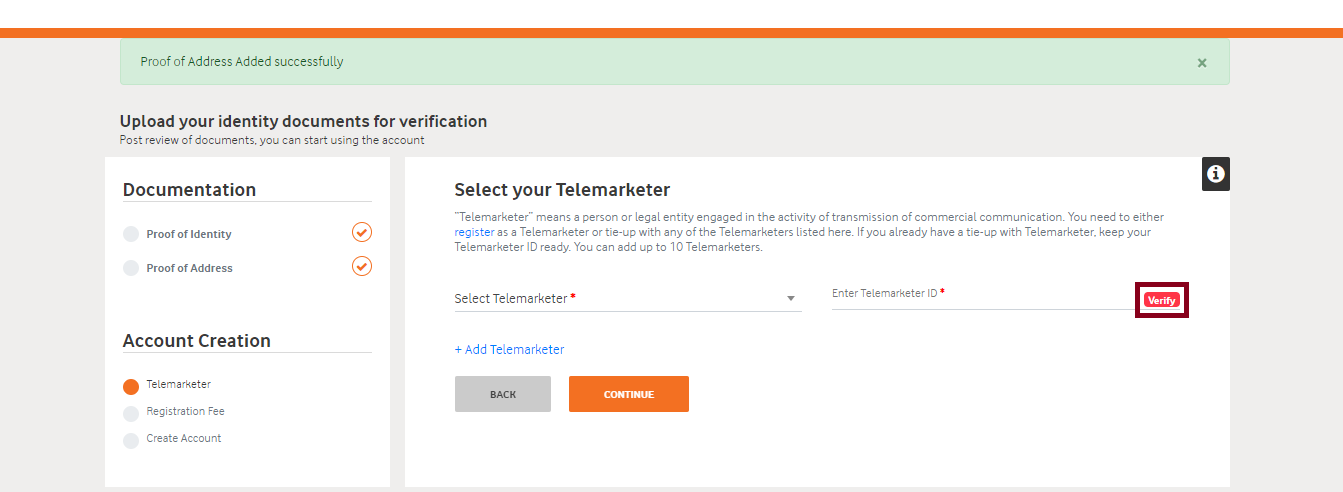
19. Select SID GROUPS PRIVATE LIMITED as your telemarketer if you want to purchase Bulk SMS Service from Fast2SMS. Enter the Telemarketer ID as 1102524310000011354 and click on the Continue button.
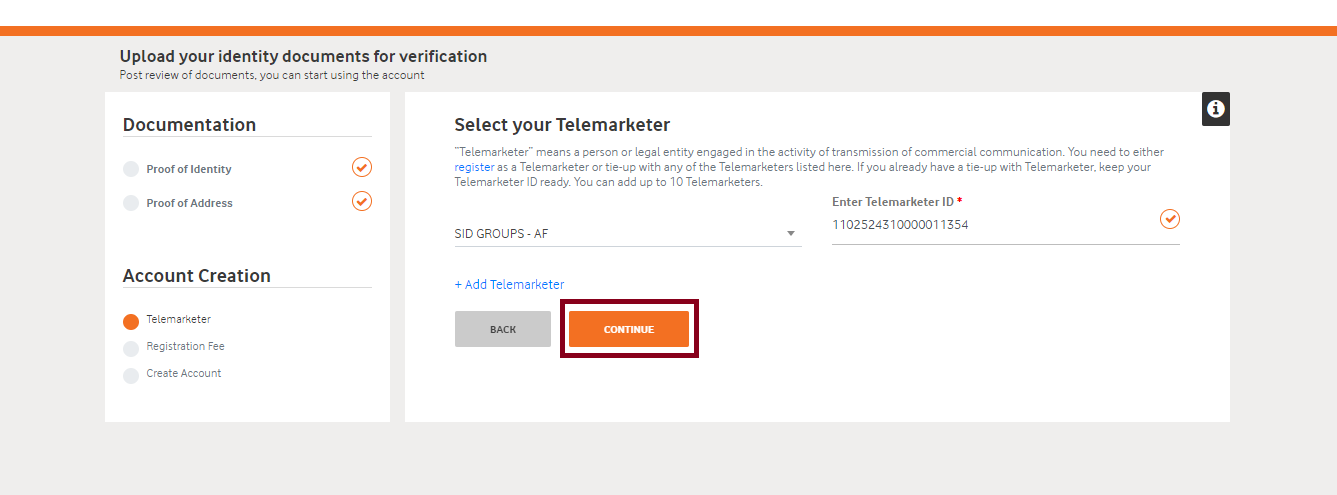
20. As you click on the Continue button, you will be re-directed to the registration fee page. Registration charges of INR 5900/- may apply.
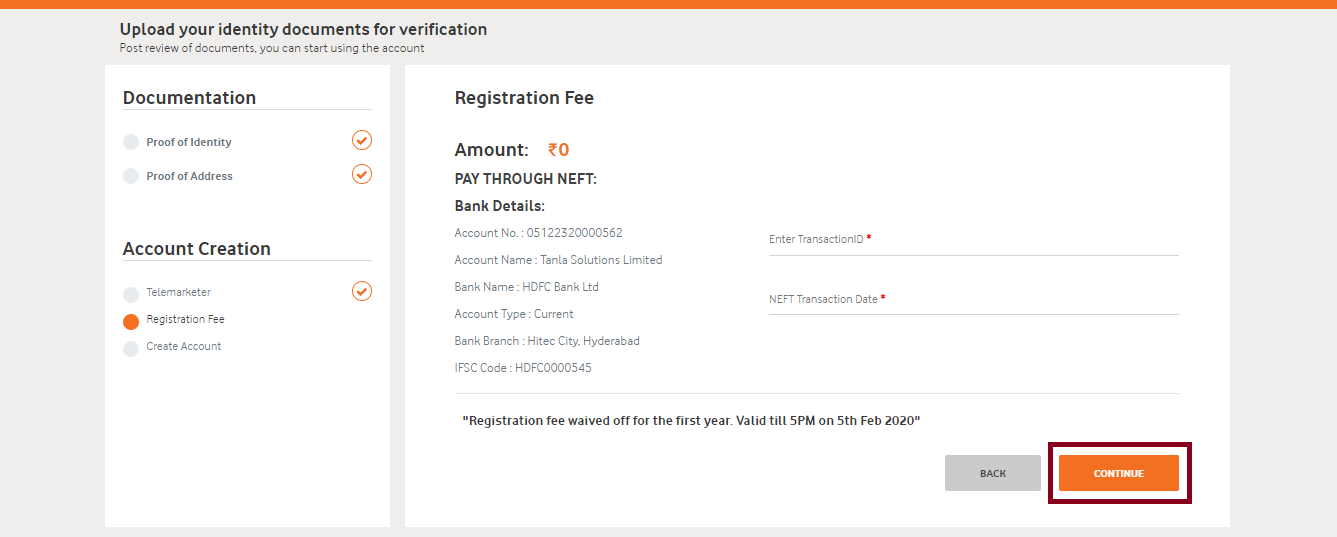
21. A message will be displayed on your screen that your payment is successful. Now, click on the button ‘Continue to create account’.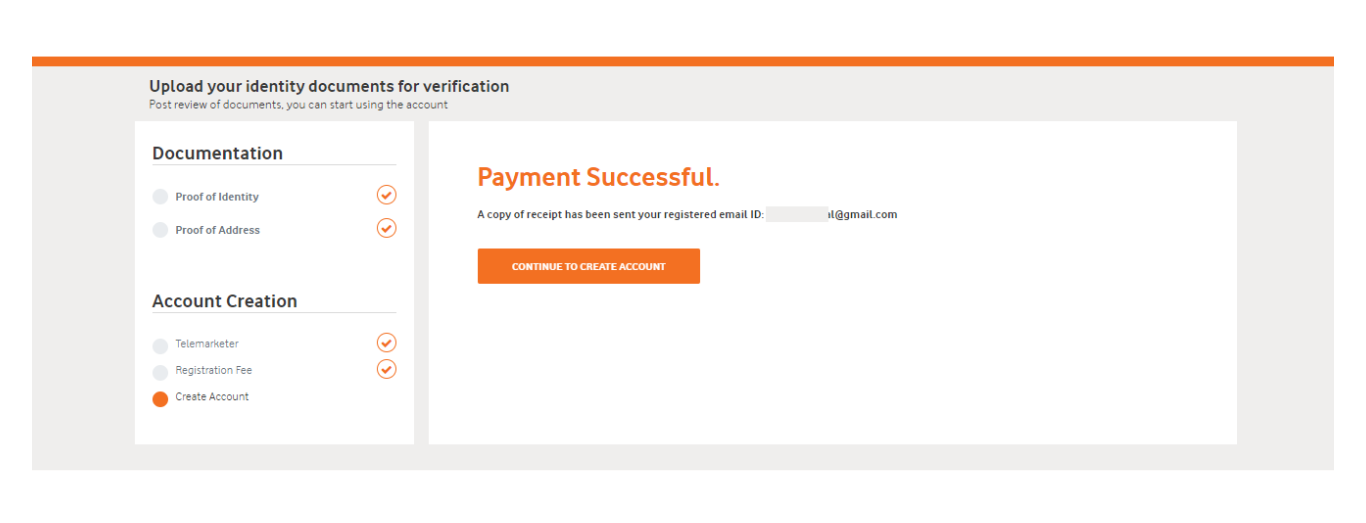
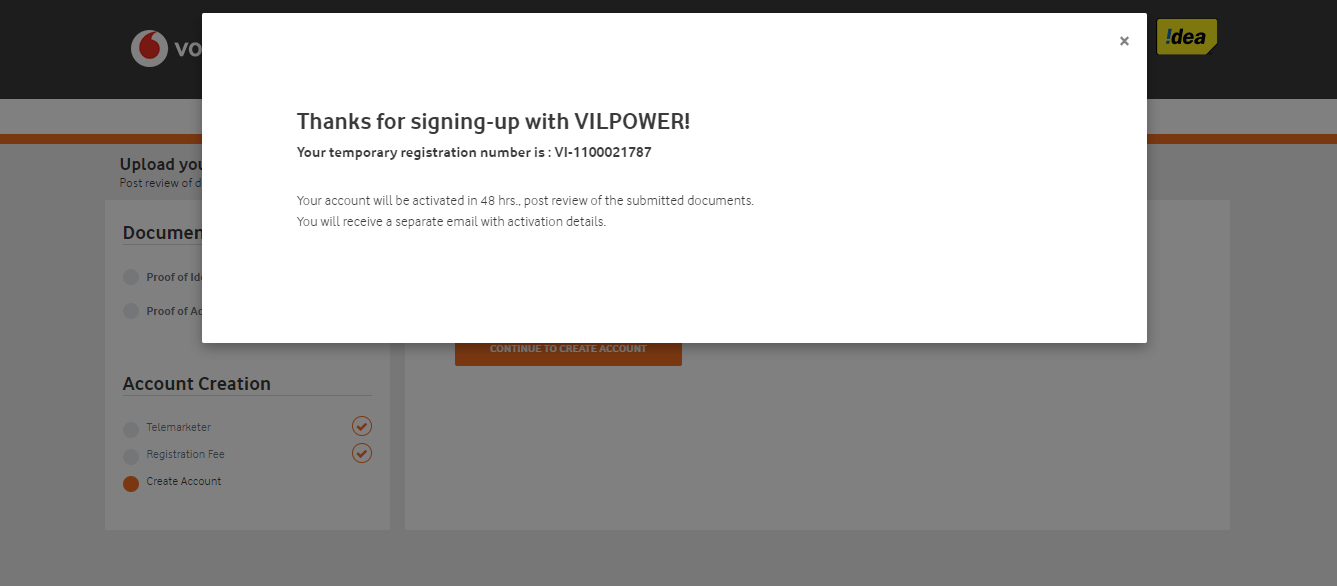
22. As you click on that button, a dialog box will be displayed with the message ‘Thanks for signing-up’.
23. Your account status will appear as pending for activation and once your documents get verified, your account will get activated.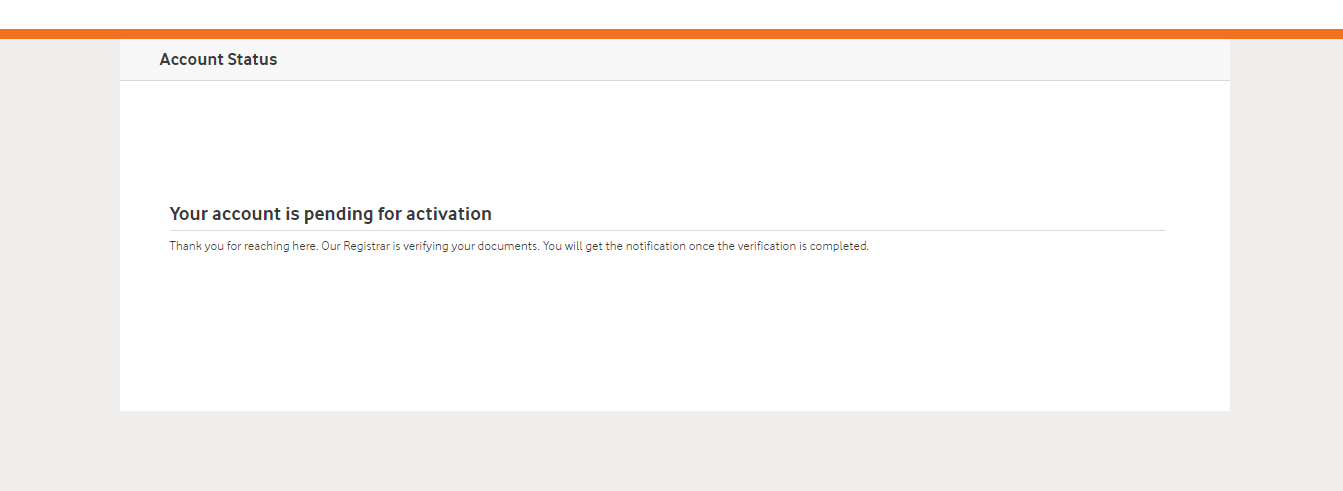
DLT Registration Process in Videocon
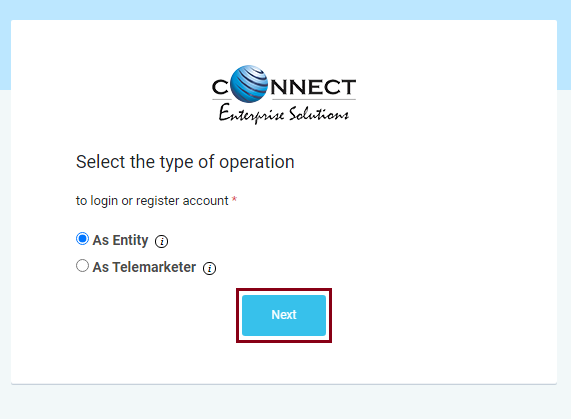
1. Visit the link: https://pingconnect.in/entity/register-with
Select ‘As Entity‘ button to signup in Videocon DLT and then click on the Next tab.
2. For New DLT Registration, click on the ‘Click Here‘ link.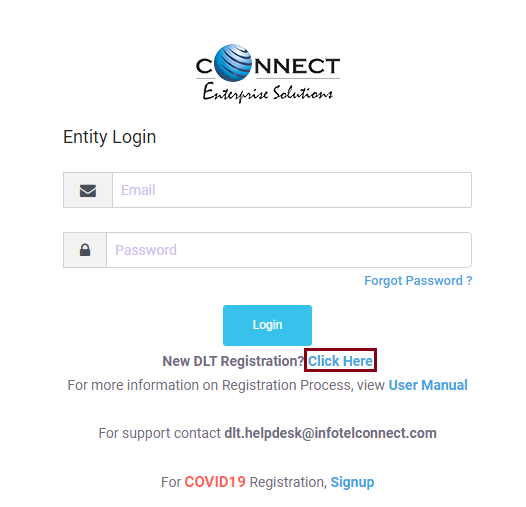
3. By default, Indian is selected as shown in the image below. Click on the Next tab to continue with the registration process.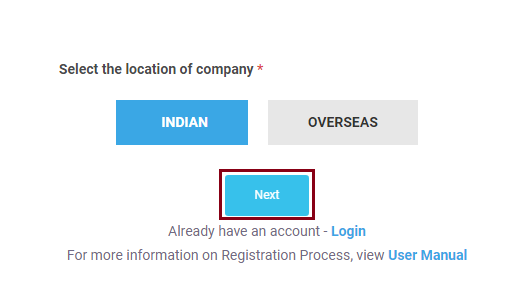
4. A ‘Customer Acquisition Form’ page will appear on your screen. Select the New Registration button if you are registering for the first time on the DLT platform.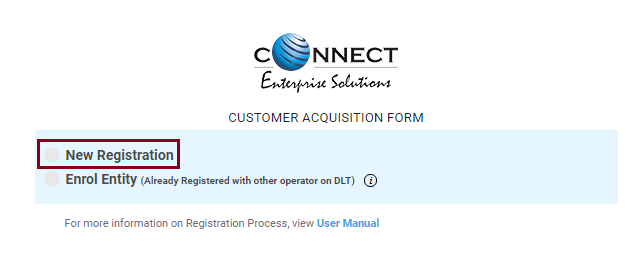
5. A message will appear on your screen as shown below. Click on the OK tab.
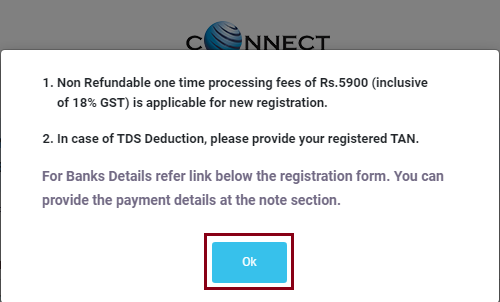
6. Another page will get displayed where you need to provide organization and company details. Enter your Organization’s Name, Entity Type, Email ID and Category of the Organization.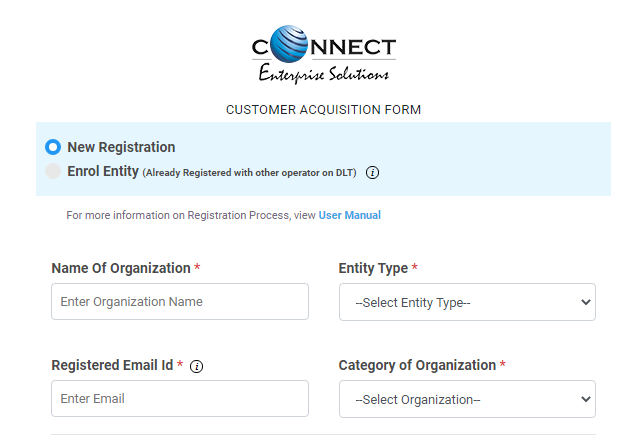
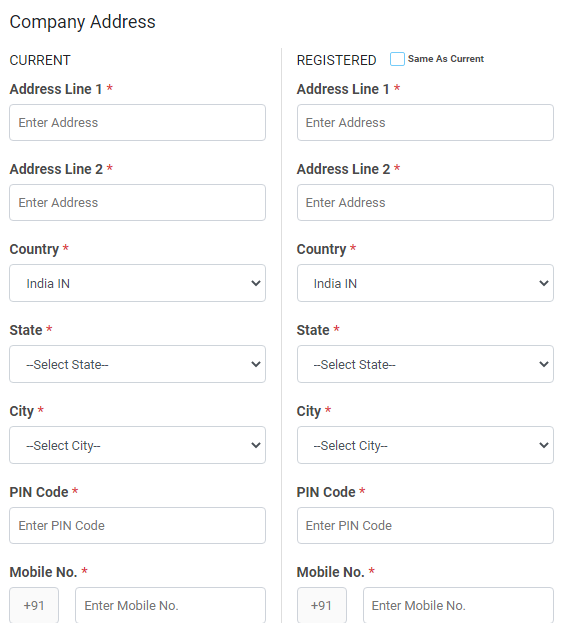
As you scroll down the list, you need to enter your Company Address, Country, State, City, PIN code and Mobile number.
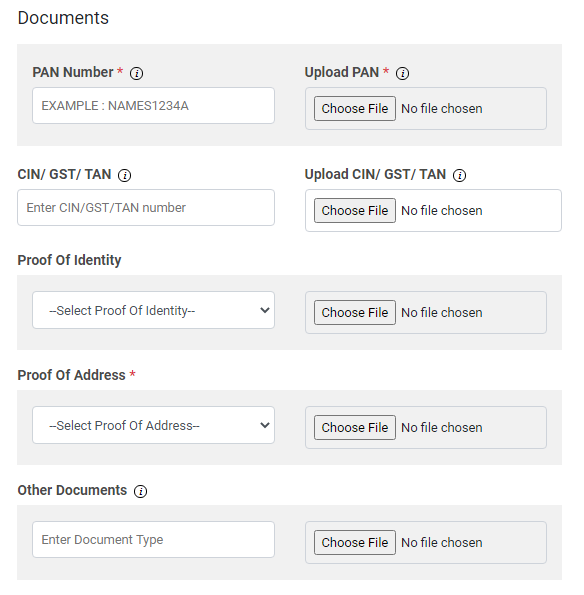
Further, you need to upload your company documents such as PAN Card, CIN/GST/TAN, Identity Proof, Address Proof and Other documents. As shown below, firstly you need to enter your document details and then upload the document file.
Proof of Identity: Following documents can be uploaded and accepted as Identity Proof
- GSTIN
- Aadhar or Unique Identity Number
- Election Commission ID
- Passport
Proof of Address: Documents accepted as Address Proof are:
- Aadhar
- Unique Identity Number
- Election Commission ID
- Passport, Electricity Bill (Not older than 3 months)
- Telephone Bill (Not older than 3 months)
- Lease Agreement/Registered Sale
Next in the list, you need to enter the details of the Authorized Person. Enter Name, Mobile number, Designation, Email and upload the Authorization Document.
The Authorization document can be written in a word document and uploaded as a file in the Authorization Document Field. Click here to download Letter of Authority.
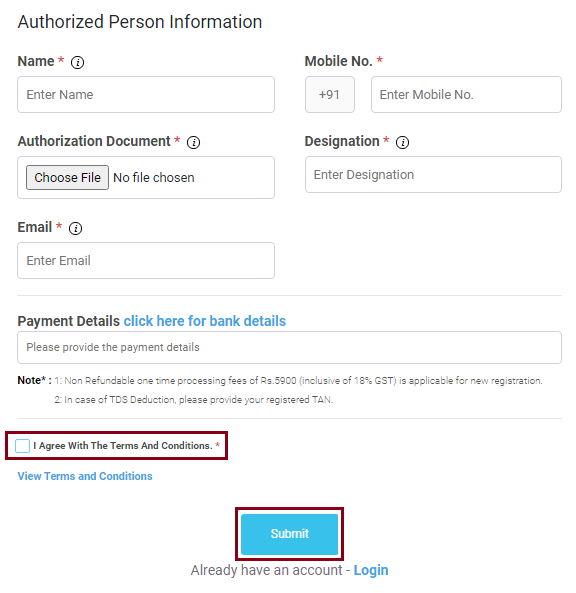
Leave the payment details field blank as there is no registration fee for you.
Click on the checkbox ‘I Agree With The Terms and Conditions‘ and then Click on Submit.
An OTP will be sent to your registered mobile number. Enter the OTP to complete the mobile number verification.
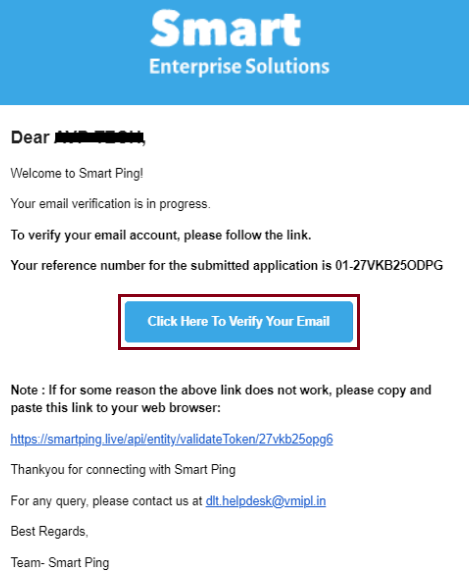
7. An Email from [email protected] will be sent to your Email ID as displayed in the image below. Click on the link ‘Click Here To Verify Your Email‘ received in your email inbox to complete the Email verification.
After that you need to wait 2-3 days for the approval of your entity & you’ll receive separate email/sms containing your login details for Videocon DLT SMS platform.
After approval, you need to approve your Sender ID’s in headers section. Follow this link for whole process.
Once your Sender ID got approved from videocon you can send screenshot of approved Sender ID on [email protected] so that our team can add those sender id in your Fast2SMS account.
DLT Registration Process in Jio
1. Visit the link: https://trueconnect.jio.com
Click on the Register Now button to register as an Entity in the Jio DLT platform.
2. The following page will be displayed. Select the Principal Entity option.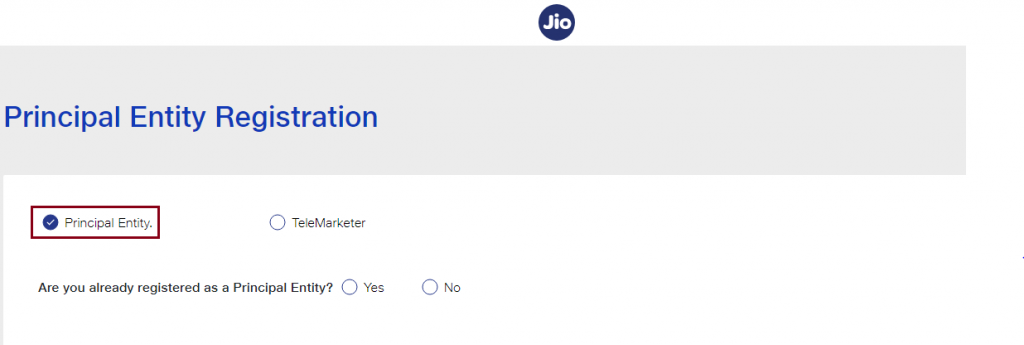
3. If you are registering on the DLT platform for the first time, select No & Fill the requested details.
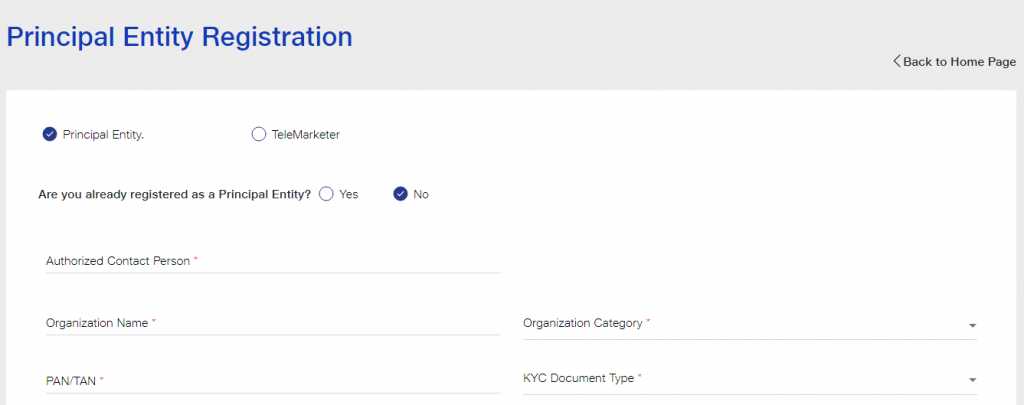
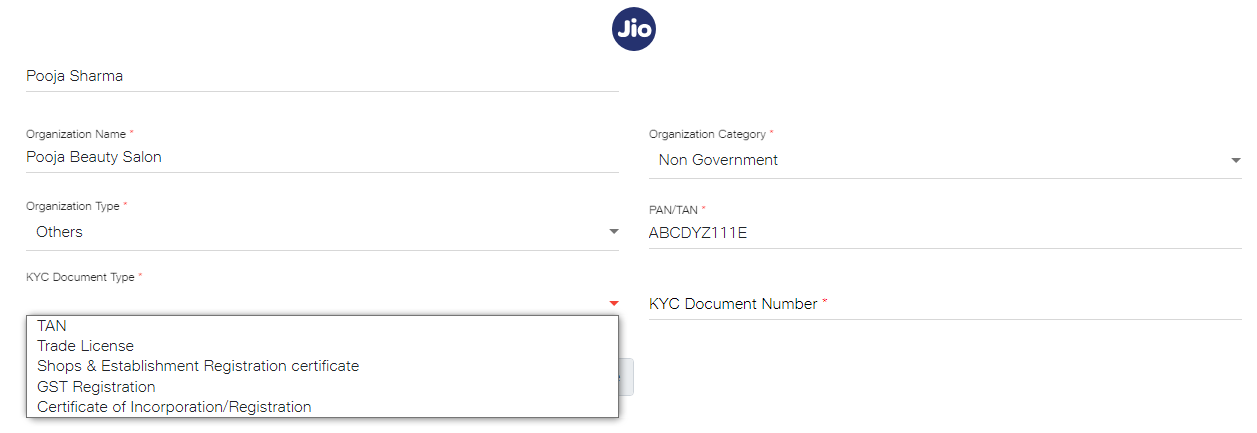
4. Enter the details as shown in the image below. Select your Organization Type from the drop down list.
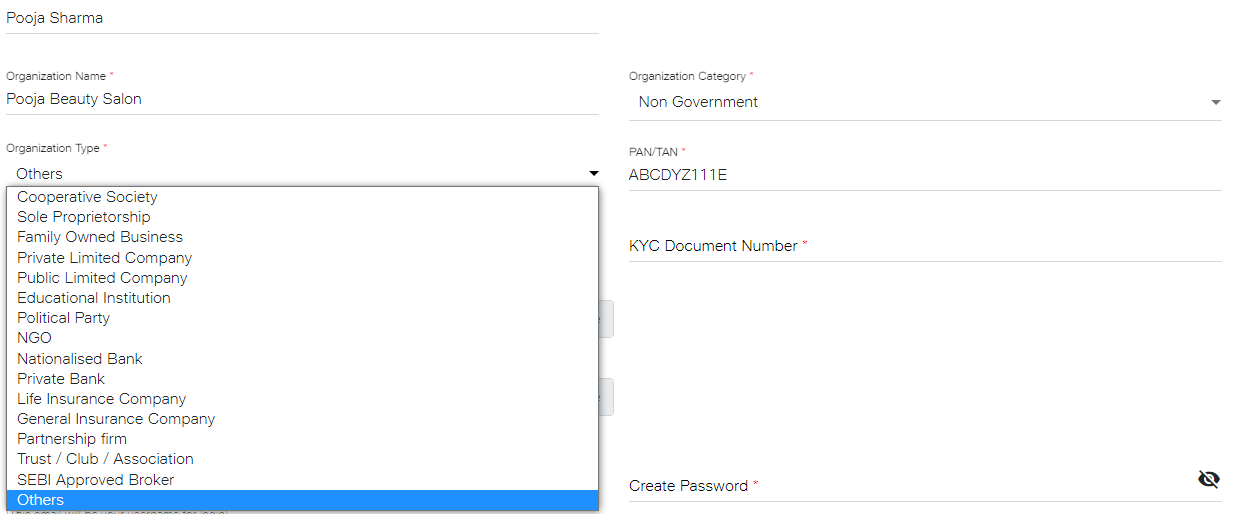
5. Select the KYC Document Type from the drop down list and enter the KYC Document Number.
6. Upload your KYC Document and PAN/TAN. Make sure the file size is less than 5 MB.
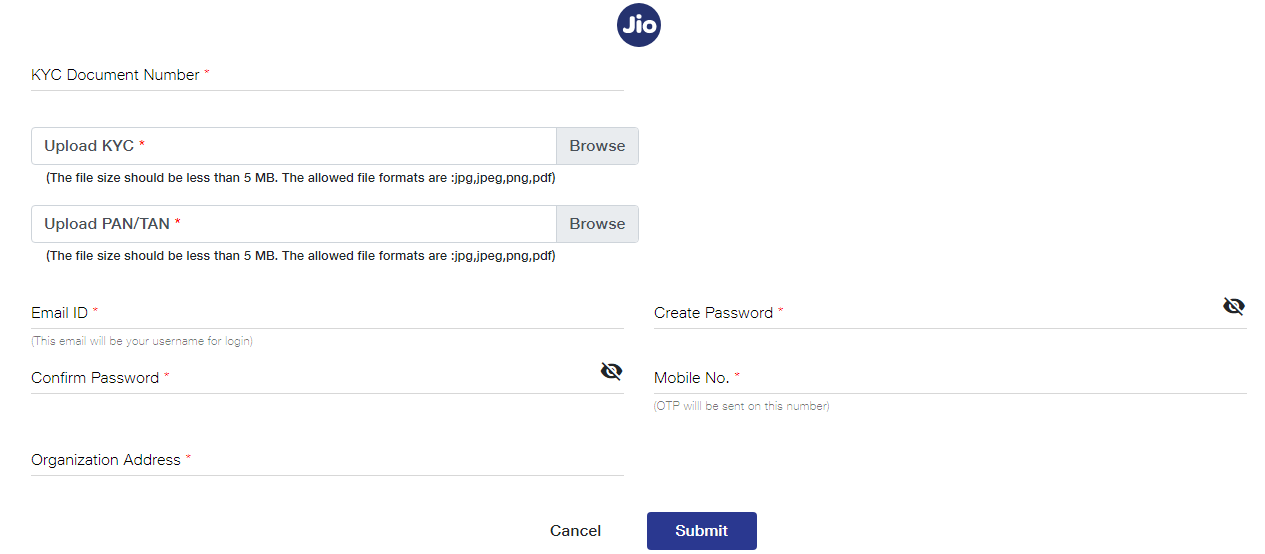
7. After uploading KYC document and PAN Card. Next, enter your email ID, password, mobile number and organization address. After providing the details, click on the Submit button.
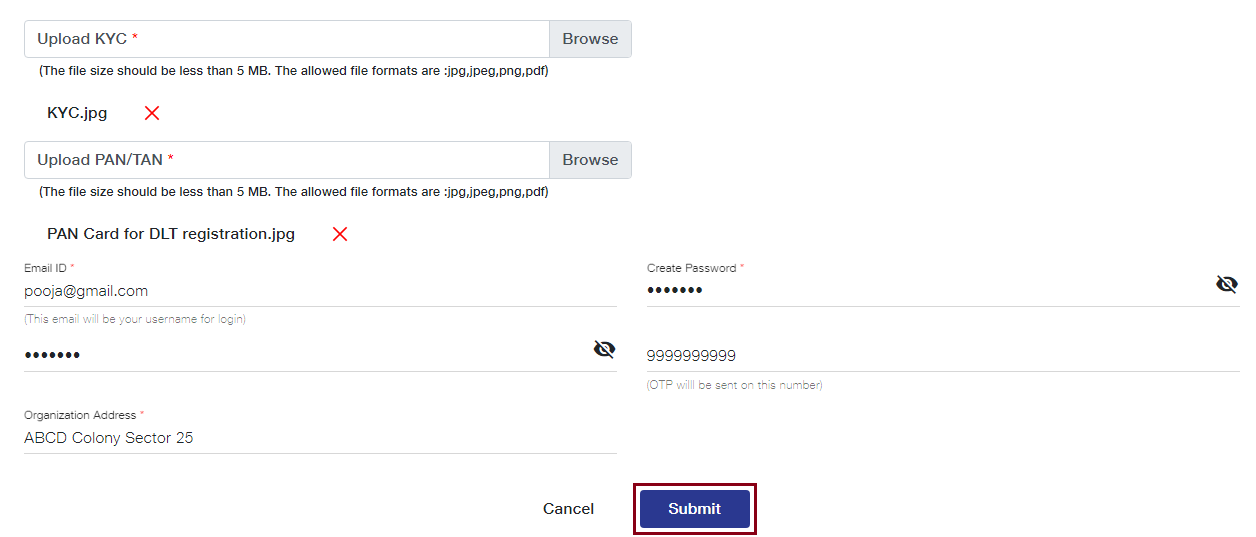
As you click on the Submit button, an OTP will be sent to your registered mobile number. Enter the OTP received to complete the mobile number verification.
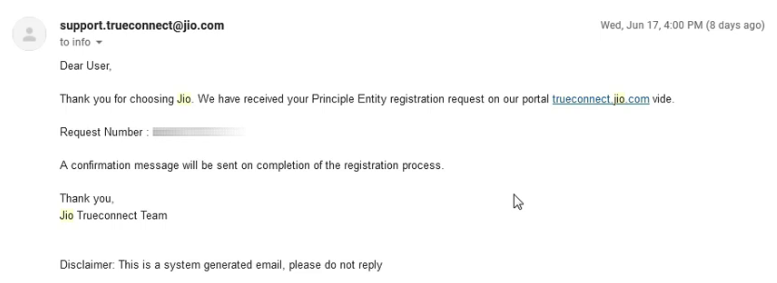
8. As shown in the image below, an email will be sent by Jio that your Entity registration request has been received and is being processed. After submitting registration request, you need to wait for 2-3 days for its approval.
9. Once your entity gets approved, an email will be sent by Jio as shown in the image below. You will receive your login details and Entity Number on your registered email ID.
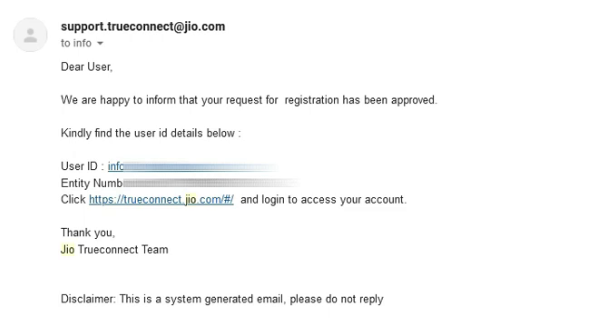
10. Now, you can login and access your JIO DLT account.
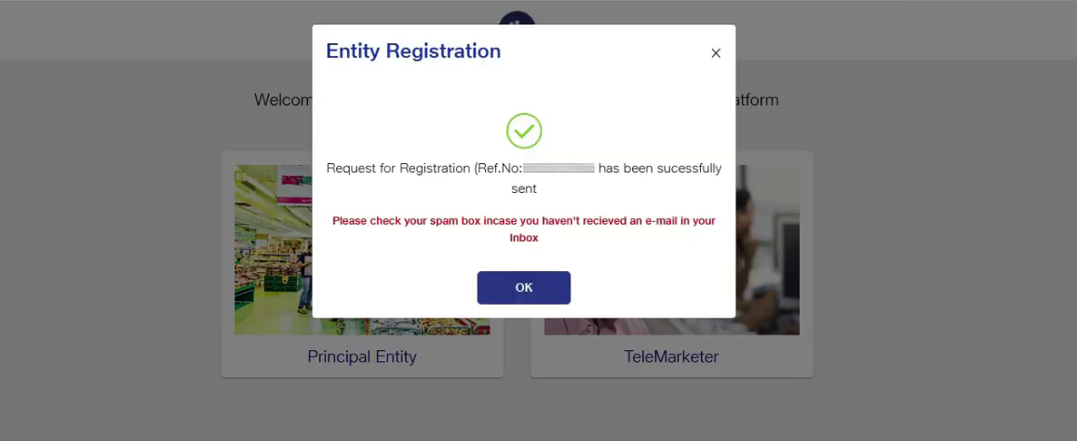
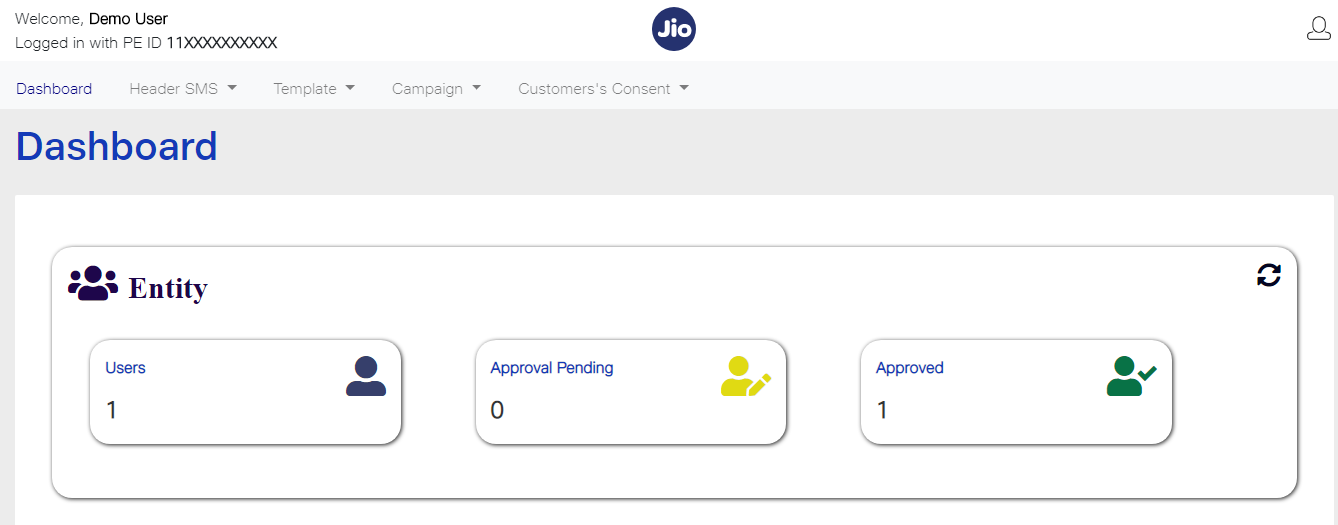
11. After login into Jio DLT, you’ll get following dashboard page.
Now you need to add SID GROUPS PRIVATE LIMITED as your Telemarketer in your Jio DLT entity account.
DLT Registration Process in Airtel
1. Search Airtel DLT on google. Click on the second link that is commercial communication platform.
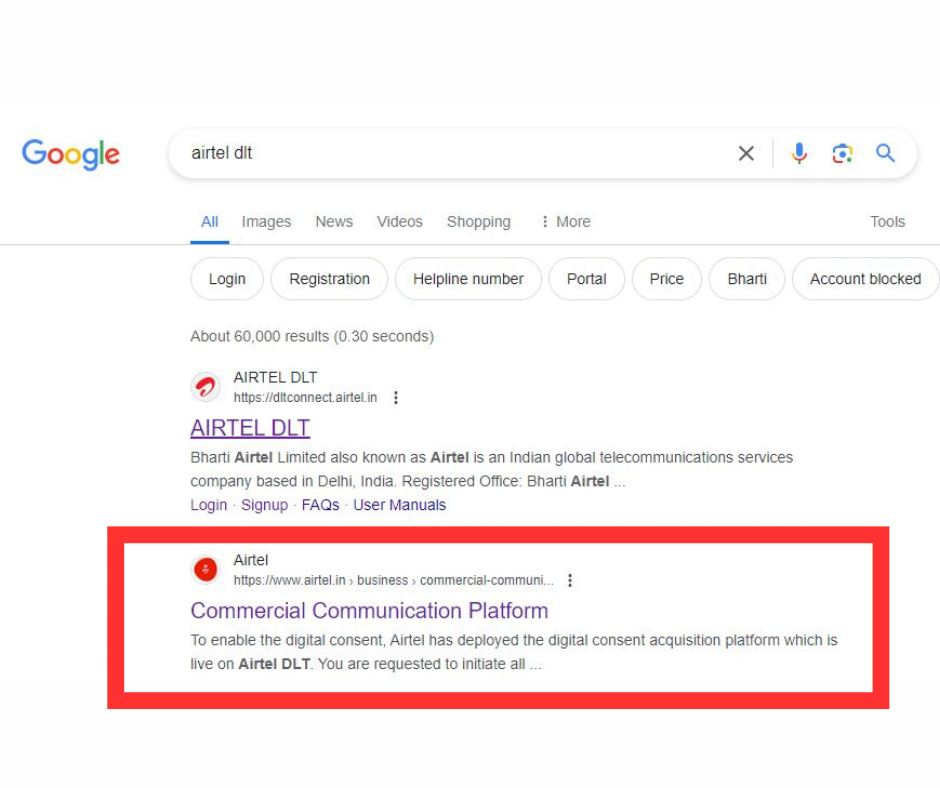
2. Click on the new registration link
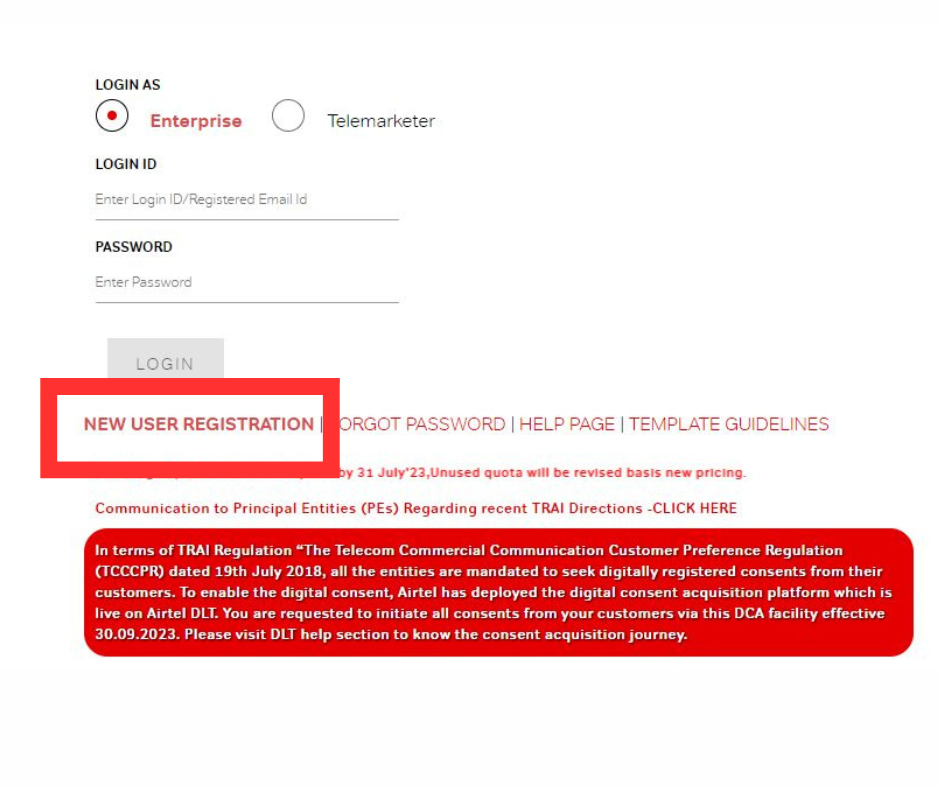
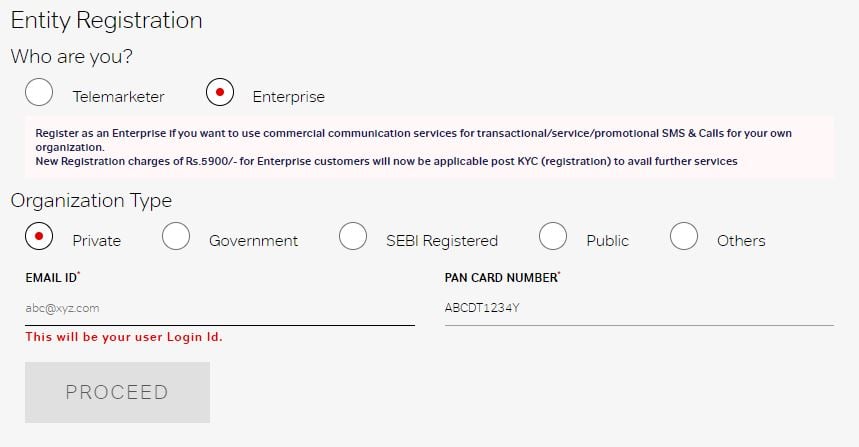
3. Choose between telemarketer and enterprises. as you are a business you should choose enterprises
4. Then choose the type of the organization from the options.
5. Enter the email and the pan card number
6. Click on proceed
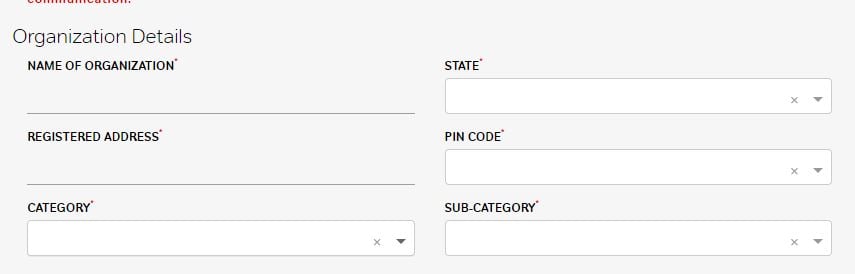
7. The next set of details appears where you have to fill mobile number, and organization details.
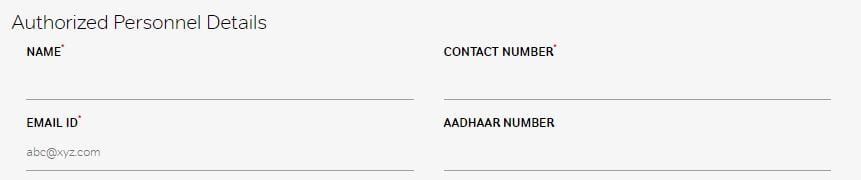
8. The fill the details of the authorised person.
9. Now select the type of communication preferred, the mode of communication , type of voice and auto dialer.
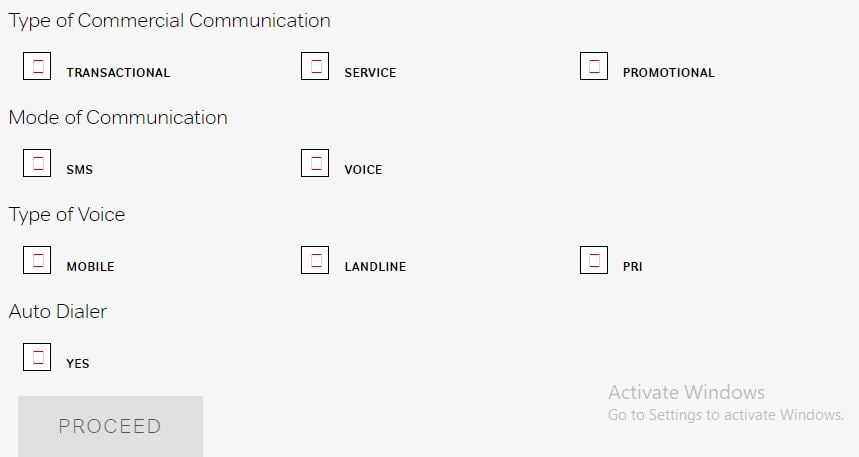
10. Click proceed
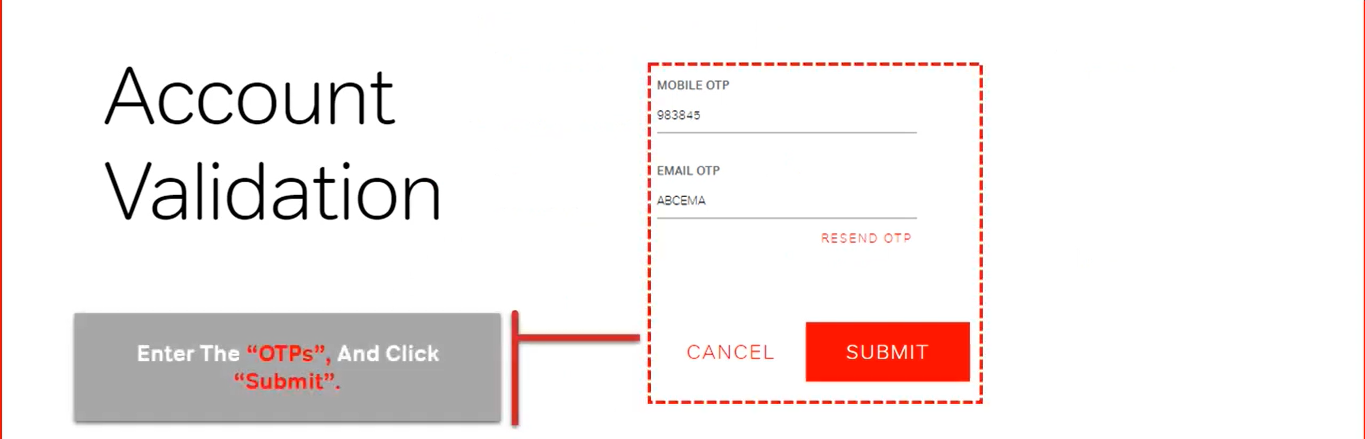
11. As you proceed you will get OTP on the given mobile number and the email Id. enter both the OTP and click submit.
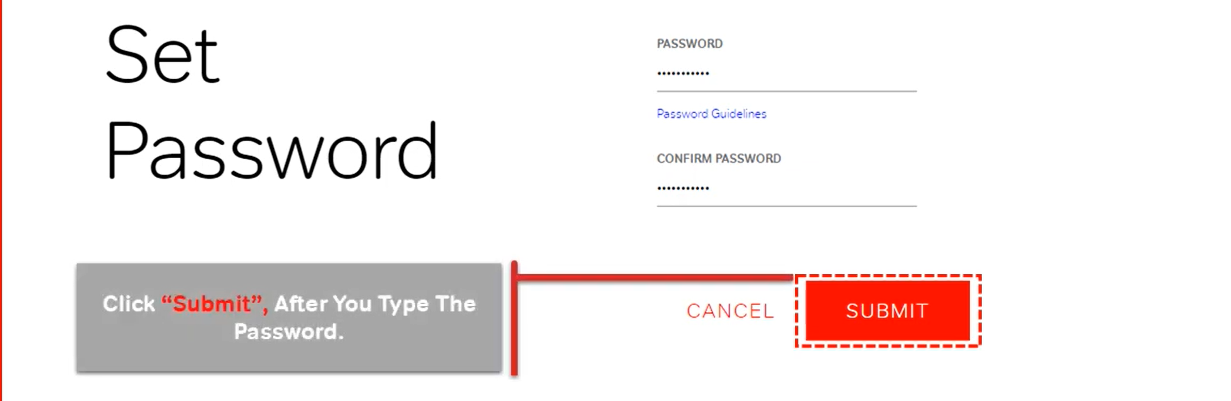
12. The next step is setting passwords as per the guidelines. click submit to proceed.
13. After submission you will be redirect to the following page where you will get a reference number. save this number for future use.
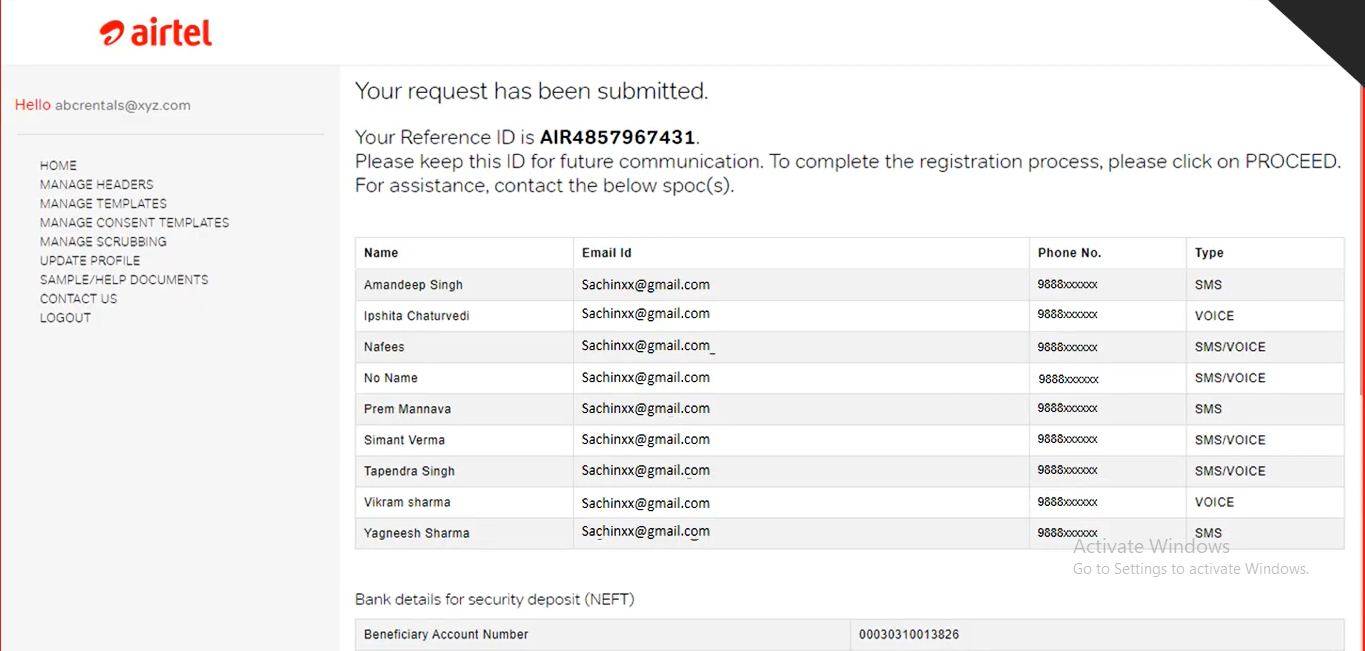
14. Scroll down for the bank details and then click proceed
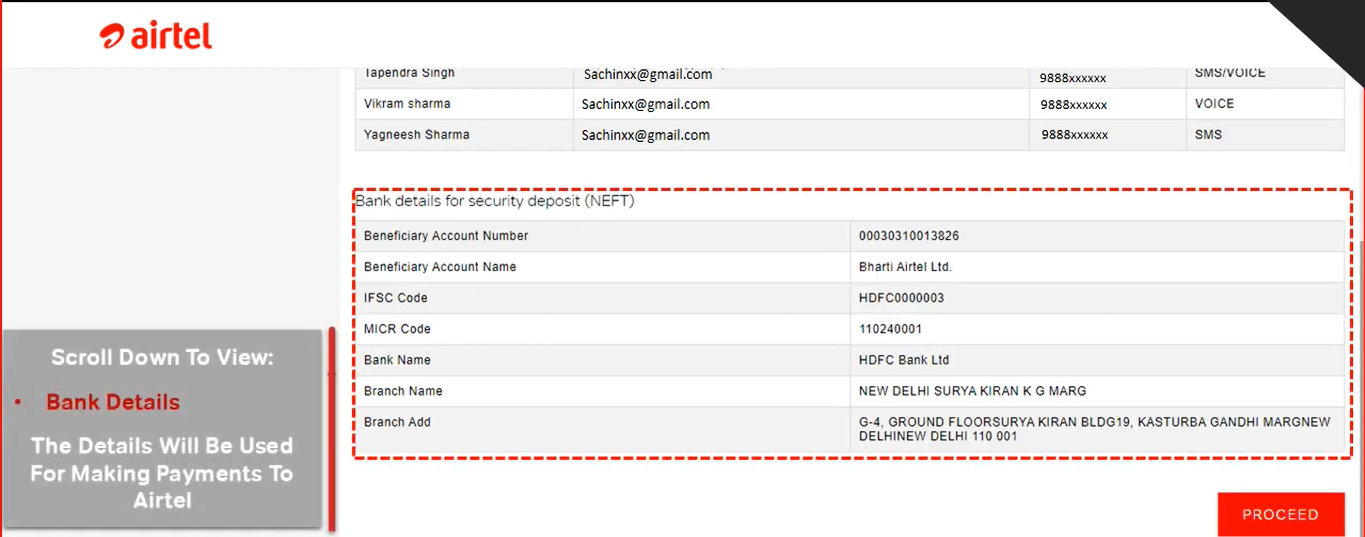
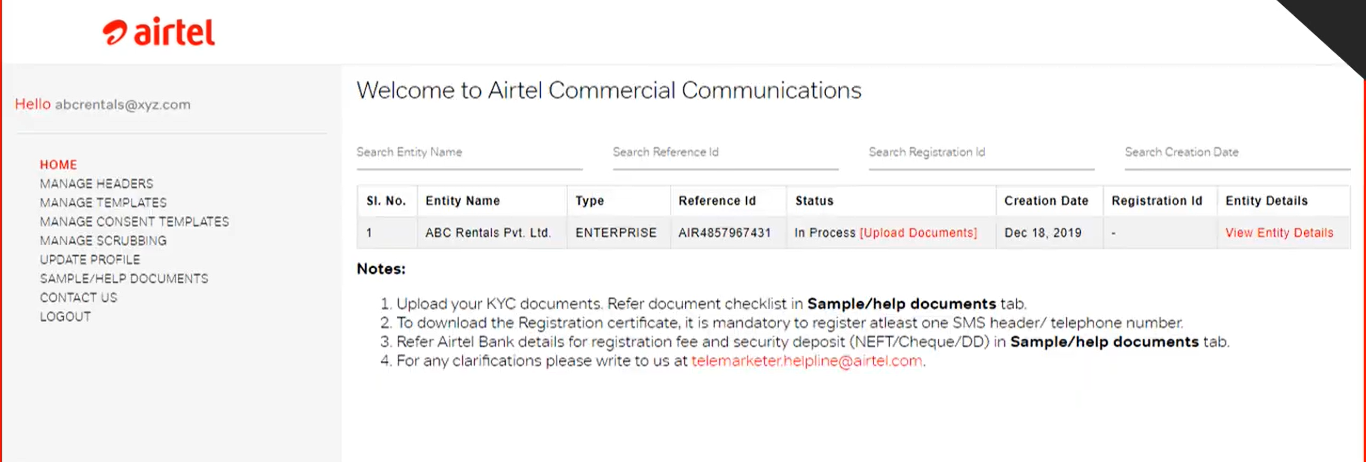
15. The next window is for the documents submission and the application status, you can also view the entities from here.
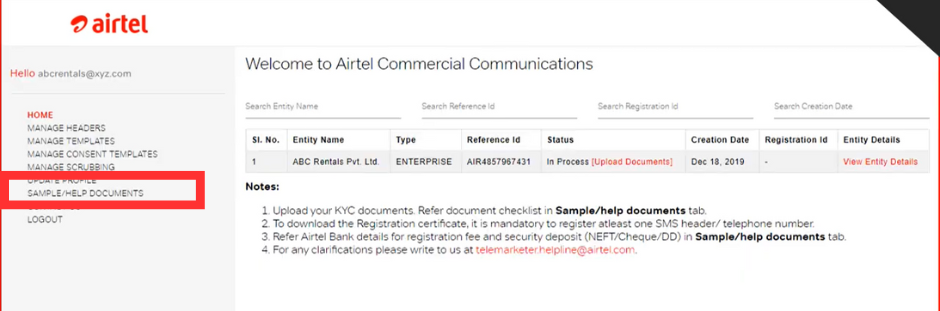
16. On the left corner you will find a option sample/help documents click and download the format of the required documents.
Note:- Fill the documents in the same format and text only.
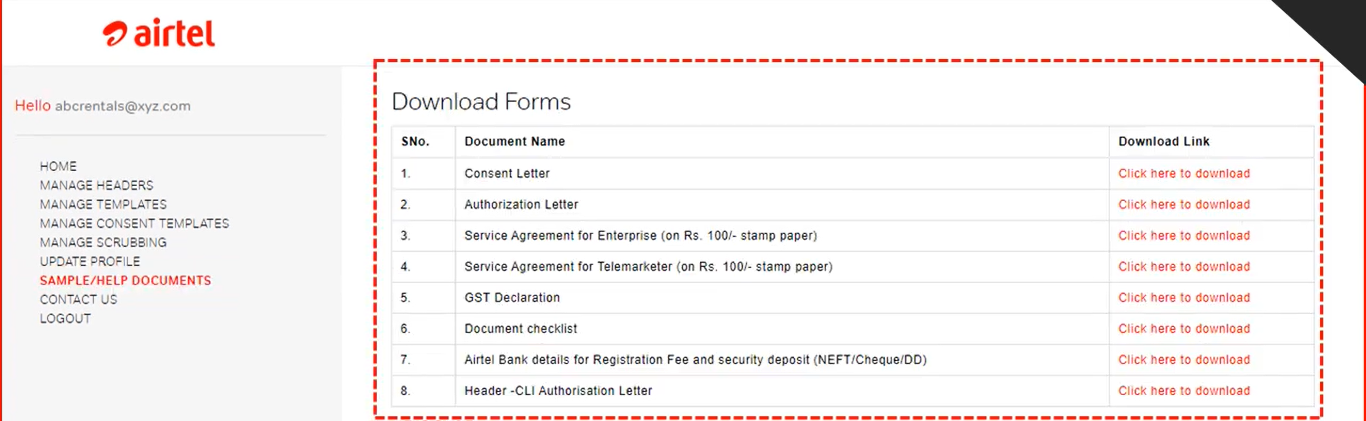
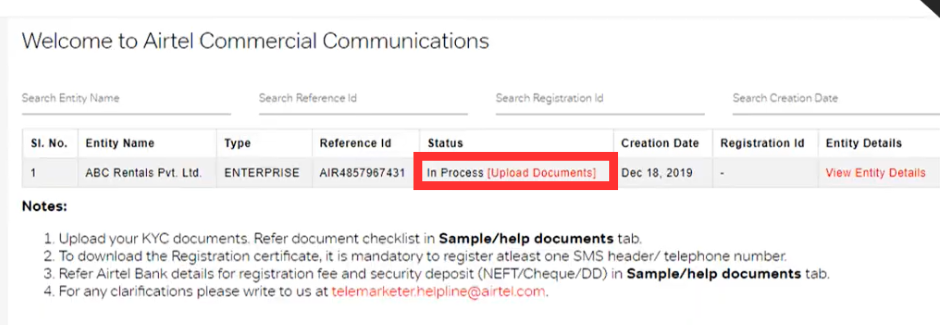
17. Click on the “upload documents” link in the status box.
18. Click on the document drop downs to select the type of the document. And click on “browse” button.
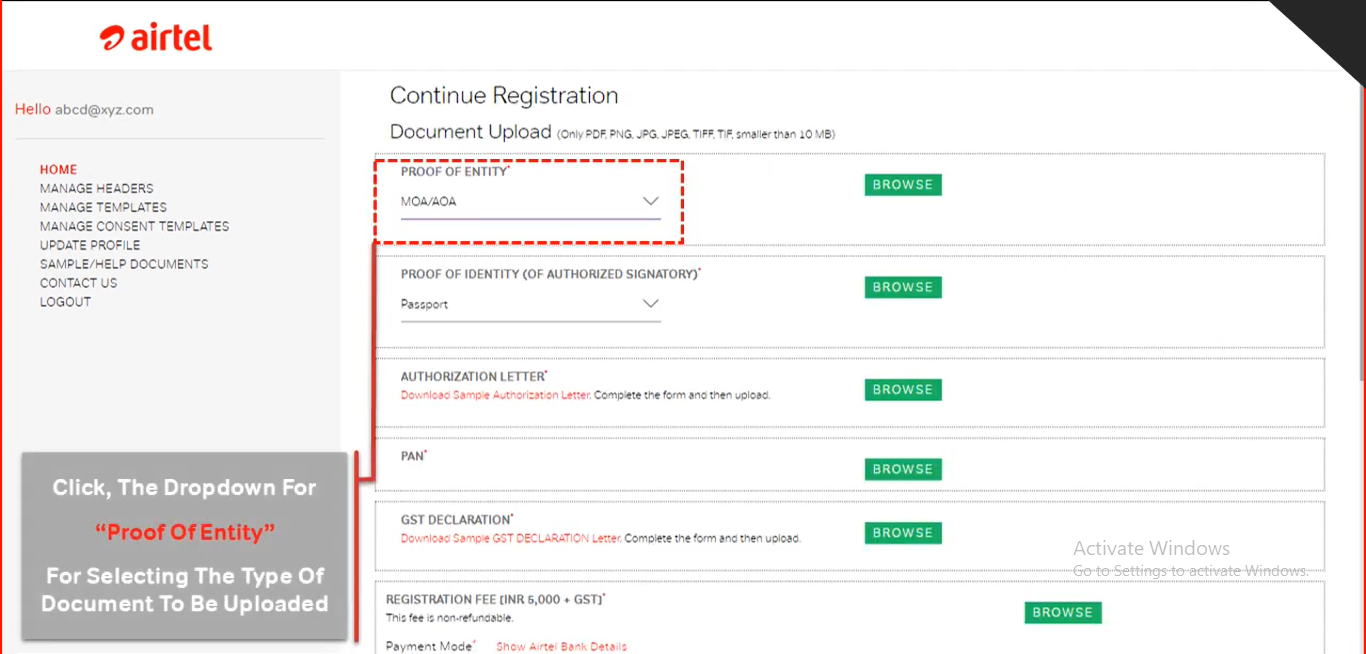
19. Then upload the downloaded documents
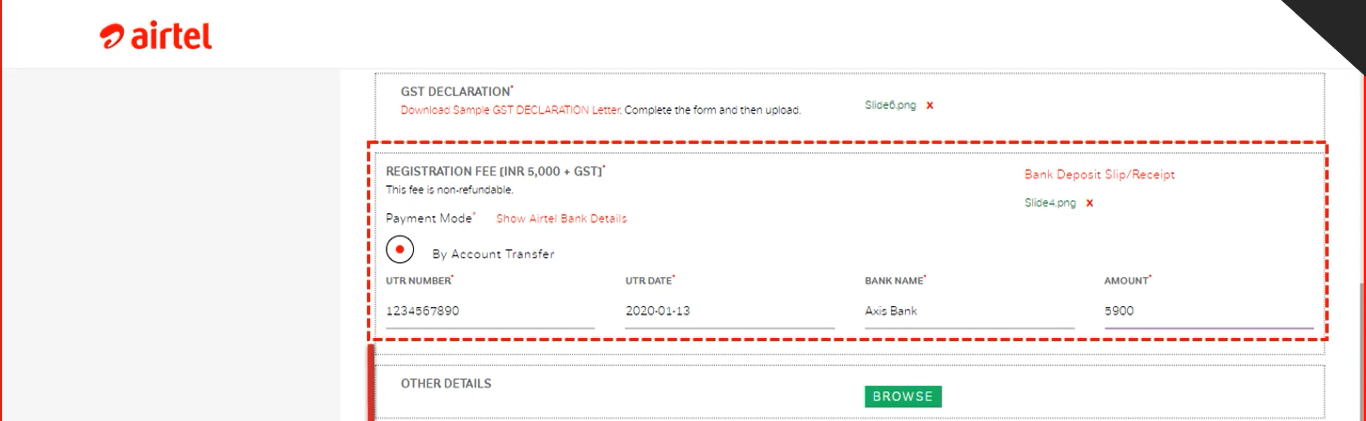
20. Scroll down for the payment details. Fill in the details to pay the registration fee that is 5900 INR.
21. Click “submit”
22. The preview page appears print the form or save it
24. Click “continue”
25. Application number and Airtel SPOC details appears click on proceed.
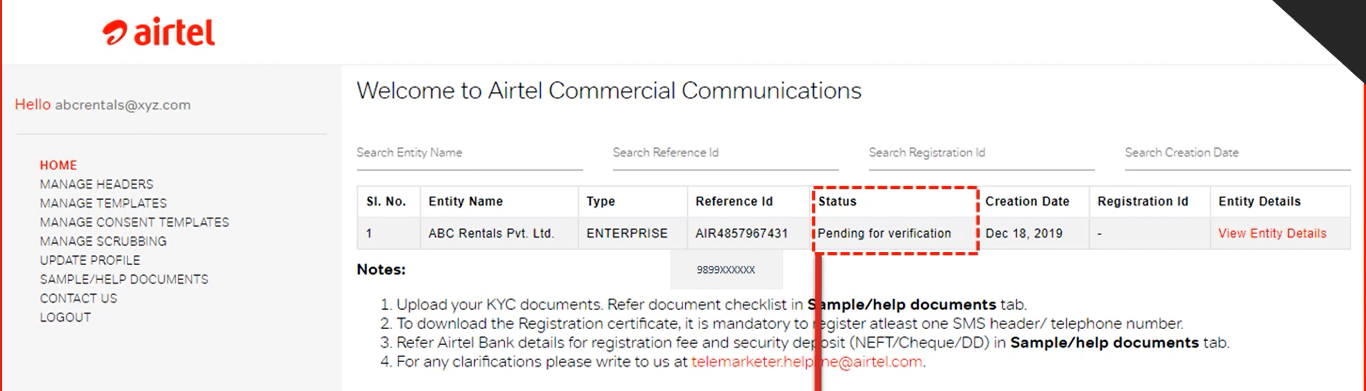
All your submitted details will be forwarded for verification. After submission it would take upto 24 hours for airtel to verify your details. After 24 hours you can start applying for headers and templates.
How to add registered DLT details in your Fast2SMS account?
1. Add Registered Entity details into your Fast2SMS account
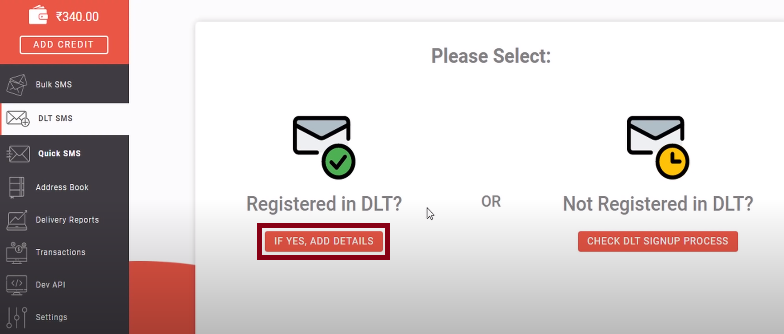
Login to fast2sms.com and click DLT SMS, the following screen will be displayed. If you have already registered in DLT portal, click on the button Add Details. If you have not yet registered in DLT, click on the button Check DLT Signup Process.
As you click on it, another window opens up where you will be asked to add your DLT approved entity details. You can get your registered Entity details from the DLT operator panel where you have signed up. Upon successful Entity registration on the DLT portal, you can view your Entity details by login into your DLT panel.
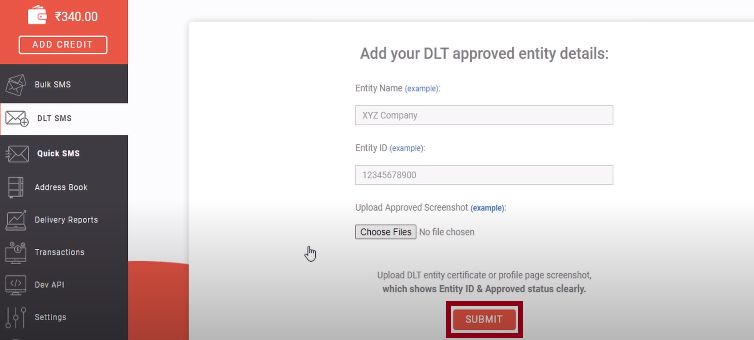
Example of Entity Registration
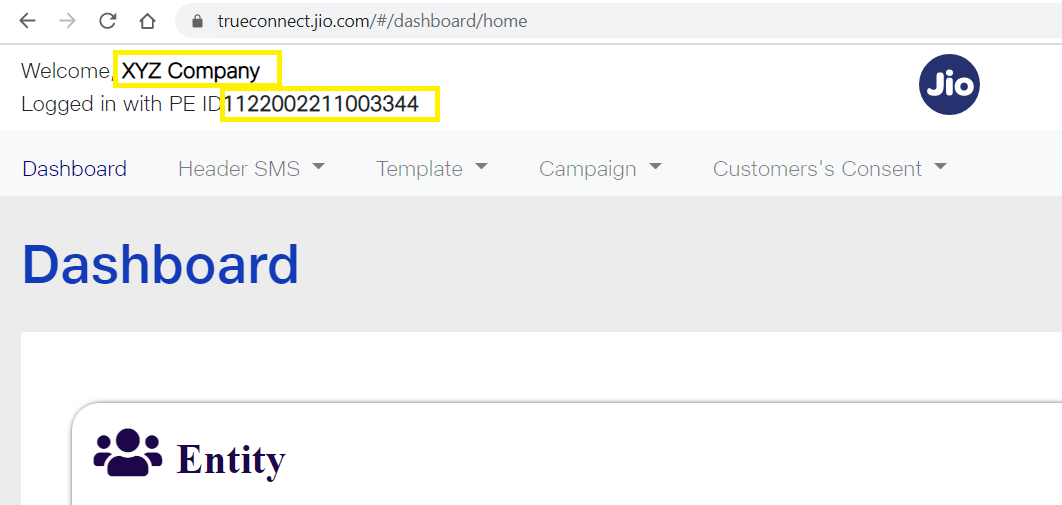
To view registered Entity details at Jio portal, login to your Jio DLT panel. The Entity details will be displayed on the Header section at the left corner of the screen. Company name denotes Entity Name and PE ID denotes Principal Entity ID. First your company name will be shown and just below it your Principal Entity ID will be displayed.
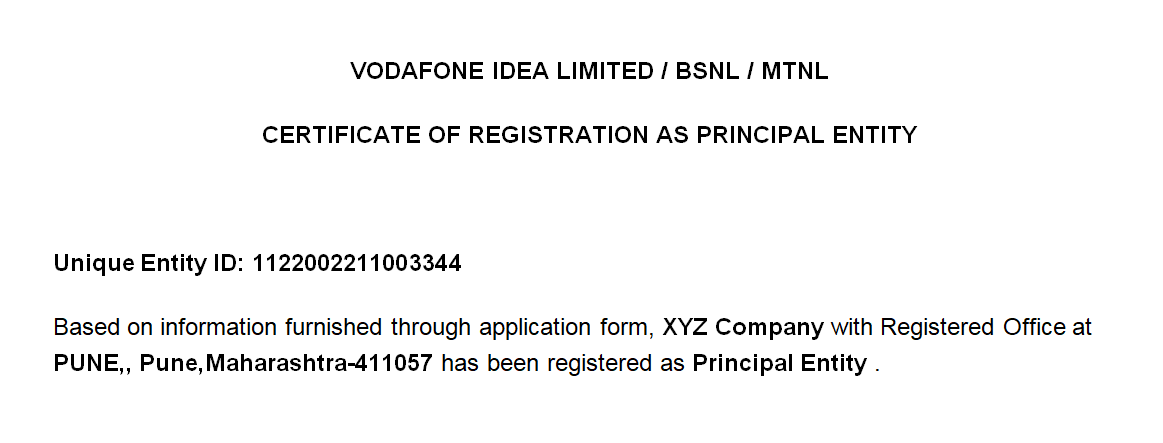
As displayed in the image below, registered Entity details can also be viewed from the Certificate of Registration wherein the Registration No. denotes the Entity ID.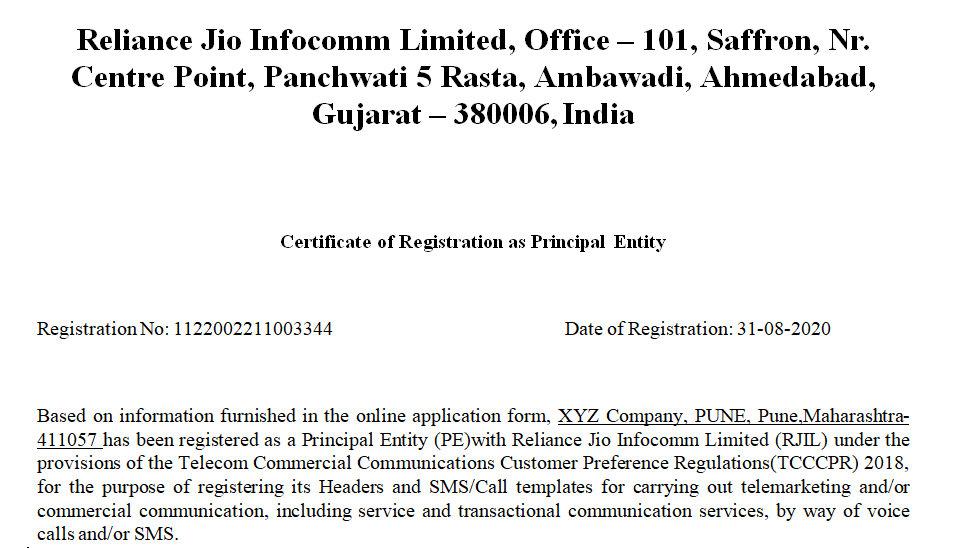
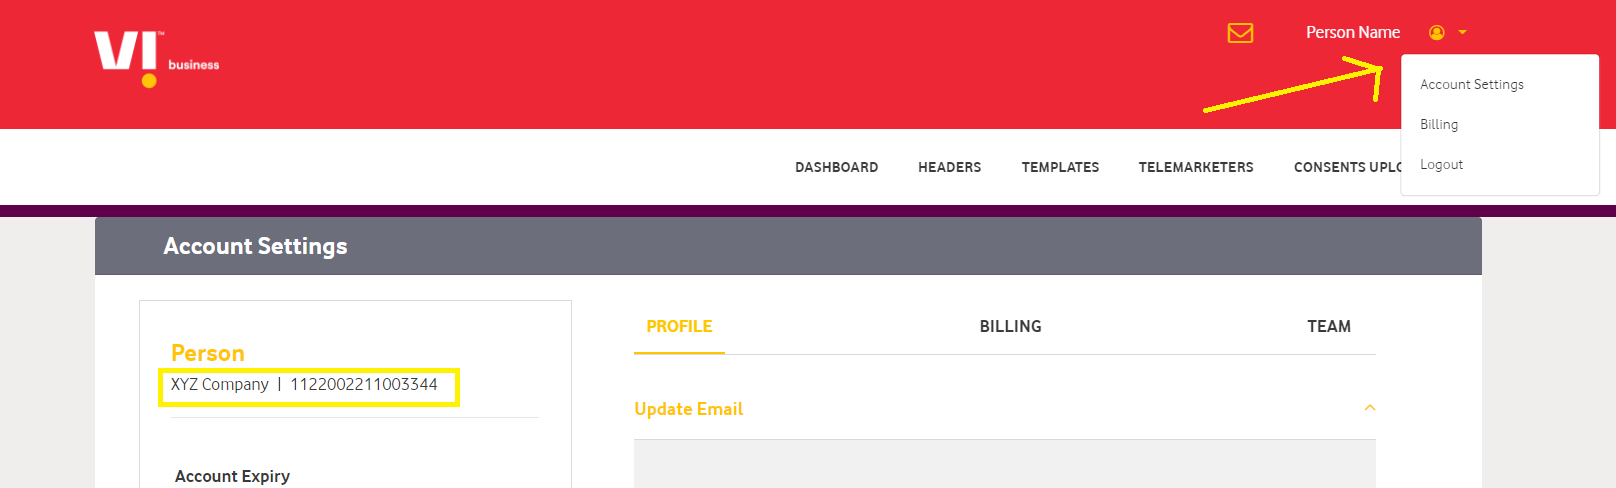
To view the registered Entity details at Vodafone, BSNL, MTNL, Airtel, you need to first login into the DLT portal, visit the Account Settings tab where your Entity Name and Entity will be displayed as depicted in the image below.
As shown in the image below, Entity details will also be mentioned on the Certificate of Registration received after successful Entity creation.
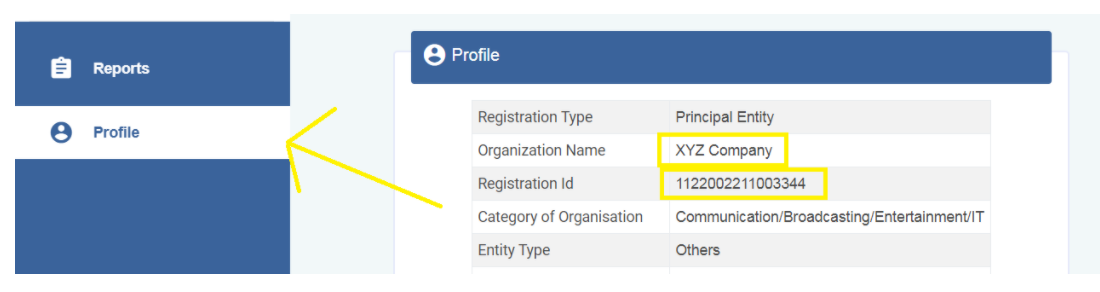
To view the registered Entity details at Videocon, login to the panel, click on Profile, your Entity name and Entity ID will be displayed as Organization Name and Registration ID respectively.
Copy your registered Entity Name and ID and paste it on the respective fields. Our suggestion is that you copy paste the details rather than typing it to avoid any kind of error. Make sure you have entered the correct details as mistakes in the Entity Name and ID may impact your template approval and message delivery.
Next, you need to upload screenshots where your Entity name and ID is visible. It is required so that our team can verify the provided Entity Name and ID and match it with the document uploaded.
Click on submit after uploading the screenshot.
As you click on it, a message ‘Entity pending for approval’ will appear on your screen.
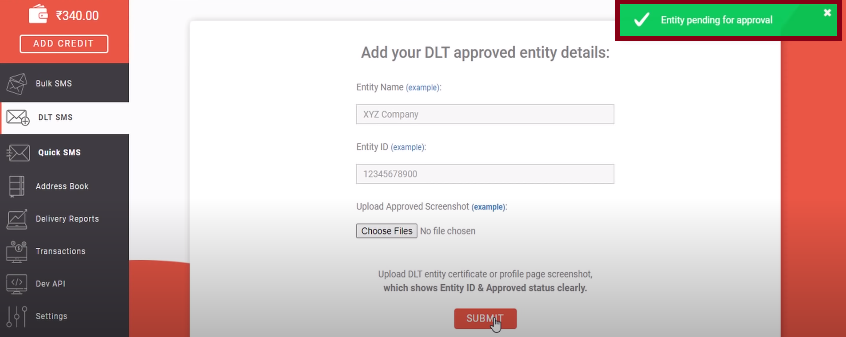
The following pop up will appear as you click on DLT SMS tab.
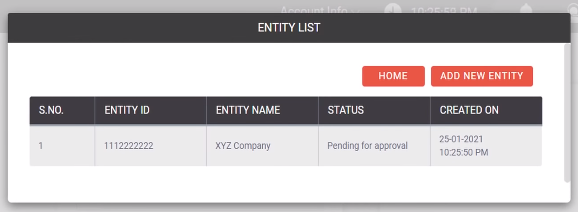
As it gets approved, an SMS will be sent to your registered number that your Entity has been approved in your Fast2SMS account. Once your submitted details are verified and approved by our team, you can start with the next step of Sender ID submission.
2. Add registered Sender ID details into your Fast2SMS account
Once the page is reloaded, another pop up will appear in which you need to upload the Sender IDs that have been approved on the DLT platform. Select Entity and Enter your six digit approved Sender ID on the Sender ID field to add it into your Fast2SMS account.
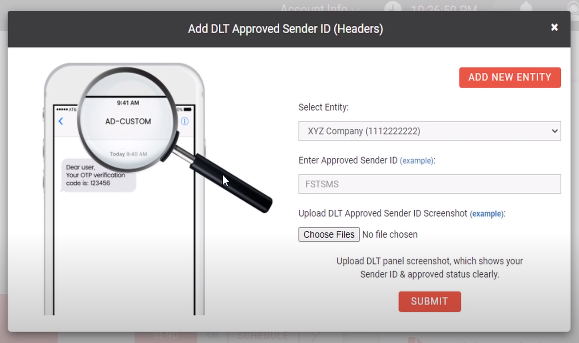
Note: Enter approved Sender ID details only. Sender ID that are pending for approval will not be accepted. Once you have submitted the Sender ID on the DLT platform and gotten its approval then only you need to add them here.
Example of Sender ID in different DLT portals
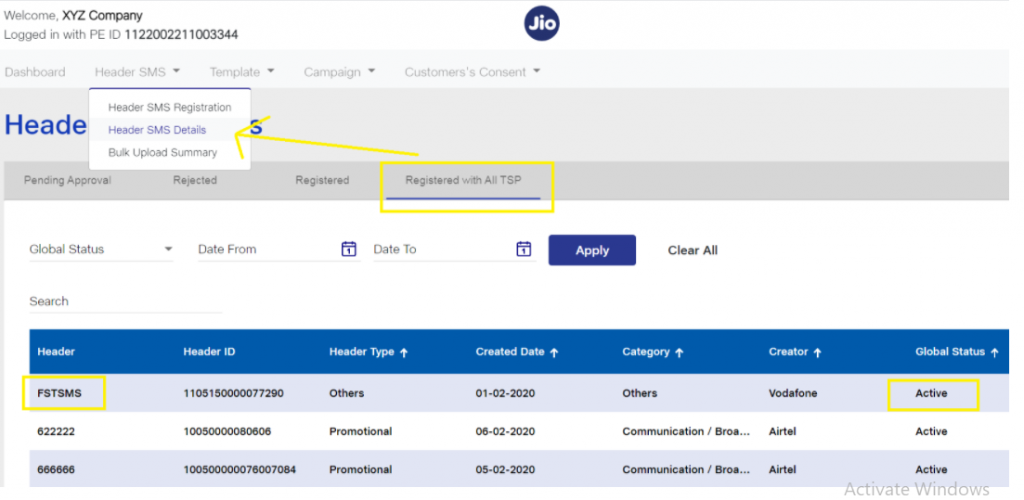
To view your Sender ID details in Jio DLT, login to the Jio panel and visit Header SMS. Click Header SMS Details under Header SMS. If it is showing Pending for Approval, then you need to first wait for Sender ID approval and once it gets approved, then you can add the details.
You can view your approved Sender ID details on the Registered or Registered with All TSP tab. As shown in the image below, you need to upload the screenshot when the Sender ID is under the Registered tab and the status is set to Active.
To view the Sender ID details in Vodafone, BSNL, MTNL, Airtel, you need to click on the Header tab after login, select Approved and click on the Search button. As displayed in the image below, your approved Sender ID details will be visible on the panel and status will be set as Approved.
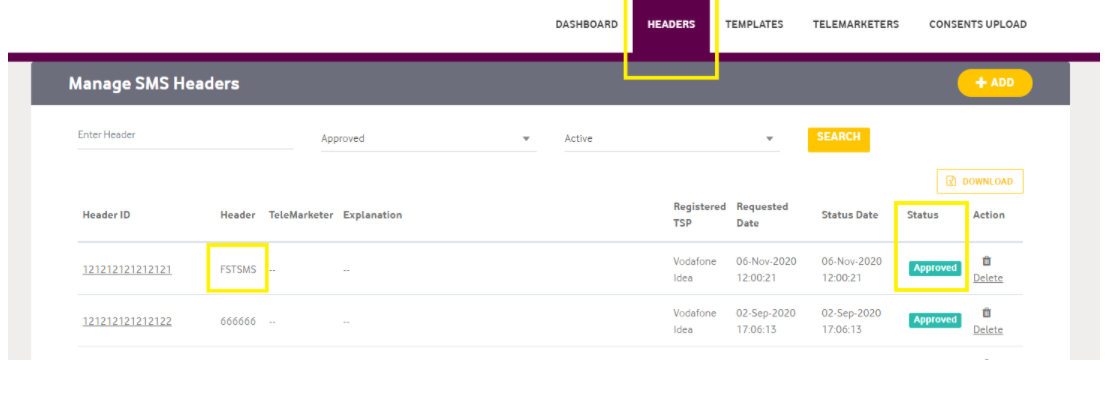
Similarly in Videocon, the registered Sender ID details will be available on the tab Headers and Headers registered with other TSP.
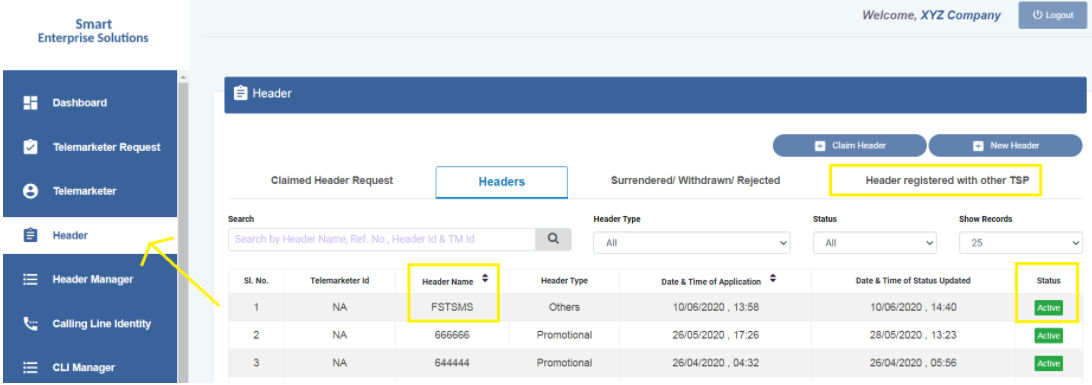
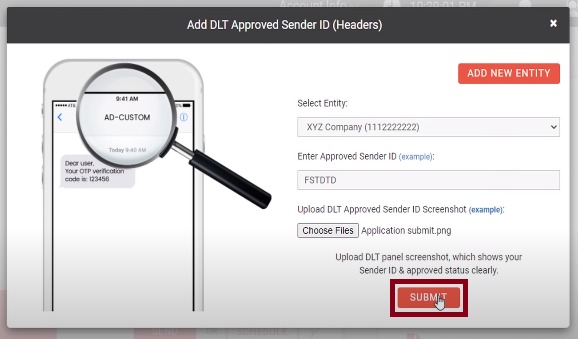
Upload the screenshot of your approved Sender ID where it is clearly mentioned that your Sender ID has been approved and status is set as Active. Click on Submit after entering all the details.
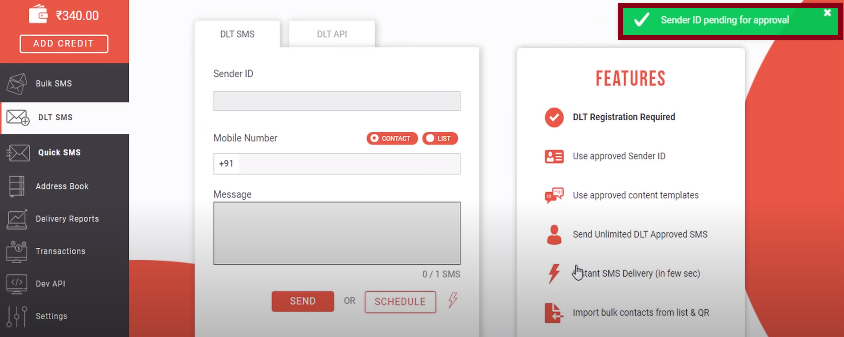
As shown in the image below, the following message will appear on your screen after you submit the Sender ID details. Fast2SMS team will match the submitted Sender ID details with the document uploaded.
Once it gets approved, you can move to the next step of adding registered Content template details.
3. Add registered Content Template details into your Fast2SMS account
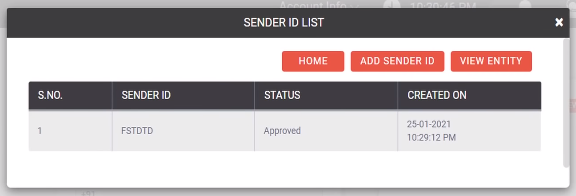
Upon activation of Sender ID, your Fast2SMS panel will appear as shown in the image below. Your approved Sender IDs will be visible on the right side of the panel. Select the Sender ID. Enter the contact number in the Mobile Number field.
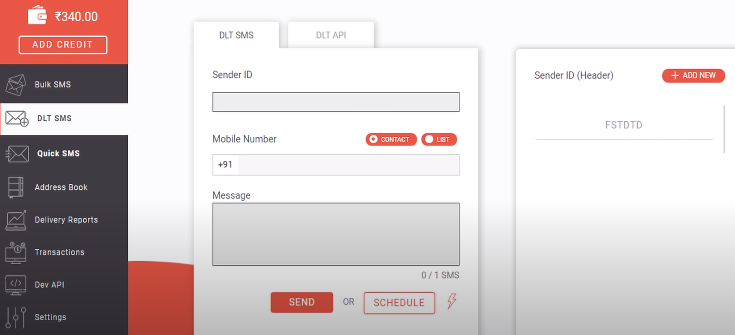
As you click on the View Details button, you will find details of all Sender IDs including rejected, pending for approval and approved. You can also, add more Sender IDs from the Add New option.
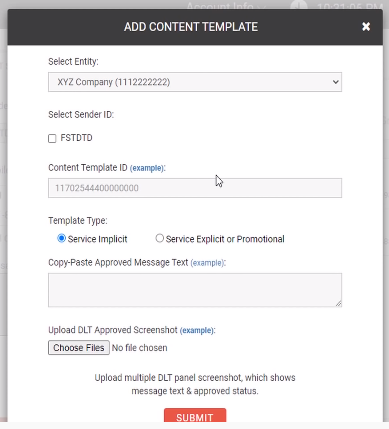
As per the new TRAI rules, you need to submit Content template (message text) on the DLT platform, and once it gets approved, then you can send it to your customers and clients. Once your Content Template gets approved on the DLT portal, you have to provide its details to proceed with sending Bulk SMS via Fast2SMS.
As shown in the image, a Content Template form will appear in your Fast2SMS panel. Here, you need to provide the details of your Content template after it gets approved on the DLT platform.
If your messages are transactional (OTP, alerts, informative) in nature that you want to deliver on both DND and Non DND 24/7 then make sure to get them approved under Service Implicit category. If you get them approved under Service Explicit category then those messages can only be sent to Non DND numbers from 10 AM to 9 PM.
New Bulk SMS routes
Promotional route: This route is for sending marketing SMS to Non DND numbers.
Transactional route: It is reserved for Banks for sending OTP SMS
Service Implicit: This route is for sending service messages such as login OTP, alerts, informative texts to both DND and Non DND numbers 24/7.
Service Explicit: It is for sending promotional SMS to Non DND.
Click here to read more about New Bulk SMS routes.
As per new TRAI guidelines, delivery reports of messages sent via Promotional route will not be provided. We recommend that you don’t get your template or Sender ID approved under Promotional route, as no delivery reports will be provided for this route.
Note: Make sure you get your informative SMS approved under Service Implicit category. As messages approved under Service Explicit category will not get sent to DND numbers.
So, if you want to send transactional messages such as order alerts, service updates, login details and other important notifications then get your Content template approved under Service Implicit. Whereas, if you want to send marketing SMS, offers, then get it approved under Service Explicit category.
Content Template details
To view your Content template details in Jio, login to your panel, visit the Template tab. To register a template visit Content Template Registration. After its gets registered, click on Content Template Details.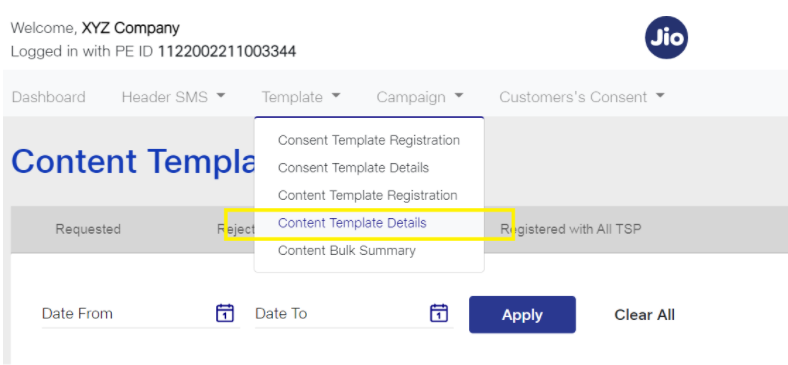
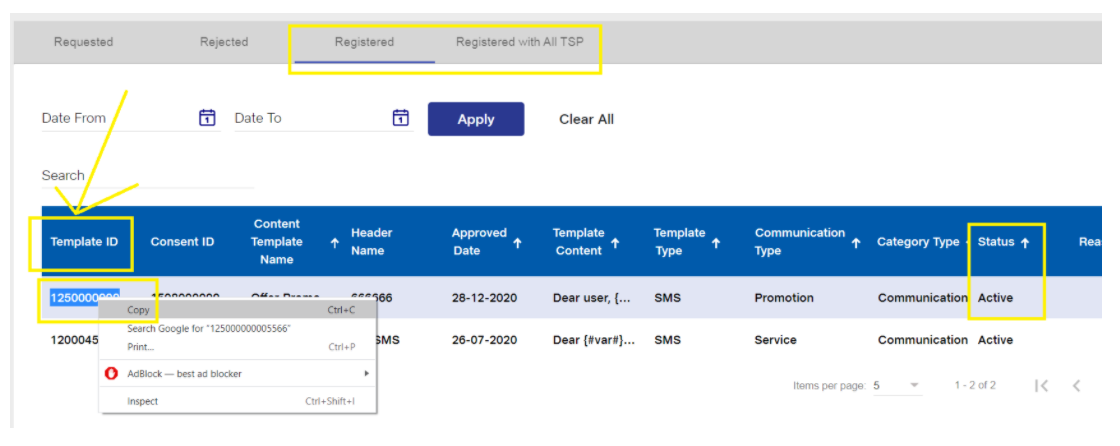
In the first tab Requested, you will find the details of the Content Templates that are pending for approval. You don’t have to submit the Content templates details in the Requested tab as these are not yet approved. Add the template details in Fast2SMS panel once the templates gets transferred to Registered tab. Your approved Content Template details can be viewed from the Registered and Registered with all TSP tabs.
As shown in the image below, copy your Template ID displayed in the first column and paste it on the Content Template ID field.
Sender ID has to be mapped with Content Template. When you apply for a Content Template, make sure to select the Senders IDs via which you want to deliver the text. If you want the text to be delivered via multiple Sender IDs then you need to select them at the time of Content Template Registration.
Note: Messages will be delivered only via the Sender IDs that you have selected while submitting the Content Template.
Select the checkbox for the Template Type.
Next, copy paste your approved Content Template. In Jio DLT, Content Template details can be viewed from the Template Content tab. Our advice is that you copy paste the Content Template and avoid typing it as a small mistake or error while typing may impact your message delivery and it can get failed.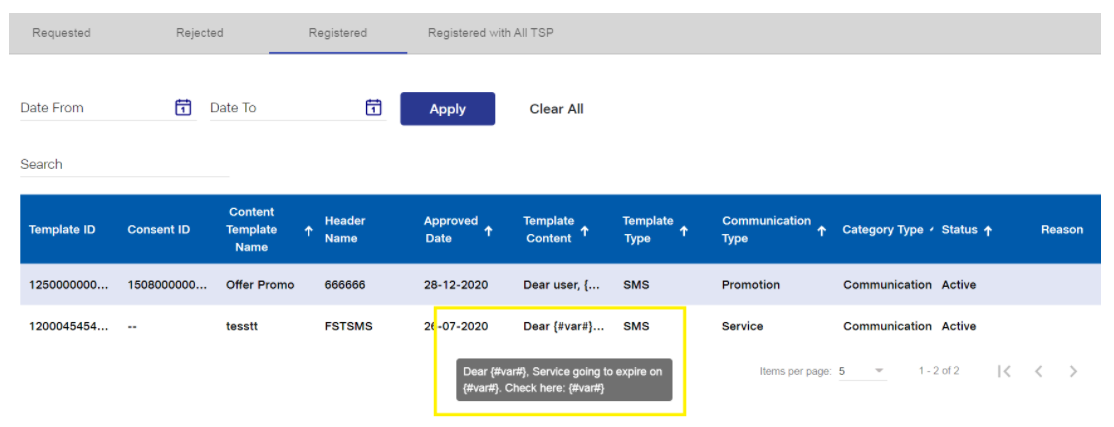
To copy the content template, double click on the message text so that it gets selected and then right click to copy the text. Paste the copied text on the message field.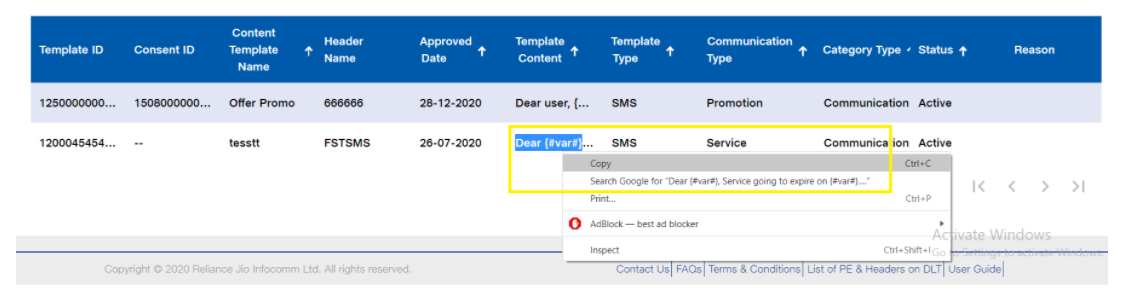
To check Content Template details in Vodafone, BSNL, MTNL, Airtel, visit the Template tab. Under Template, select Content Template and then select Approved. As you click on the Search button, the details of your approved Templates will be displayed. Copy the Template ID and paste it on the message text field.
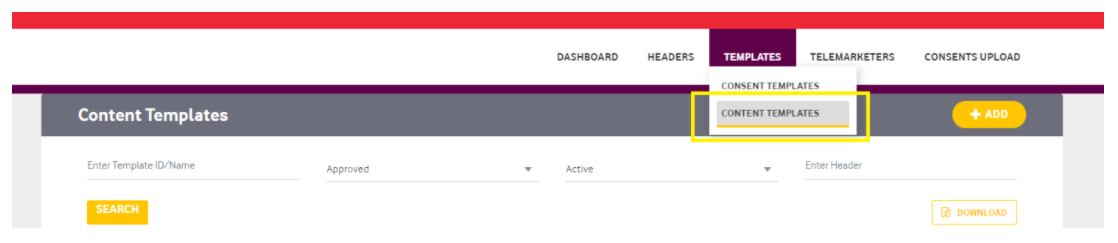
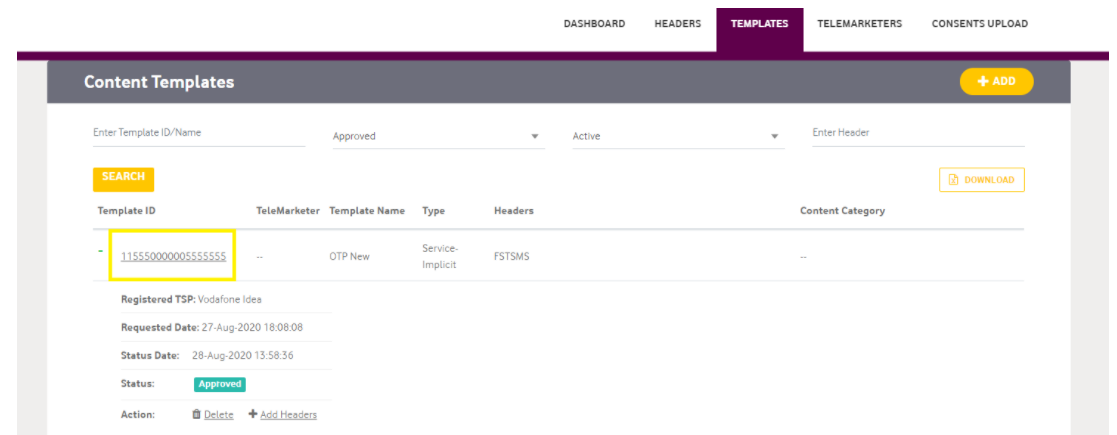
Click on the Template ID, a pop up will appear having all the details such as Template ID, message category, and template text. Take the screenshot of this page and upload it on the Content Template approval form.
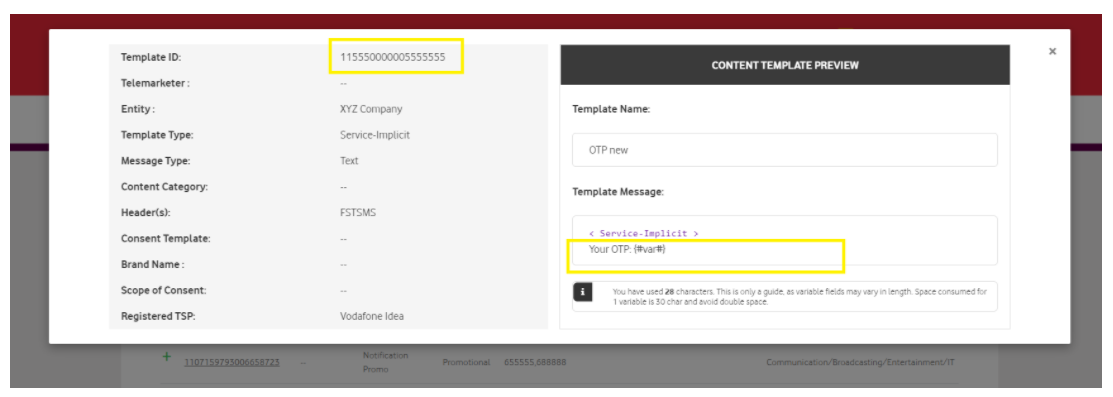
As per new TRAI rules, it is mandatory to add your company name after the text. Templates submitted without company name might get rejected.
You can upload Multiple screenshots as well.
Note: Ensure that you upload those screenshots where the details are clearly visible.
After entering all the details, click on the Submit button.
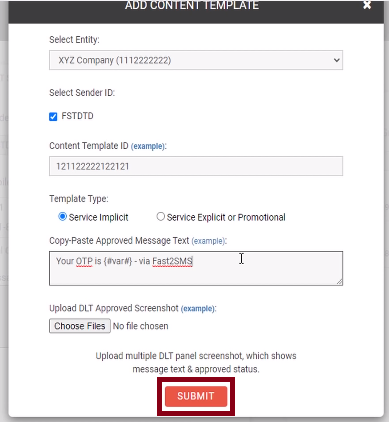
As shown below, the content template is pending for approval. Upon submission, your content will be manually verified by our team and once it gets activated, it will be visible on your Fast2SMS panel.
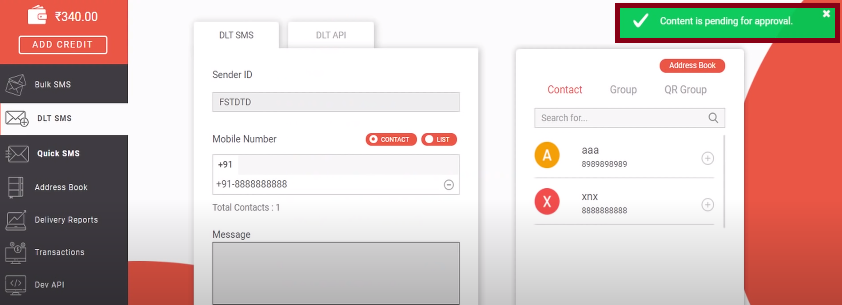
Once you visit DLT SMS tab and select Sender ID, your approved Sender ID will get displayed on the right side of the panel.
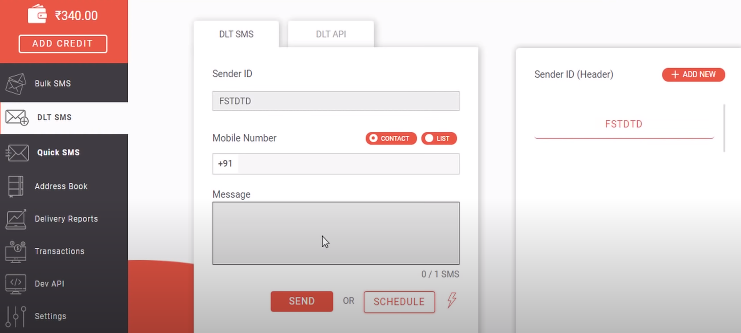
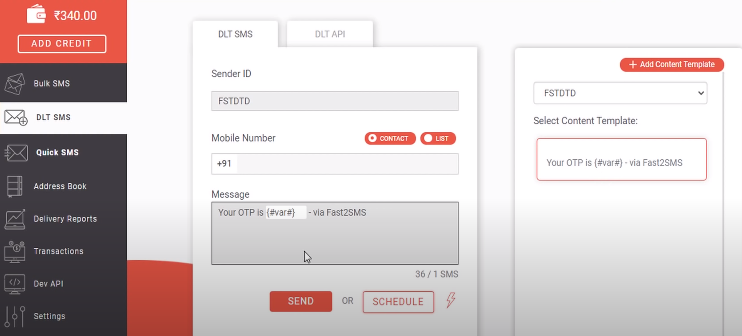
When you click on the Message field, all the content templates that have been mapped with the selected Sender ID will be displayed in the right side of the panel.
As shown in the image below, the details of the message template are being displayed on the right side. Bar symbol denotes that the message is of Service Explicit category and will be delivered to Non DND numbers from 10 AM to 9 PM.
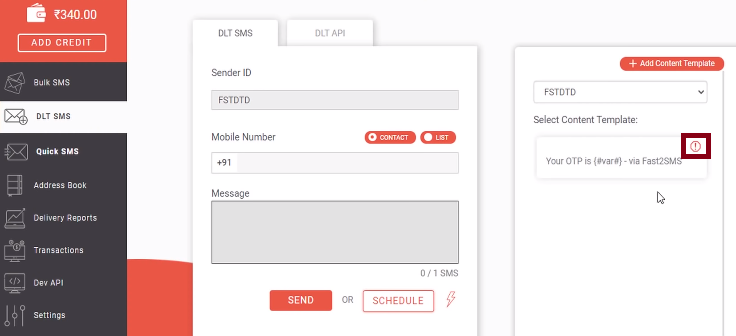
If you are sending OTP SMS from the Service Explicit category, then you need to submit the template again on the DLT portal under Service Implicit category and once it gets approved then submit the same on the Fast2SMS panel as Service Implicit. As you click on the message text, it gets placed on the Message field. The maximum limit of the variable values can be 30 characters.
Hope you have understood the DLT Registration Process for sending Bulk SMS in India. For any DLT related queries, you can call Fast2SMS support team at 6262778822 and get solutions for your questions instantly. Sign up at Fast2SMS now for reaching your target audience directly at their cell phones.