
When more than one person answers your WhatsApp number, you need to know who owns each chat and what it is about. In the Fast2SMS Live Chat inbox you can assign a chat to an agent, mark it with a label, add tags and private notes, and set its status to Open, Pending or Closed. This guide shows each one and how to filter the inbox with them.
Before you start
- A connected WhatsApp number and access to Live Chat (Inbox). For the basics of the inbox, see WhatsApp Live Chat in Fast2SMS.
- At least one agent in Team Members, with WhatsApp ticked and the business number selected. You can add more team members (agents) at any time.
- Labels, tags and notes are only for your team. Customers never see them.
Labels, tags, notes and status: what is the difference?
| Tool | How many per chat | Limits | Good for |
|---|---|---|---|
| Label | One. A new label replaces the old one | 2-70 characters, letters, numbers and spaces; up to 50 labels per account | The main type of chat: Order Query, Complaint, VIP, New Lead |
| Tags | Many | Up to 50 characters each | Extra details: city, product, campaign, language |
| Notes | Many | 10-400 characters each, shown with the writer’s name and date | Context for the next agent: “Asked for refund, waiting for photo” |
| Status | One | Open, Pending or Closed | Where the chat stands in your workflow |
| Assignee | One agent | Agents with WhatsApp access to that number | Who is answering this customer |
How to organise chats in the inbox
-
Assign the chat to an agent
Open the chat and click Transfer To at the top right. Pick an agent from the list, or type to search, and confirm “Do you want to transfer this chat to {name}?”. A line “Chat has been Assigned to {agent} by {you}” appears in the chat, and the agent’s name shows under the chat in the list.
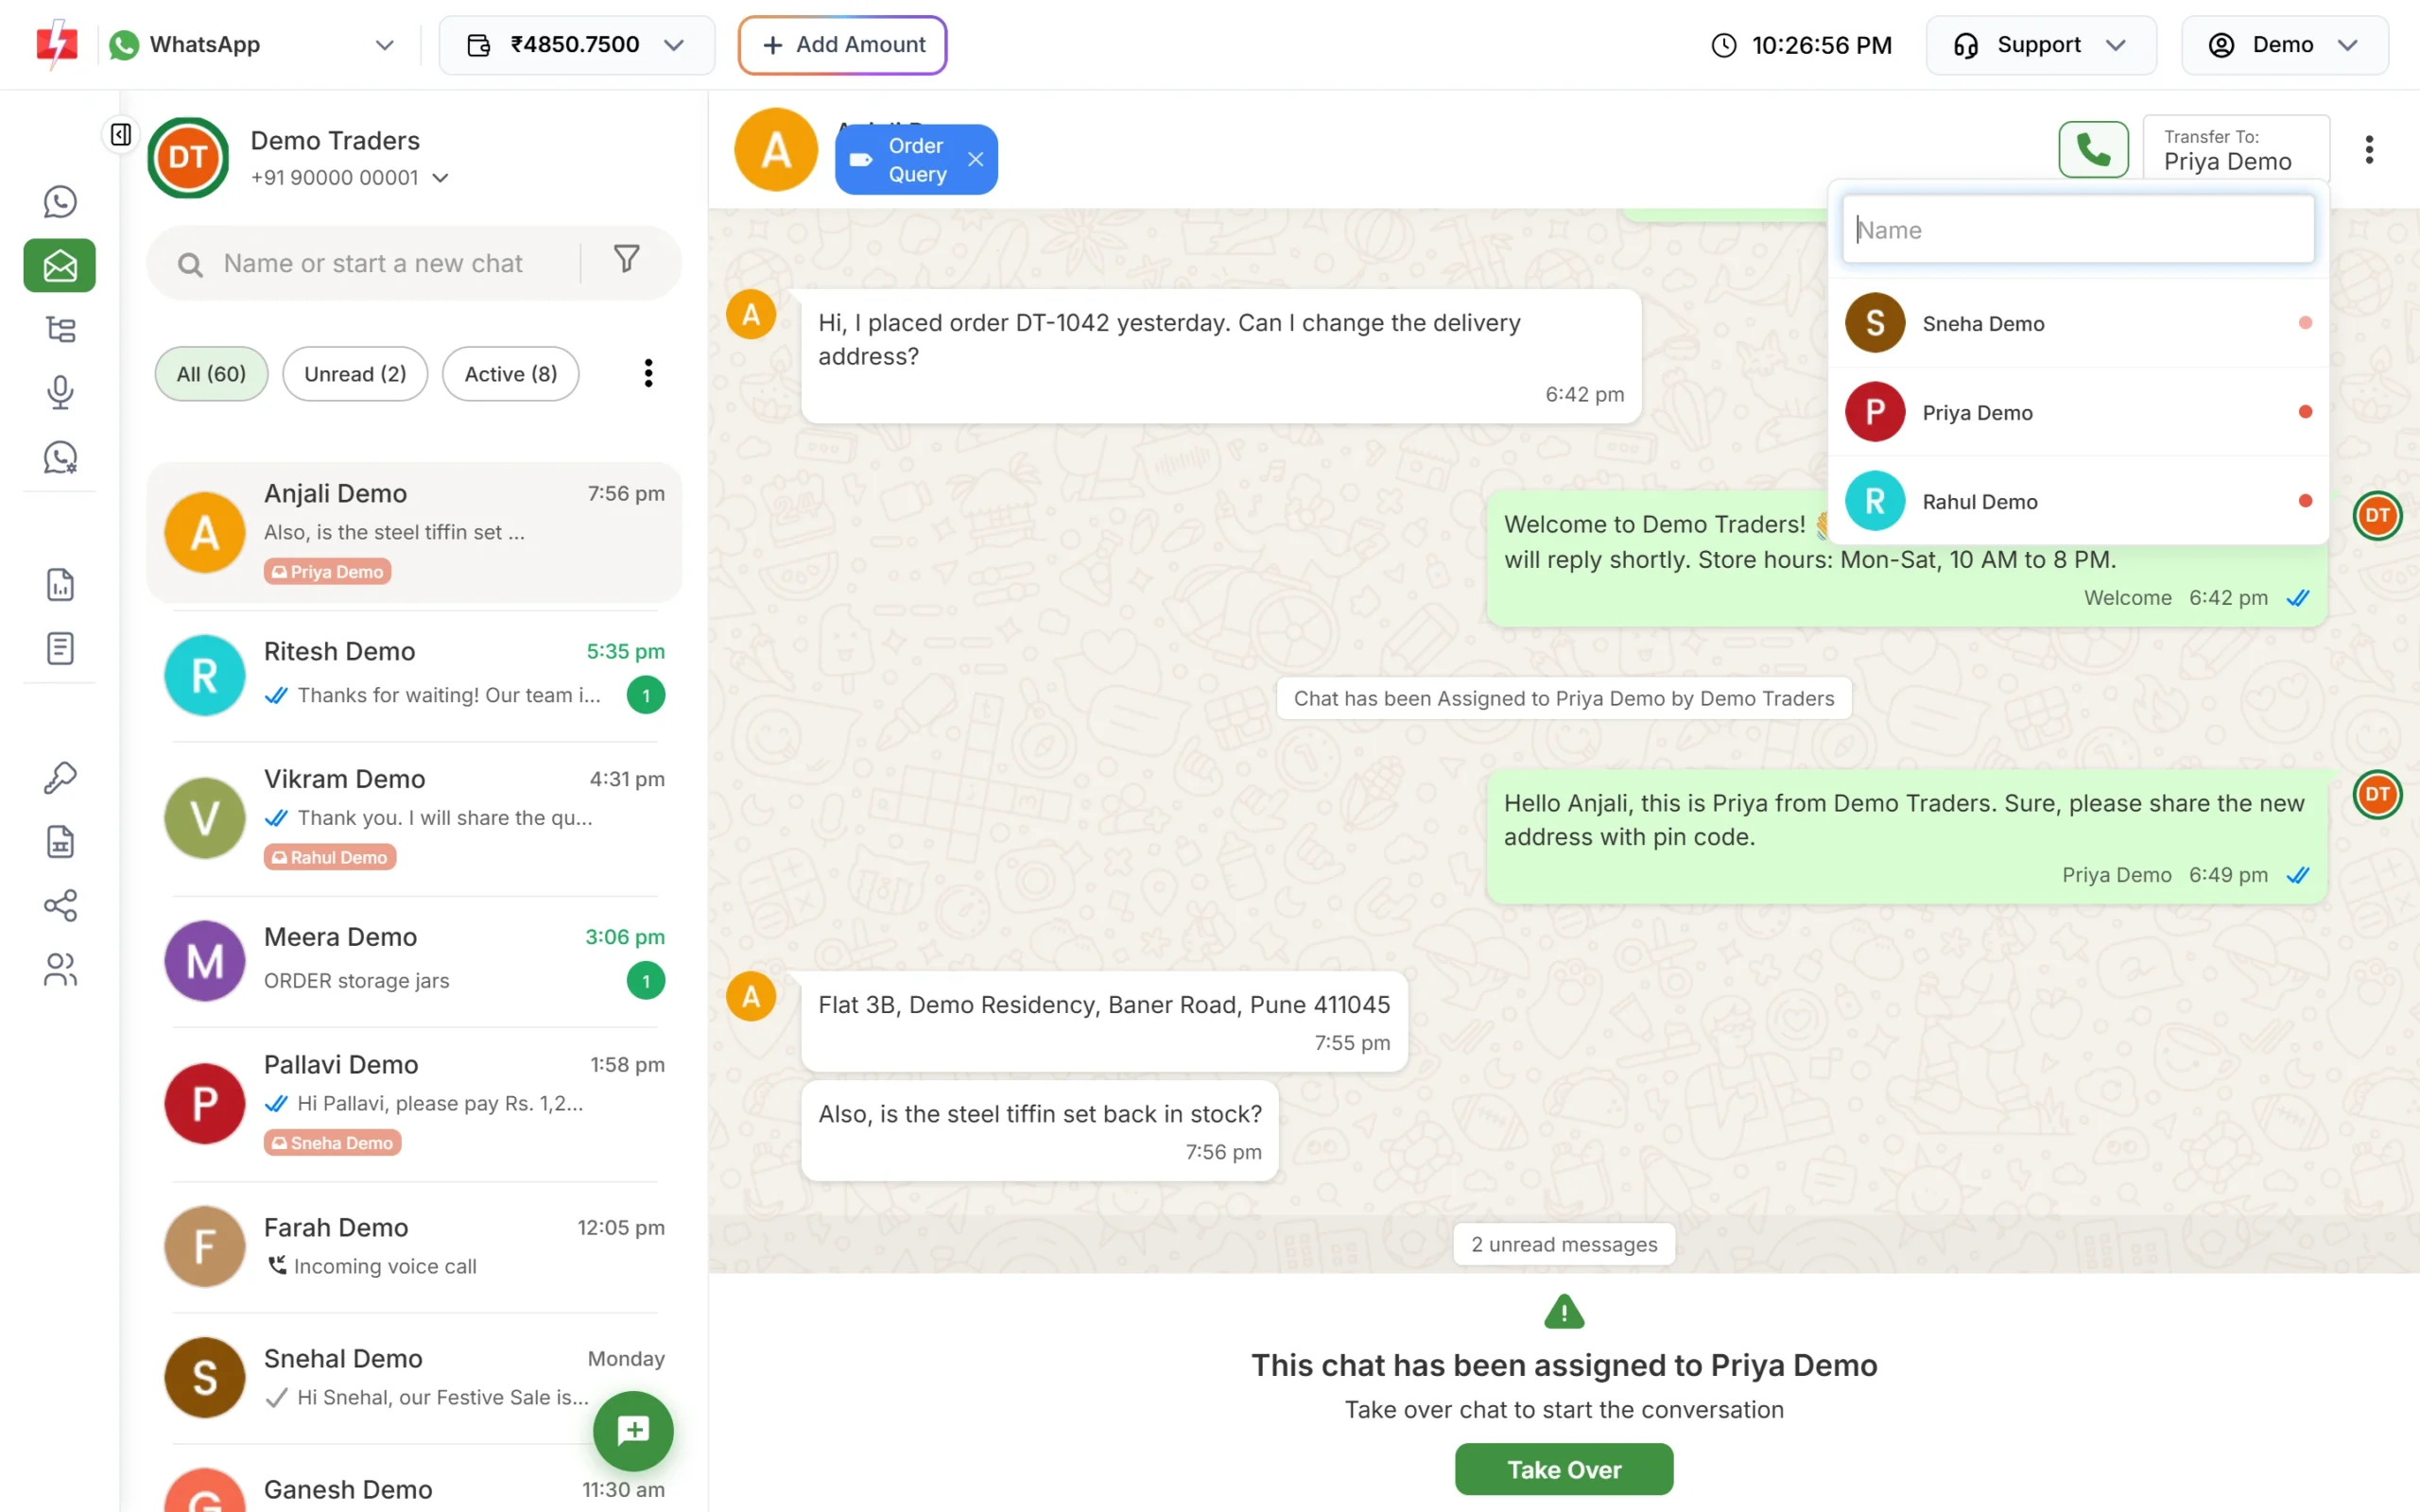
Transfer To lists the agents who can use this number. Once a chat is assigned, the owner sees “This chat has been assigned to {agent}” instead of the reply box. Click Take Over to answer it yourself; this removes the agent. To unassign without taking over, use Remove transfer chats in the three-dot menu.
-
Assign many chats at once
Click the three dots next to the All, Unread and Active pills and choose Assign Multiple Chats. Tick the chats (or Select All), choose the agent in Select Agent and confirm. You see “{n} chats assigned successfully.” This is handy after a campaign, when many customers reply at the same time.
-
Add a label
Click Add Label under the customer’s name. Pick an existing label or type a new name and choose “Creating new: …”. The new label gets a colour automatically. The label also shows on the chat in the list, so the team can spot complaints or VIPs at a glance. Click the x on the label to remove it.
-
Add tags and notes in Contact info
Open the three-dot menu and click Contact info, or click the customer’s name. The panel on the right shows Last Activity and counts of Template Messages, Sent Messages and Failed Message, then three sections:
- Tags: click Edit, tick tags under Available Tags or type in Create New Tags, then Save Changes. Saving replaces the chat’s tag list with what you ticked.
- Attributes: details collected by your chatbot, such as an order ID.
- Notes: click Add Note, write between 10 and 400 characters and save. Each note shows who wrote it and when. You can edit or delete notes later.
You can also correct the customer’s name here with the pencil icon (up to 50 characters).
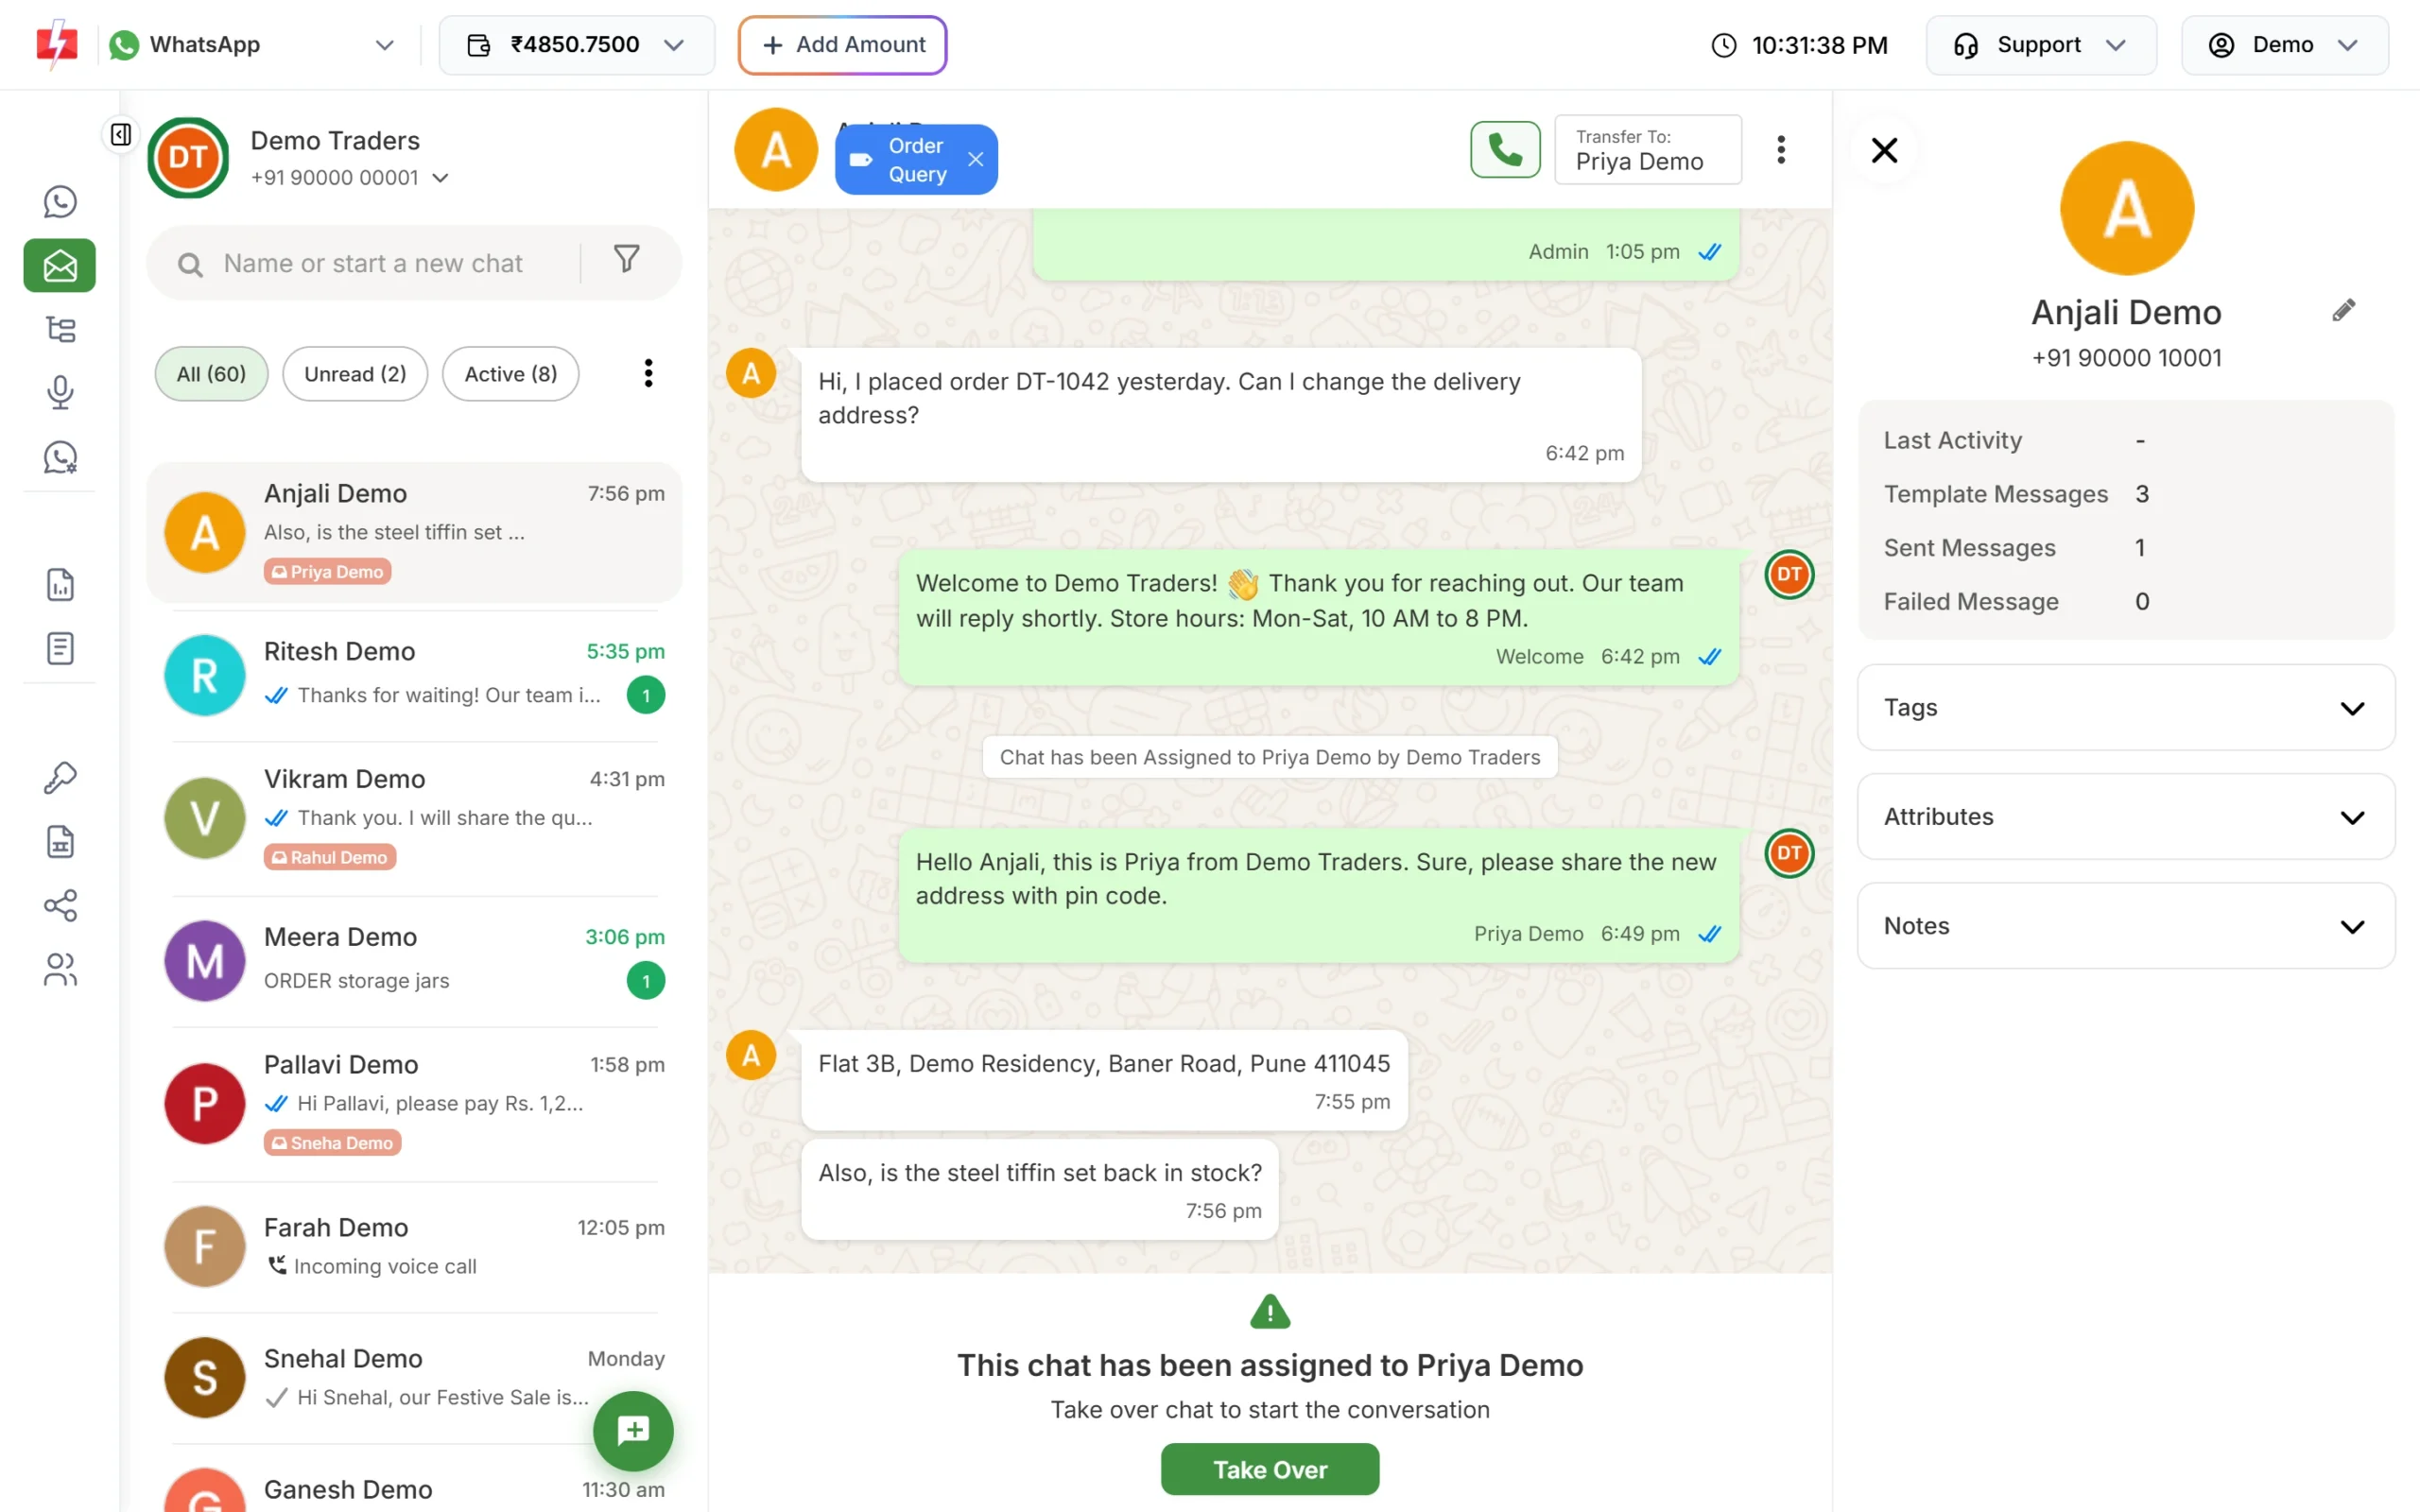
Contact info holds tags, chatbot attributes and team notes. -
Set the chat status
In the three-dot menu, choose Pending or Close (or Open for a closed chat). The menu only shows the statuses the chat is not already in. A line such as “Demo Traders marked chat as closed” is added to the chat so everyone sees what happened.
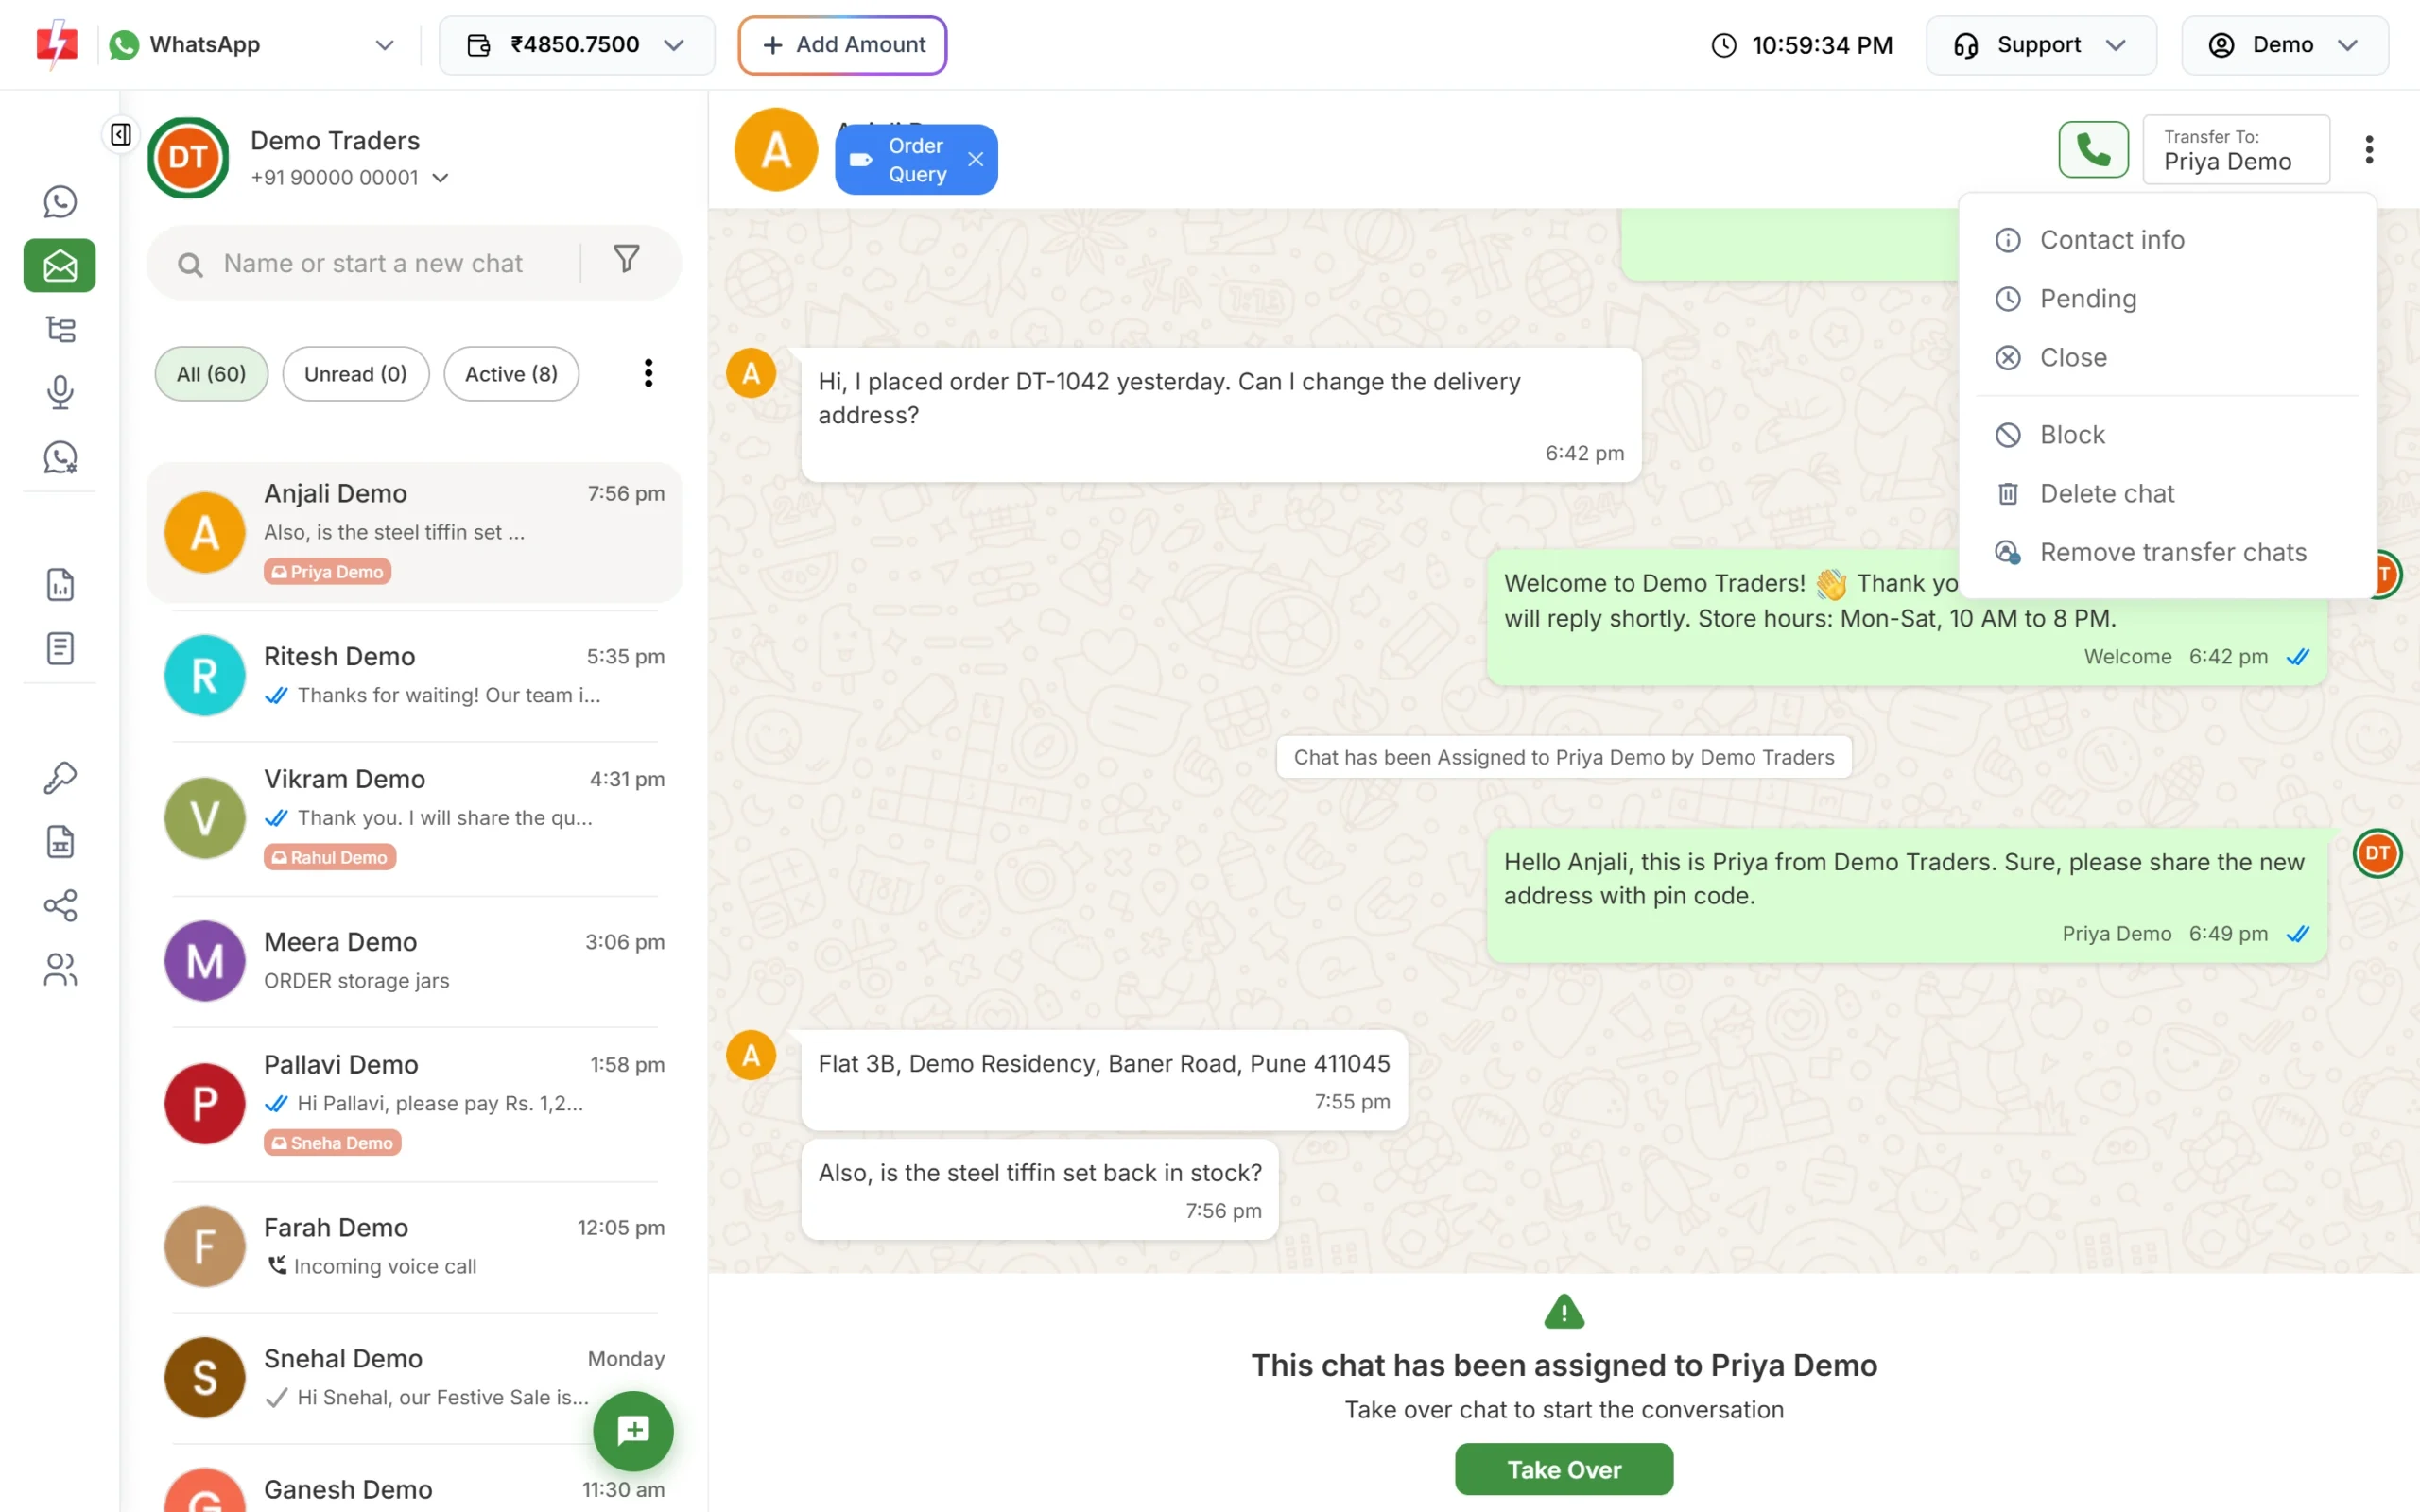
Status, block, delete and unassign are in the chat menu. A simple routine many teams use: Open while you are working on it, Pending while you wait for the customer or another team, Closed when it is done.
-
Filter the inbox
Click the funnel icon next to the search box to open Filter Conversations. You can combine:
- Labels, including “No Label Attached”
- Tags
- Chat Status: Open, Pending, Closed
- Assignee: Unassigned, Assigned to me, or an agent
- Reply Status: Unreplied, Replied Manually, Auto Replied, Replied by Bot
- Read/Unread and Response Window (Active means the customer wrote in the last 24 hours)
Click Apply Filters. For a quick view, the three-dot menu by the pills also has Assigned, Open, Pending and Closed. You can drag these to change their order and pin your top three as pills; the order is saved for each business number.
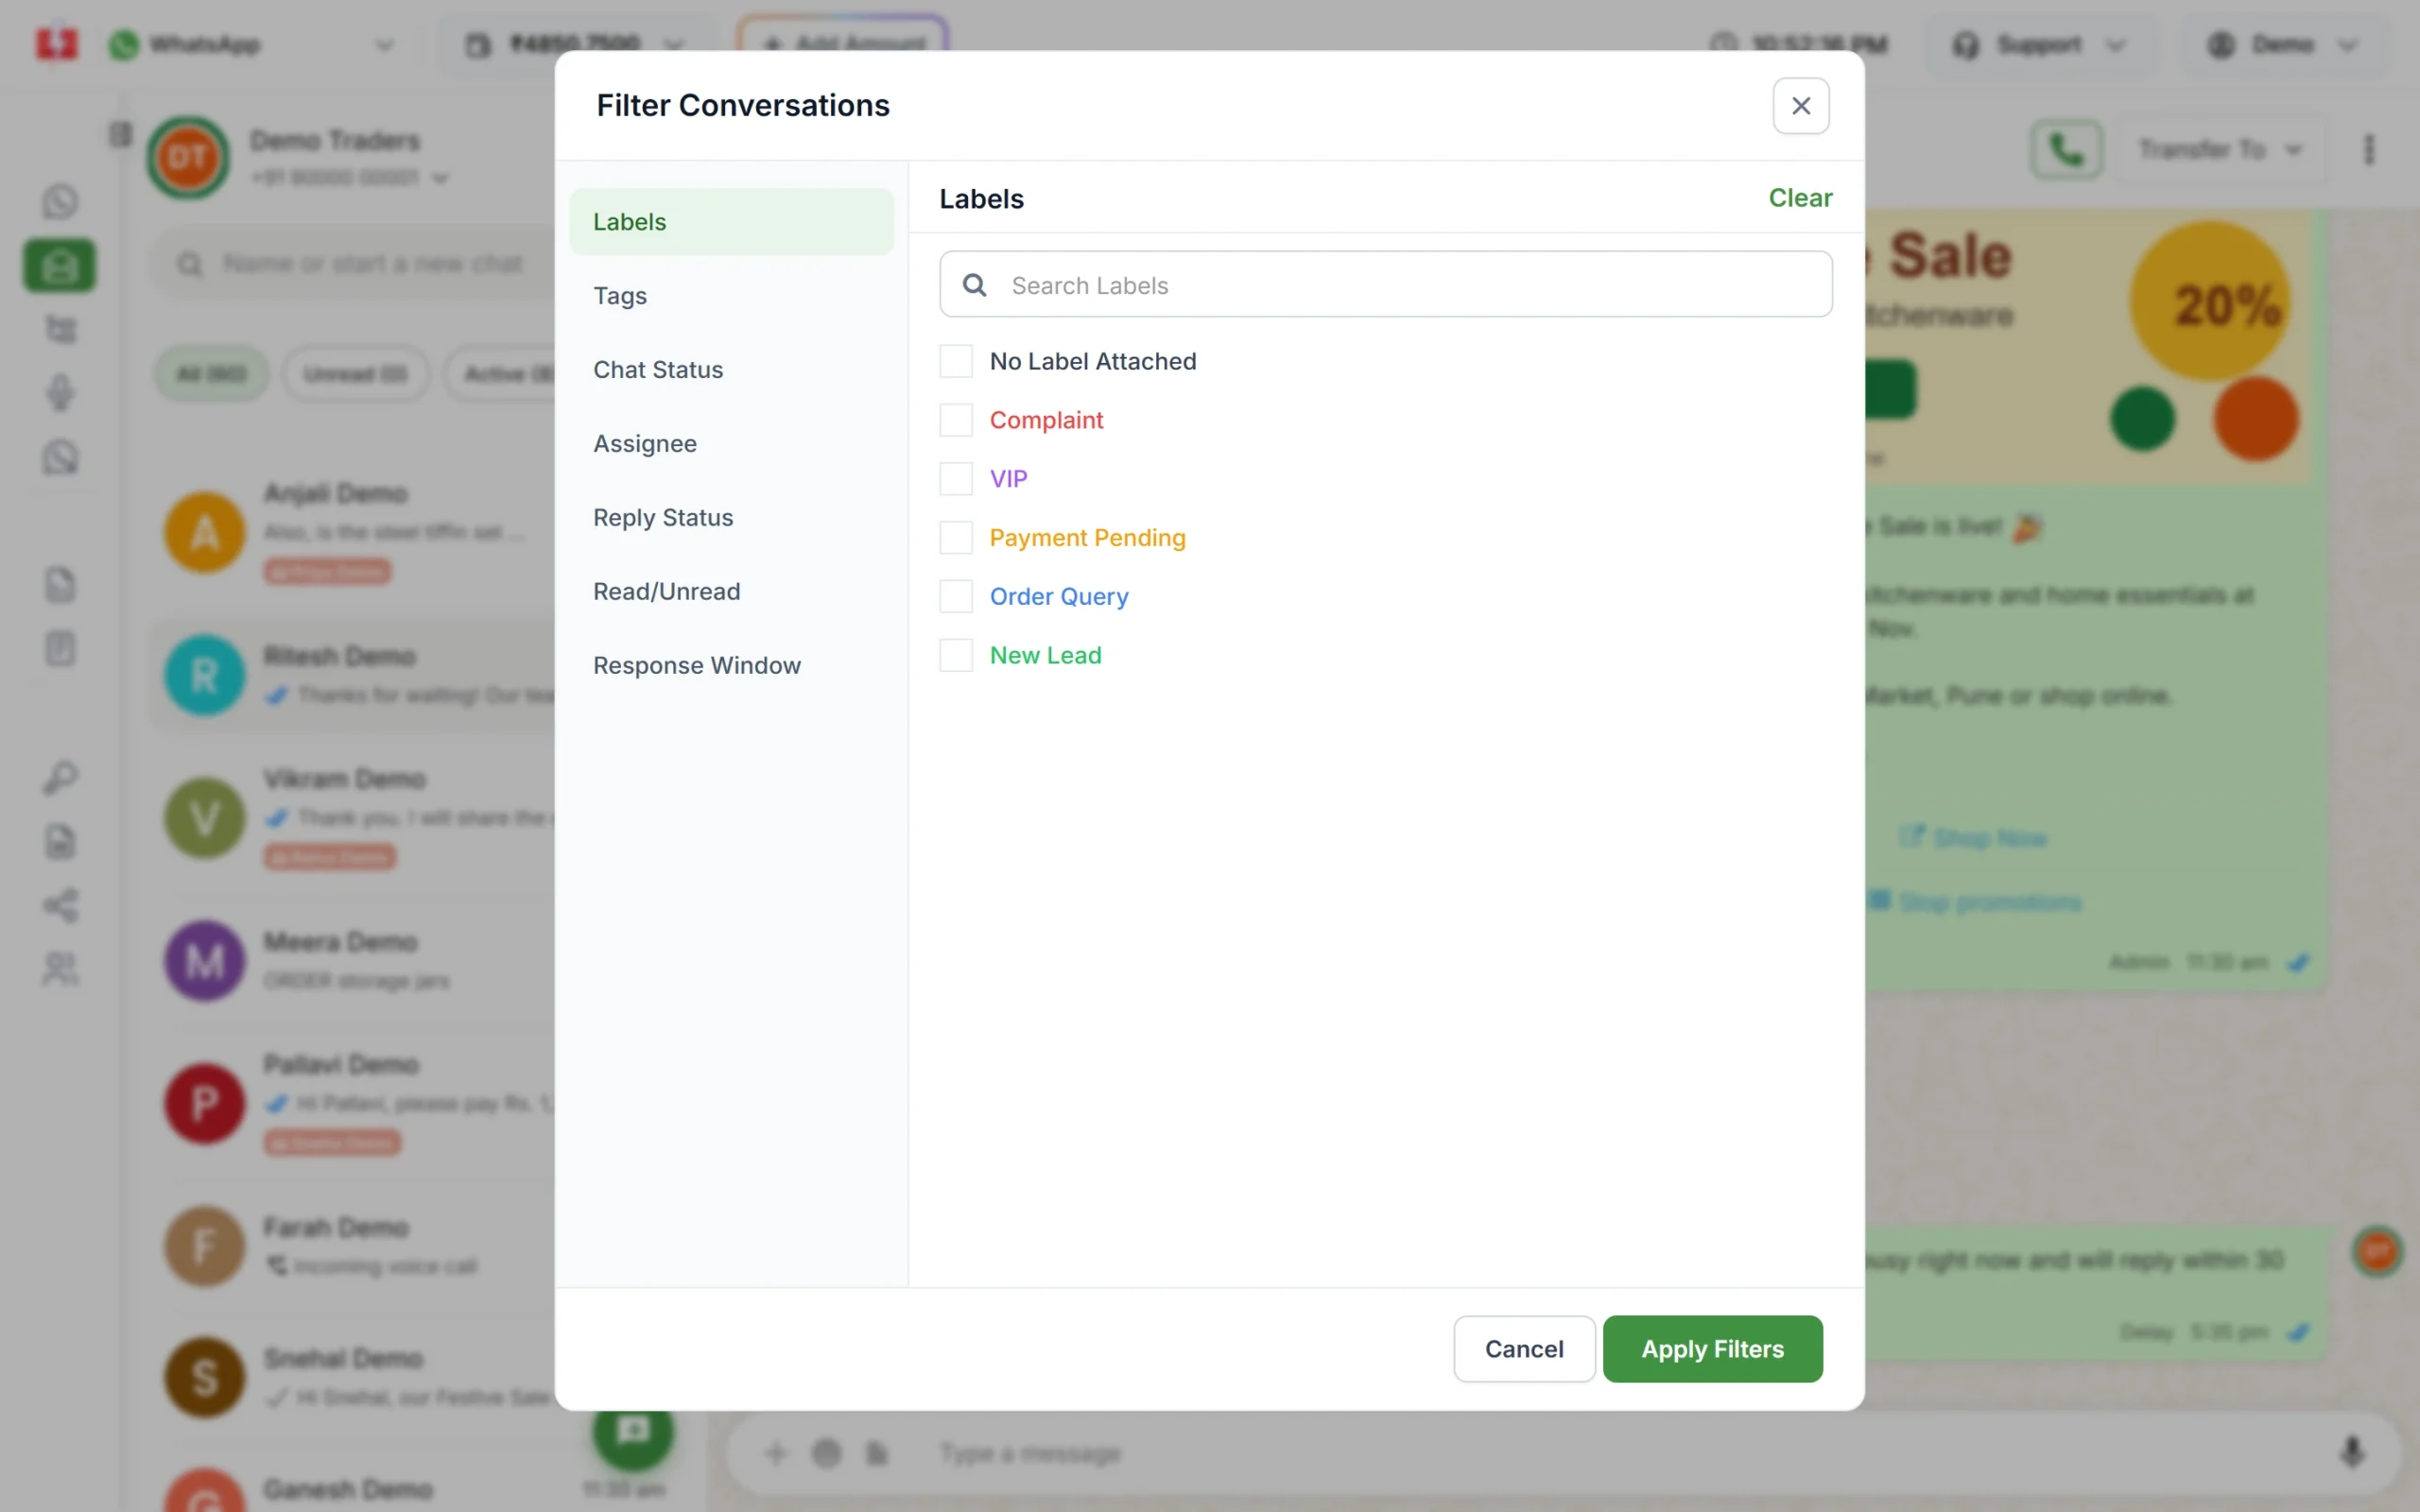
Filter by label, tag, status, assignee, reply status and more.
What each team role sees
| Who | What they see |
|---|---|
| Owner (main account) | All chats on all connected numbers, the assignee on each chat, prices, Delete chat and Take Over. |
| Admin agent | All chats on the numbers given to them, Transfer To and the bulk-assign menu. |
| Chat Agent | Only chats assigned to them, on the numbers given to them. No Transfer To, no bulk menu and no system lines such as assignment notes. |
Agents log in with their own email and password at the address Open Login URL copies, and always get the mobile layout of Live Chat.
Common problems and fixes
| Problem | Fix |
|---|---|
| An agent is missing from Transfer To | In Team Members, edit the agent, tick WhatsApp and select this business number. Inactive and deleted agents are not listed. |
| “maximum label created” | Your account has 50 labels. Reuse labels, and use tags for extra detail. |
| Note will not save | Notes must be between 10 and 400 characters. |
| Label name rejected | Use 2-70 letters, numbers or spaces. Symbols are not allowed. |
| A Chat Agent cannot see a chat | Chat Agents see only assigned chats. Assign it to them or make them Admin. |
| “A chat with this number already exists. Please ask the owner to assign it to you.” | A Chat Agent tried to start a chat that already exists. The owner or an Admin should assign it. |
Frequently asked questions
Can one chat have more than one label?
No. A chat has one label. Use tags when you need several markers on the same chat.
Can customers see my labels, tags or notes?
No. They are visible only inside your Fast2SMS inbox.
Can I assign a chat to two agents?
No. A chat has one assignee at a time. Transfer it when someone else should take over.
Does closing a chat stop the customer from writing?
No. Closing only changes the status for your team. To stop a customer from messaging you, use Block.
Can my chatbot assign chats?
Yes. Add the Assign Conversation action in Flow Builder and pick the agent, for example after the customer taps “Talk to our team”.
Is there a charge for agents?
No. You pay for the messages you send, not for agents, labels or tags.