To send bulk SMS from Excel in Fast2SMS, save your Excel sheet as a CSV file, open DLT SMS, choose CSV File under Send To, upload the file and pick the column that has the mobile numbers. You can also fill each template variable from a column, so every customer gets their own name, amount or order number.
If you want to keep your contacts for later, you can instead upload the Excel file to Address Book once and pick the group whenever you send. This guide shows both ways, step by step, and the file rules that stop numbers from being skipped.
Which way should I use?
| Upload CSV on the DLT SMS page | Import into Address Book | |
|---|---|---|
| Best for | A one-time campaign, or messages with different values per person | A customer list you message again and again |
| File types | .csv only | .csv, .xlsx, .xls or .txt |
| File size | Up to 20 MB | The upload box says up to 10 MB |
| Personal values (name, amount) | Yes, map any column to a template variable | No, only name and number are saved |
| Saved for next time | No, you upload again | Yes, as contacts and groups |
Before you start
- A Fast2SMS account with enough wallet balance.
- An approved Sender ID and DLT content template linked to it, in DLT Manager.
- Your Excel sheet with a header row, for example: Name, Mobile, Amount. One customer per row.
How to prepare your Excel file
- Put headers in the first row. Short names like Name, Mobile, OrderID, Amount make mapping easy.
- Keep mobile numbers in one column. 10-digit Indian numbers are best. Format the column as Text in Excel so numbers do not turn into 9.1E+09.
- Keep values short and clean. No extra spaces or line breaks inside cells, because the values go straight into your DLT template.
- Save as CSV for the DLT SMS page. In Excel, click File > Save As and choose CSV UTF-8 (Comma delimited). UTF-8 keeps Hindi and other non-English text readable.
Method 1: Send bulk SMS from a CSV file on the DLT SMS page
-
Open DLT SMS and choose your Sender ID
Open the SMS app and click DLT SMS. Click Select Sender ID and pick your approved sender.
-
Click CSV File and upload your sheet
Under Send To, click the CSV File tab, then Click to upload and choose your .csv file. The file must not be more than 20 MB. If you need an example layout, click Sample CSV.
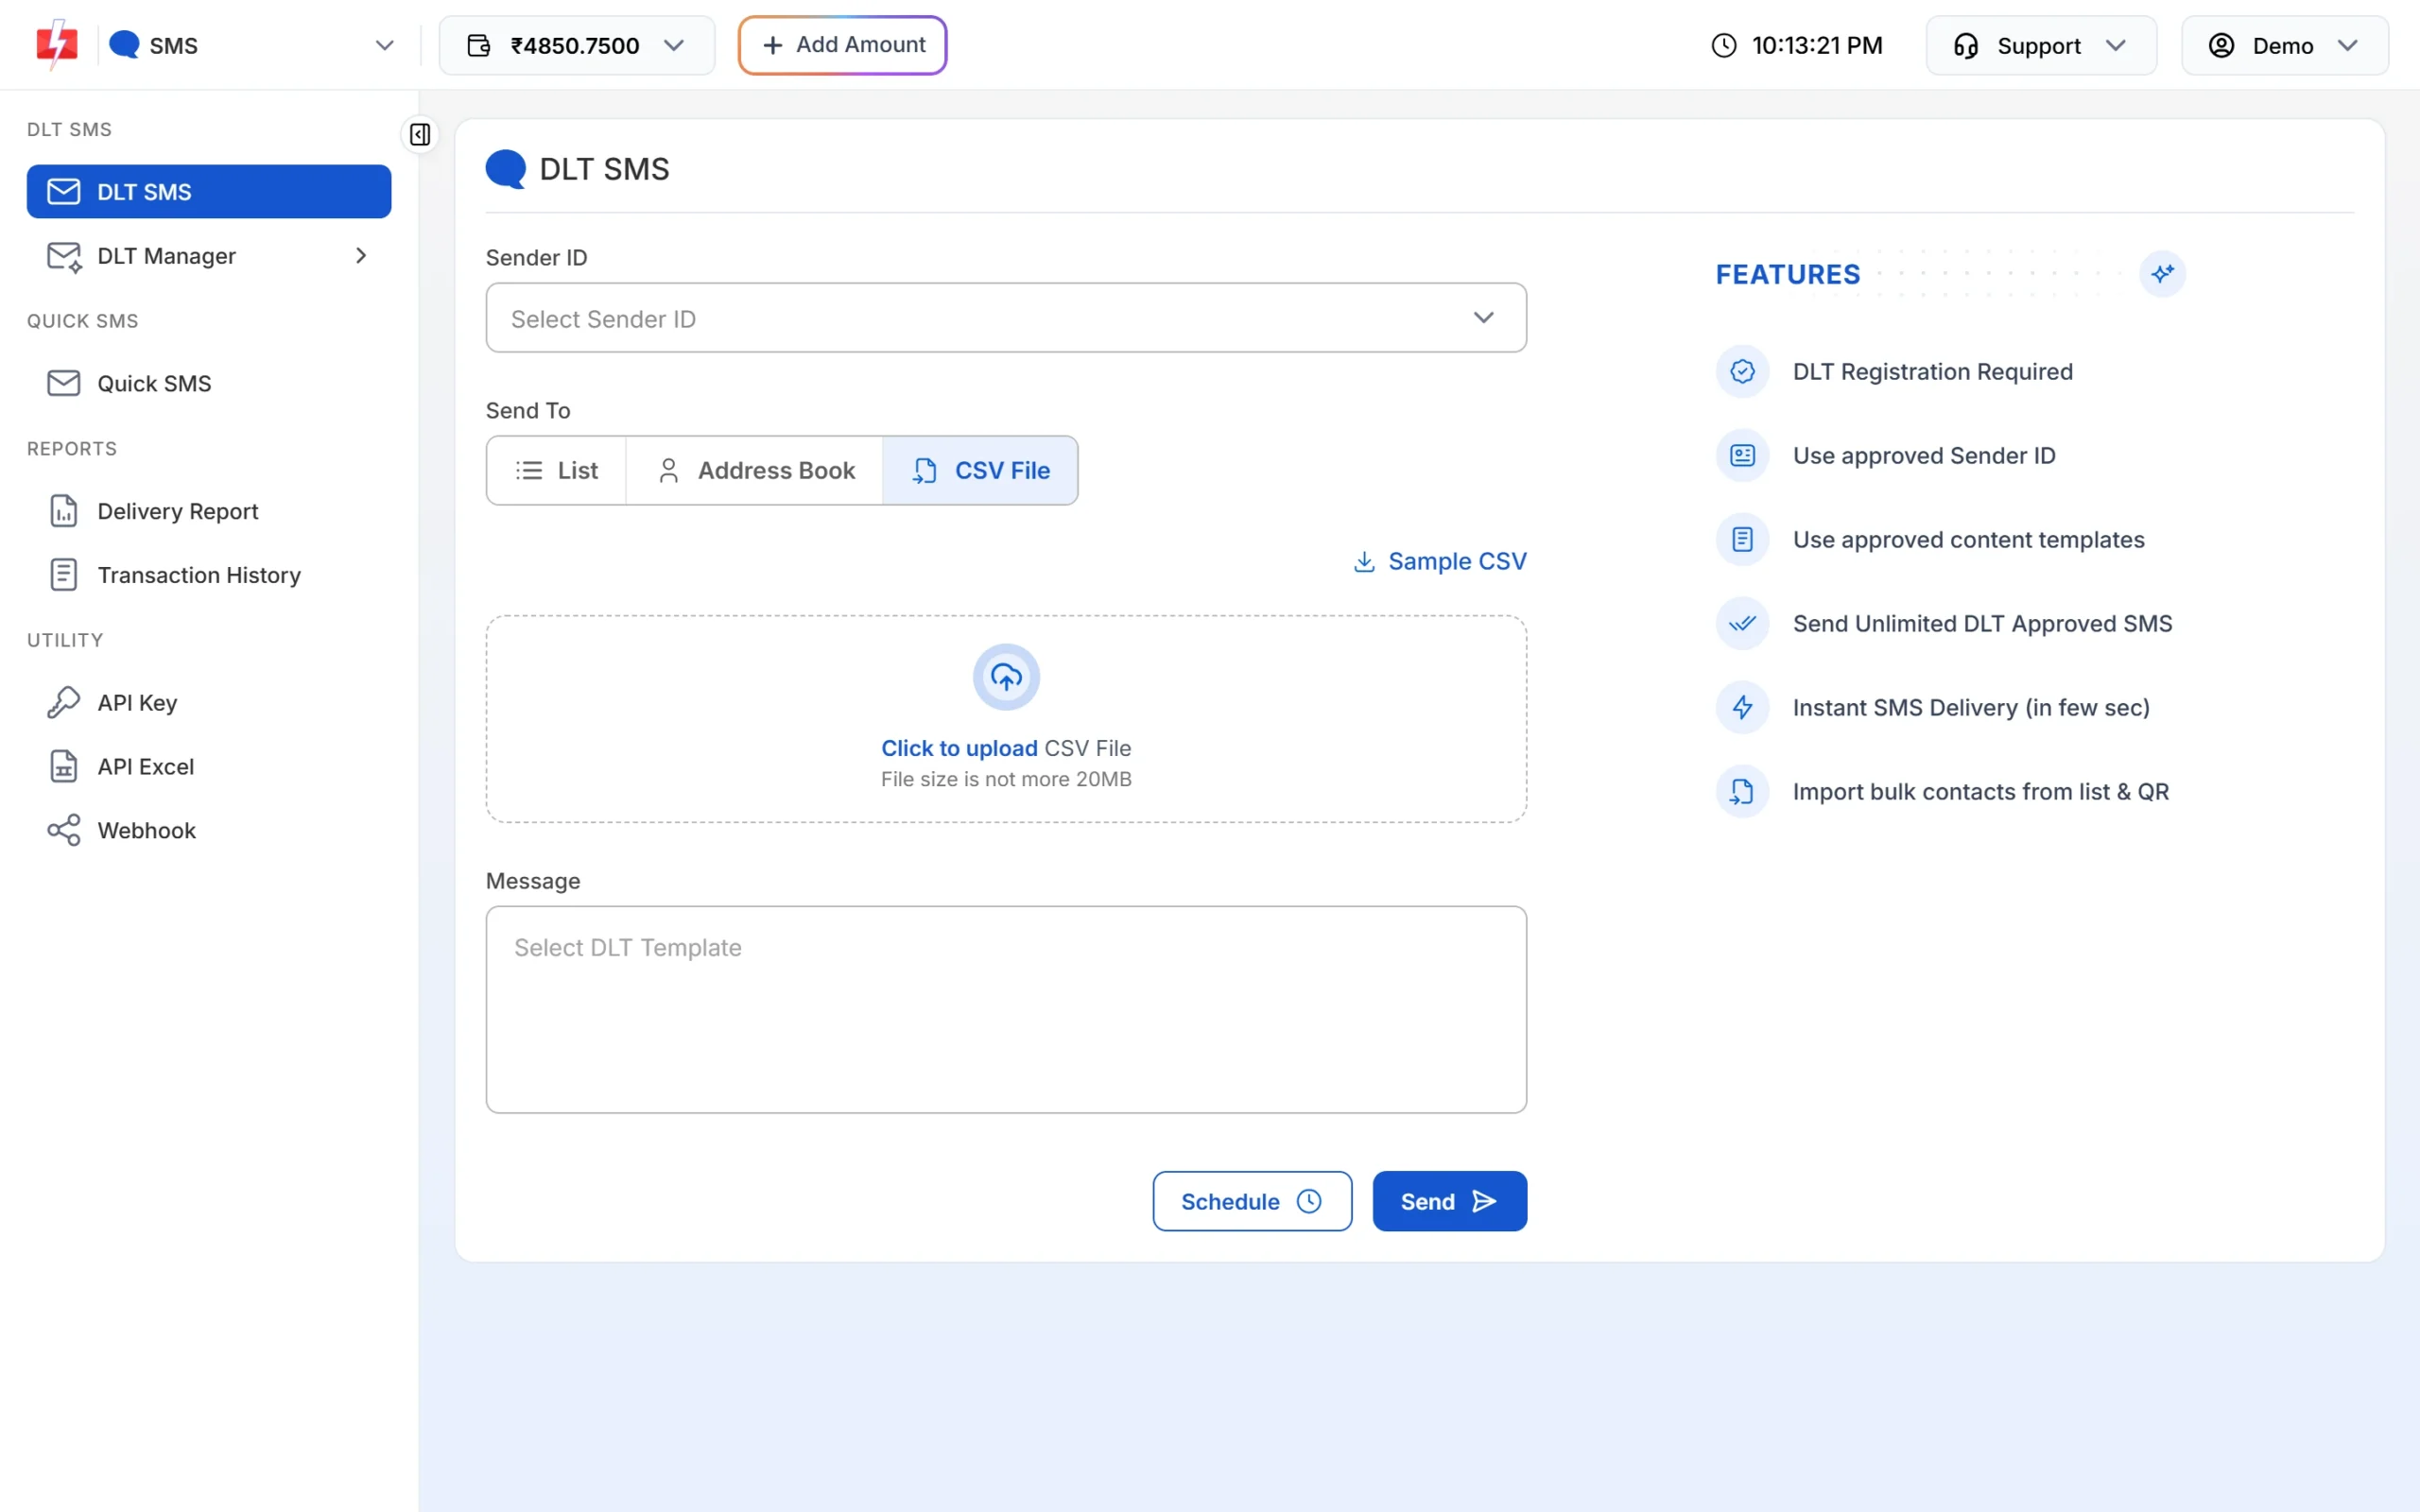
The CSV File tab on the DLT SMS page. After the upload you see a preview of the first rows and the total number of contacts in the file. Check that the columns look right.
-
Pick the column with mobile numbers
Under Select Column Name which has Mobile Numbers, click Select column and choose your mobile number column, for example Mobile. If you skip this, the panel shows “Select Column Name which has Mobile Numbers.” when you click Send.
-
Select your DLT template
Click the Message box and choose a template from Select DLT Template. Only approved templates linked to your Sender ID are listed.
-
Map each variable to a column
Each {#var#} in the template gets its own field. Click Select column to send in {#var#} and choose the column for that place, for example Name for “Dear {#var#}” and Amount for “Rs. {#var#}”. Every row then gets its own value.
If a variable should be the same for everyone, like your shop name or a date, type it in Or type a custom value instead of picking a column.
The phone preview on the right shows how the message will look, and the counter below it shows the characters and SMS parts.
-
Click Send and check the cost
Click Send (or Schedule to pick a later time). Nothing is sent yet. The Message Preview & Confirmation popup shows the cost per SMS, the number of SMS parts, total, duplicate, valid and invalid numbers, and the final cost.
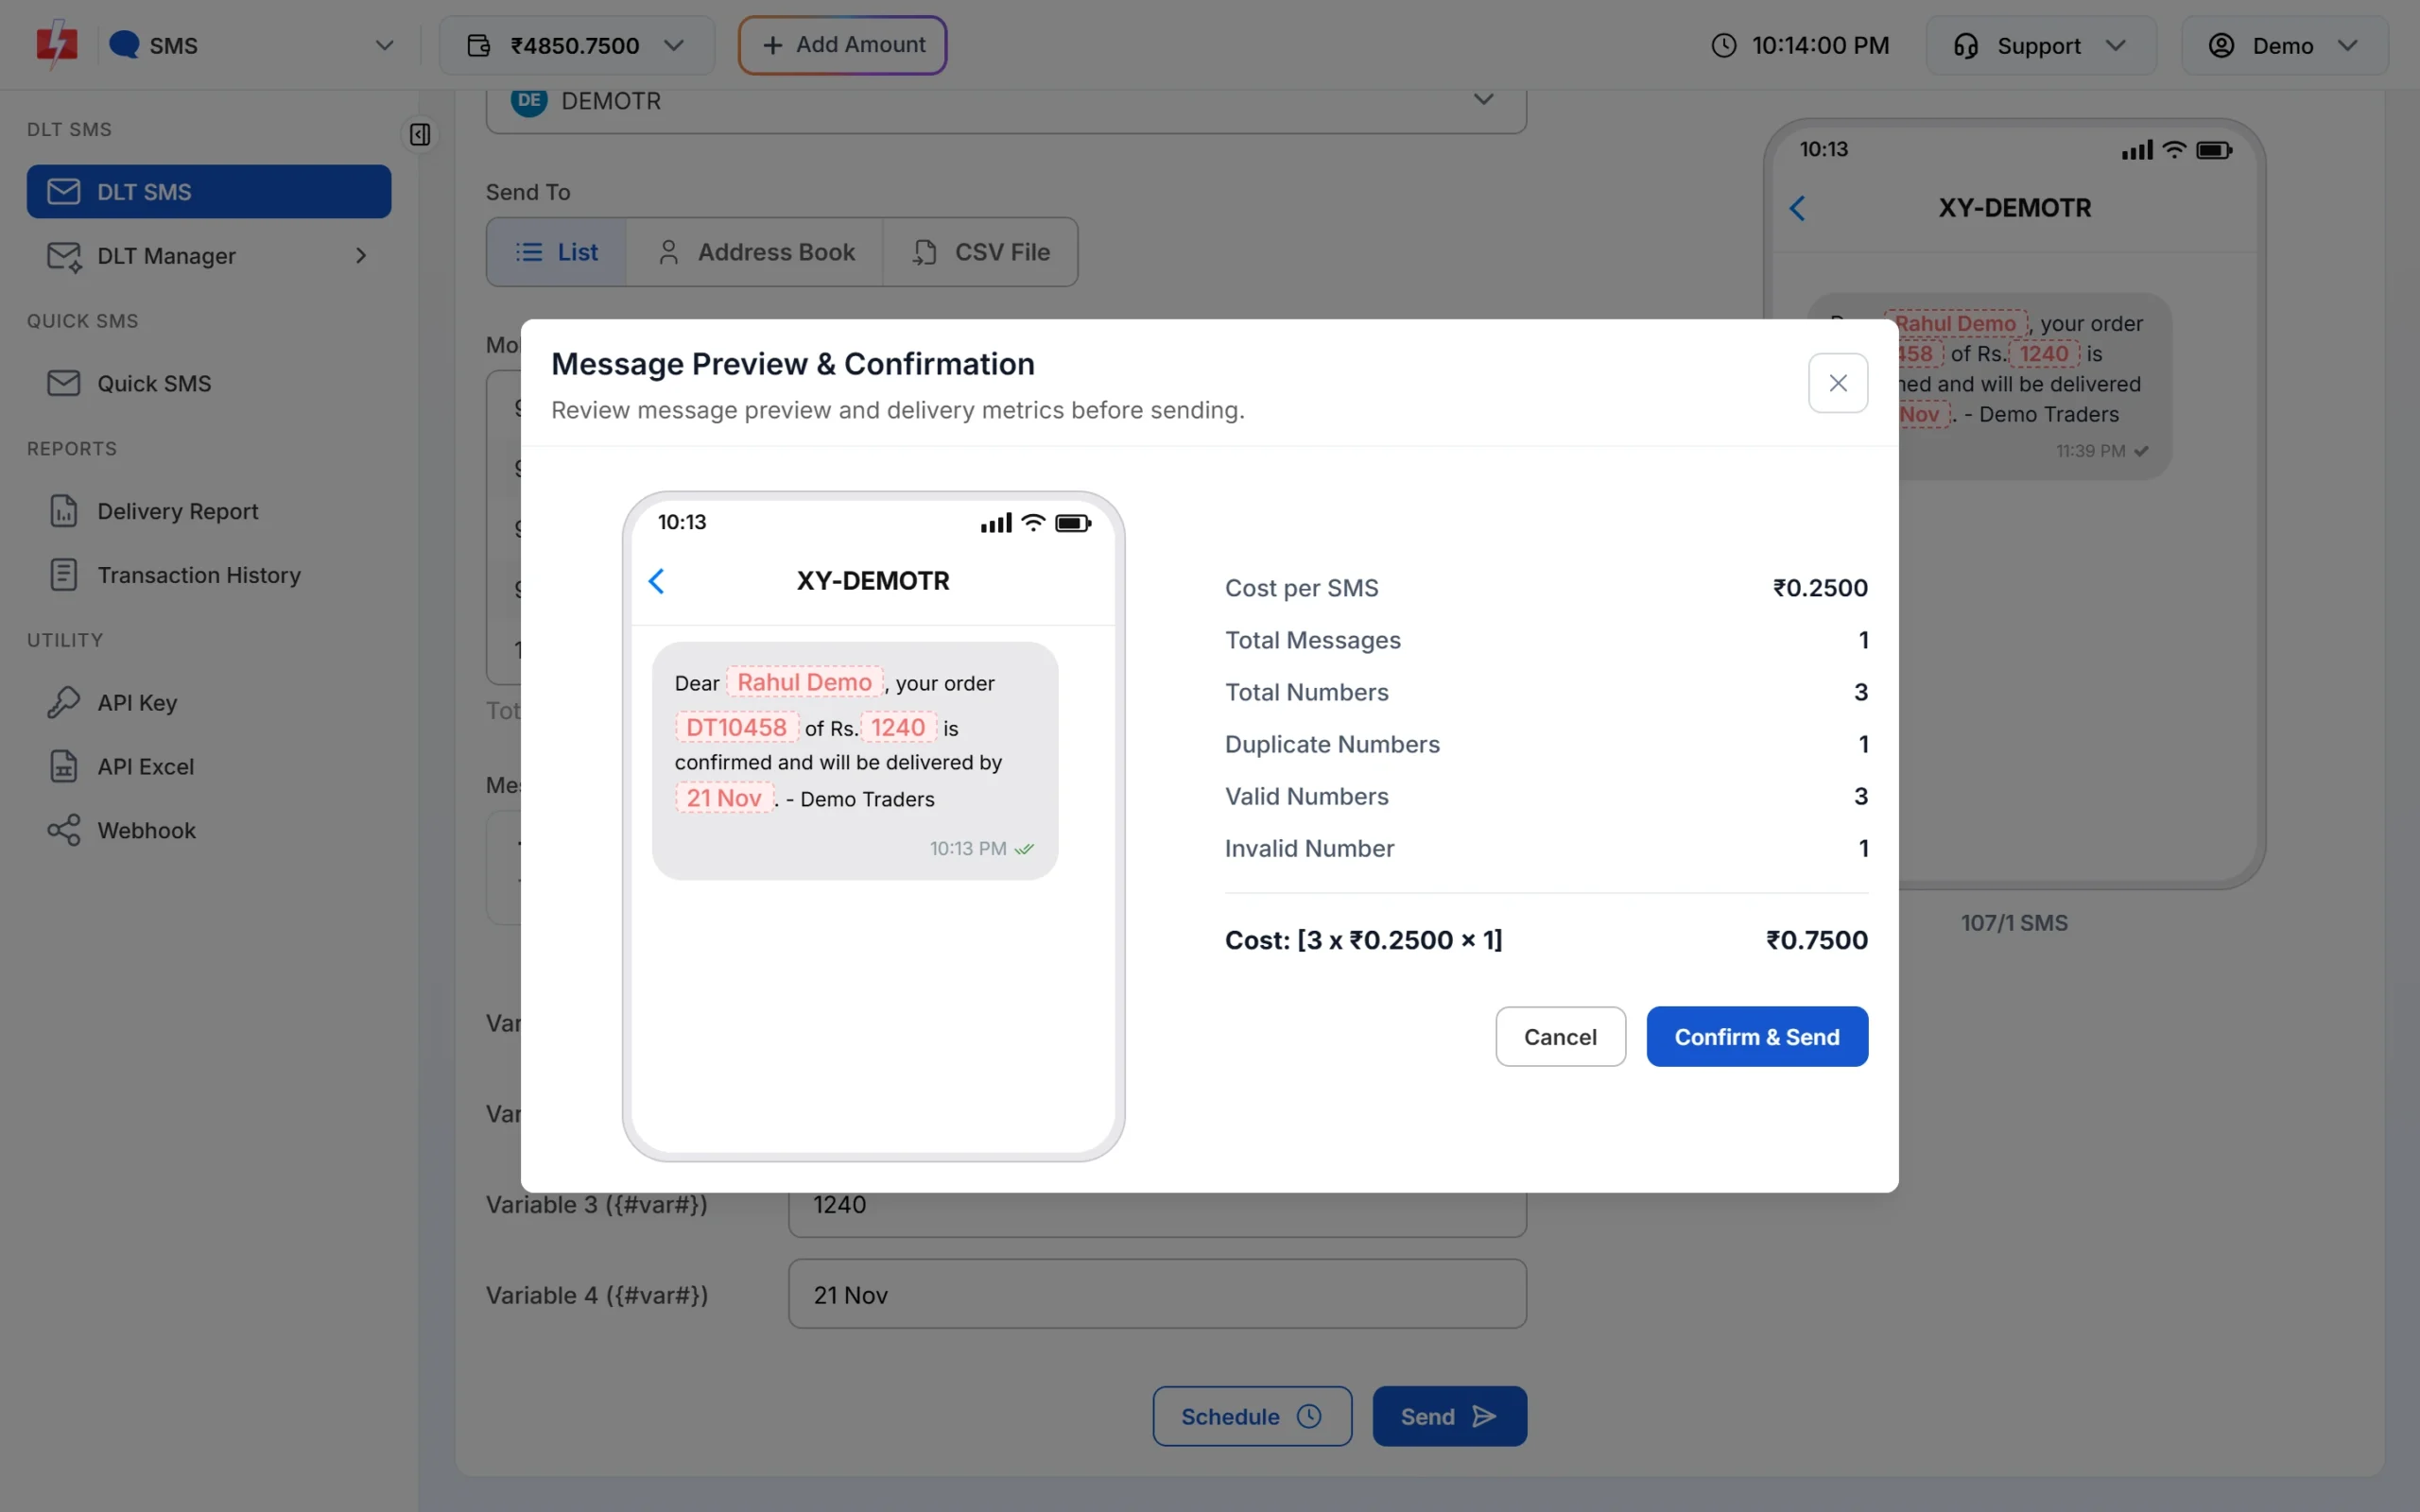
Check valid, duplicate and invalid numbers before you confirm. Duplicate and invalid numbers are not counted in the cost. If it all looks right, click Confirm & Send.
Method 2: Import Excel contacts into Address Book, then send
-
Open Address Book and click Add Contact
Open Address Book from the apps menu at the top left, go to Contact and click Add Contact. In the drawer, open the Upload CSV tab.
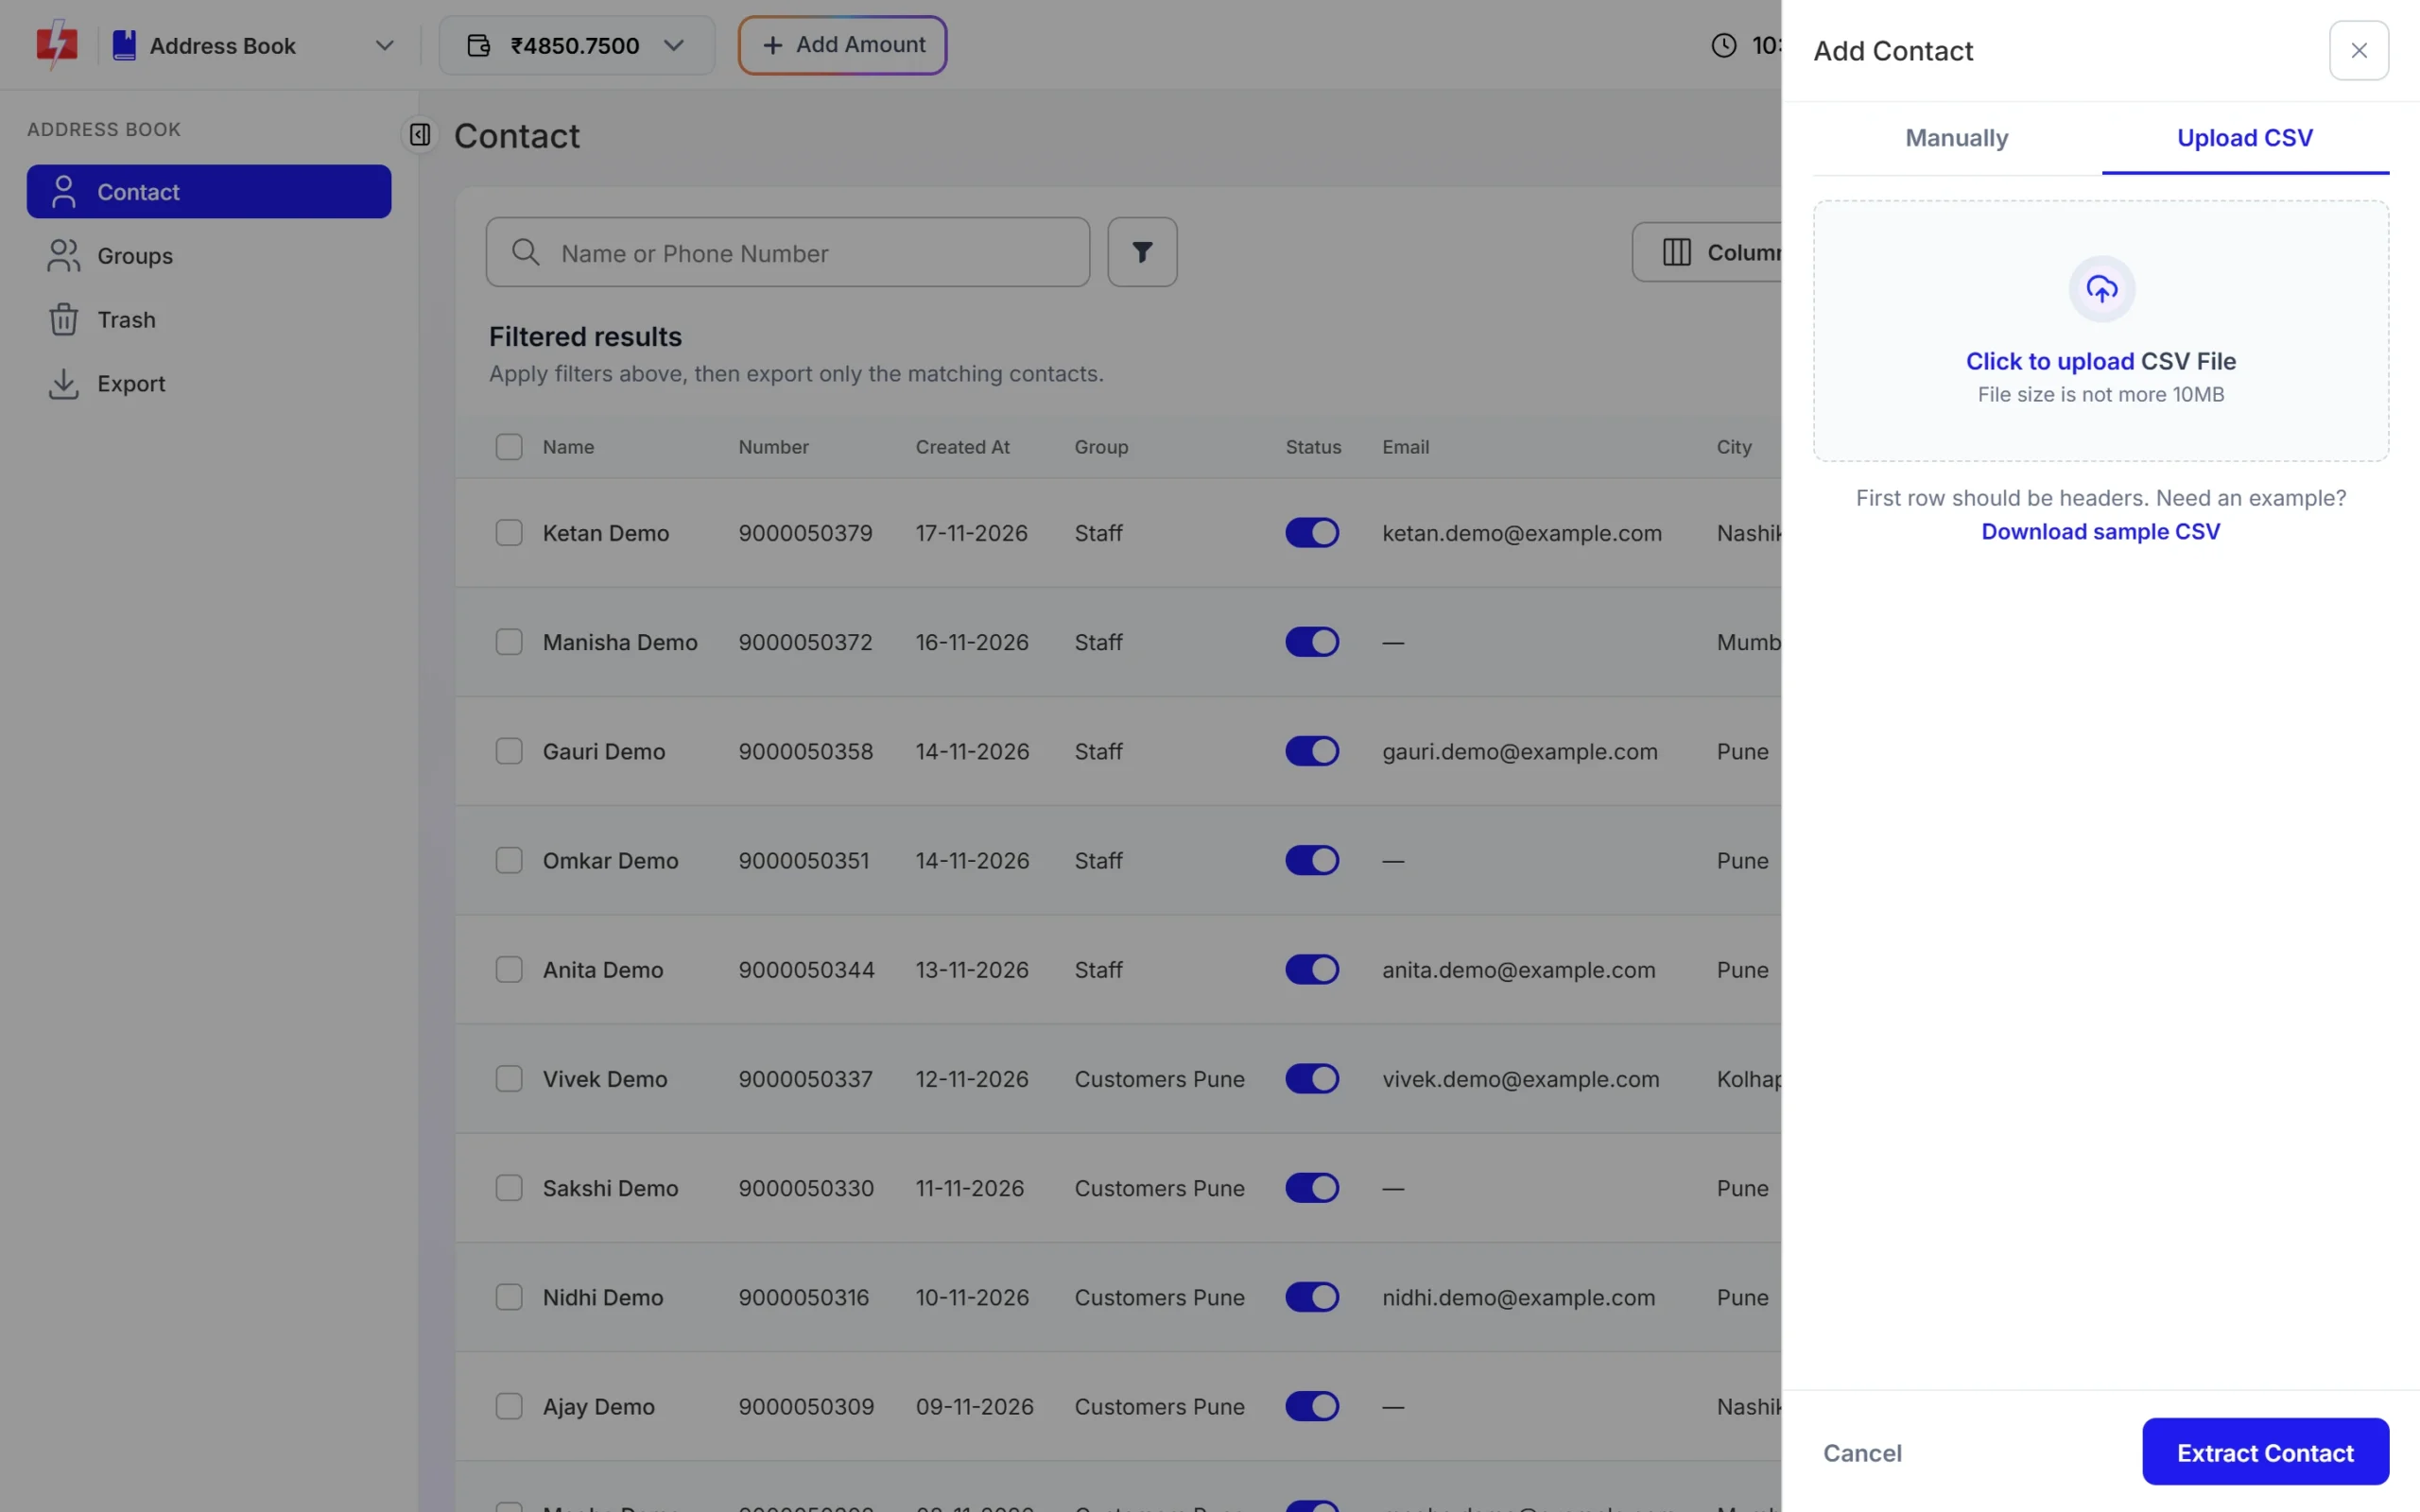
Upload CSV accepts Excel files too. -
Upload your Excel or CSV file
Click Click to upload and choose your file. Here you can use .xlsx, .xls, .csv or .txt, so there is no need to convert from Excel. The first row must be headers. Use Download sample CSV if you want the expected layout (Name, Number).
-
Map Name and Number, and pick a group
The panel tells you how many rows it found. Choose the Name column and the Number column. Columns named like “name” or “mobile” are picked for you. In Add to group, choose a group such as “Diwali customers” so you can select all of them in one click later. Then click Extract Contact.
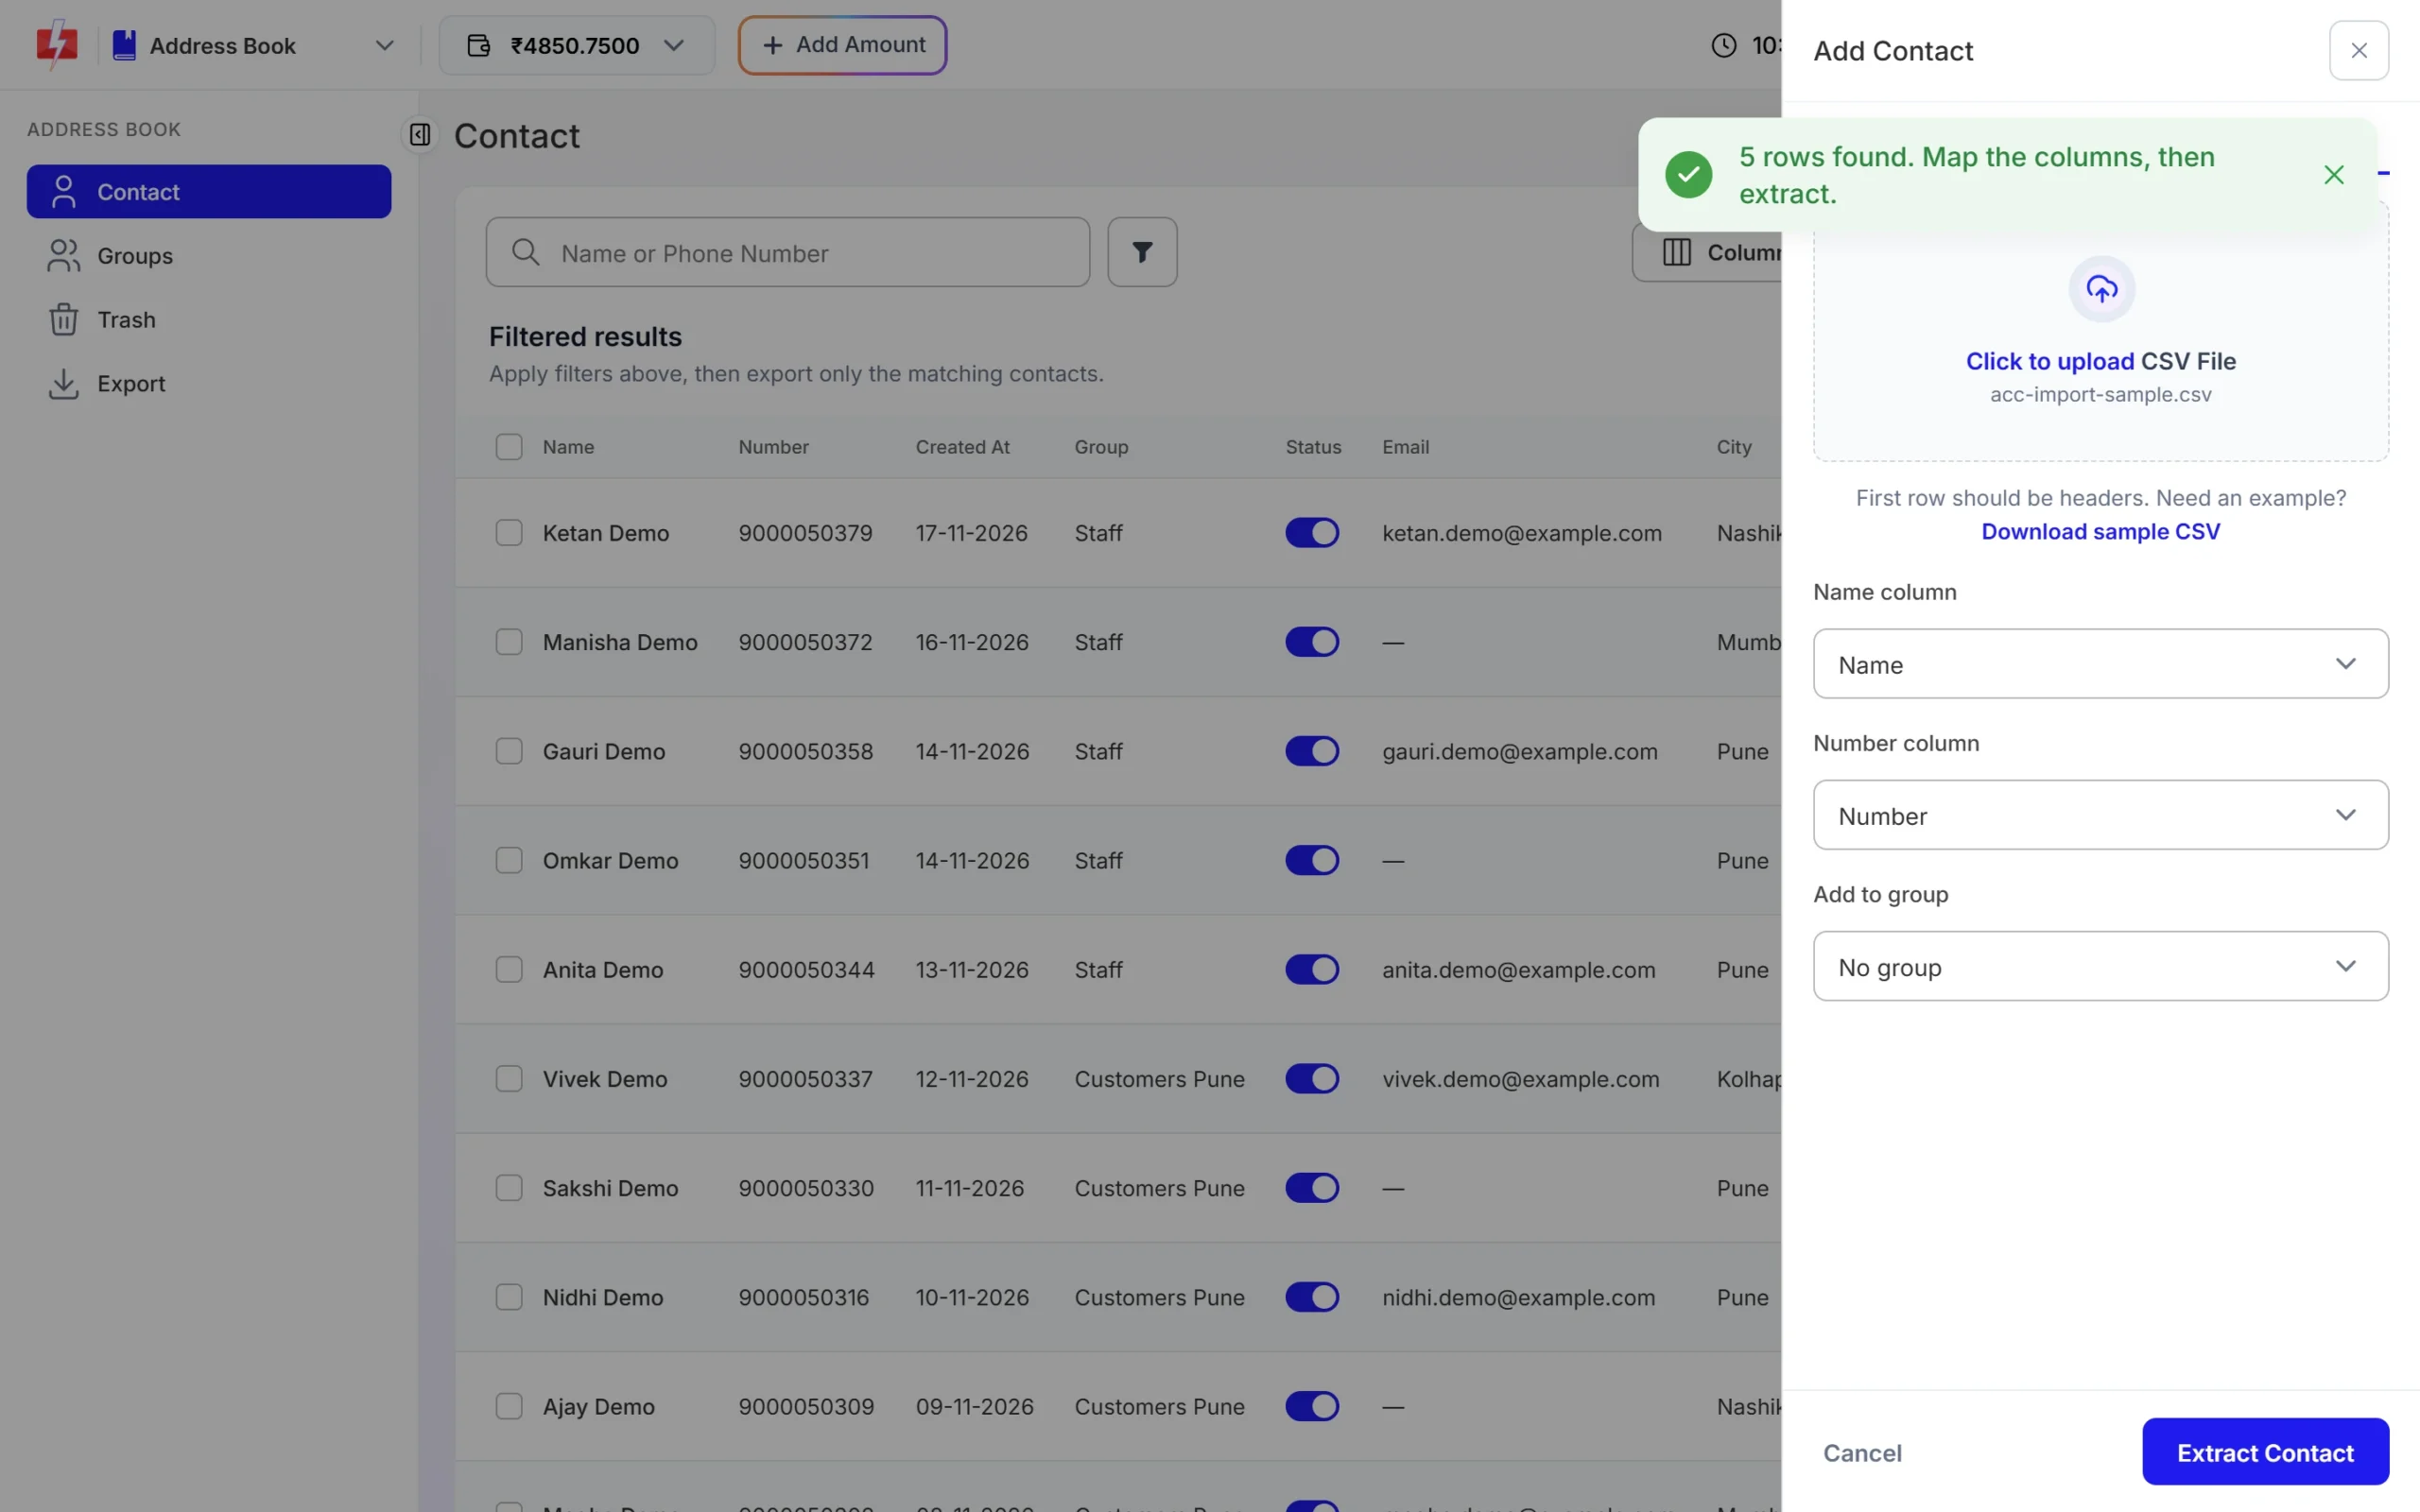
Choose the name and number columns and an optional group. When it finishes, a message tells you how many contacts were imported, how many already existed, and how many invalid or duplicate numbers were skipped.
-
Send to the group from DLT SMS
On the DLT SMS page, choose Address Book under Send To and click Choose Contacts. Open the Group tab, tick your group (or tick contacts on the Contact tab) and click Submit. Then pick your template and send as usual.
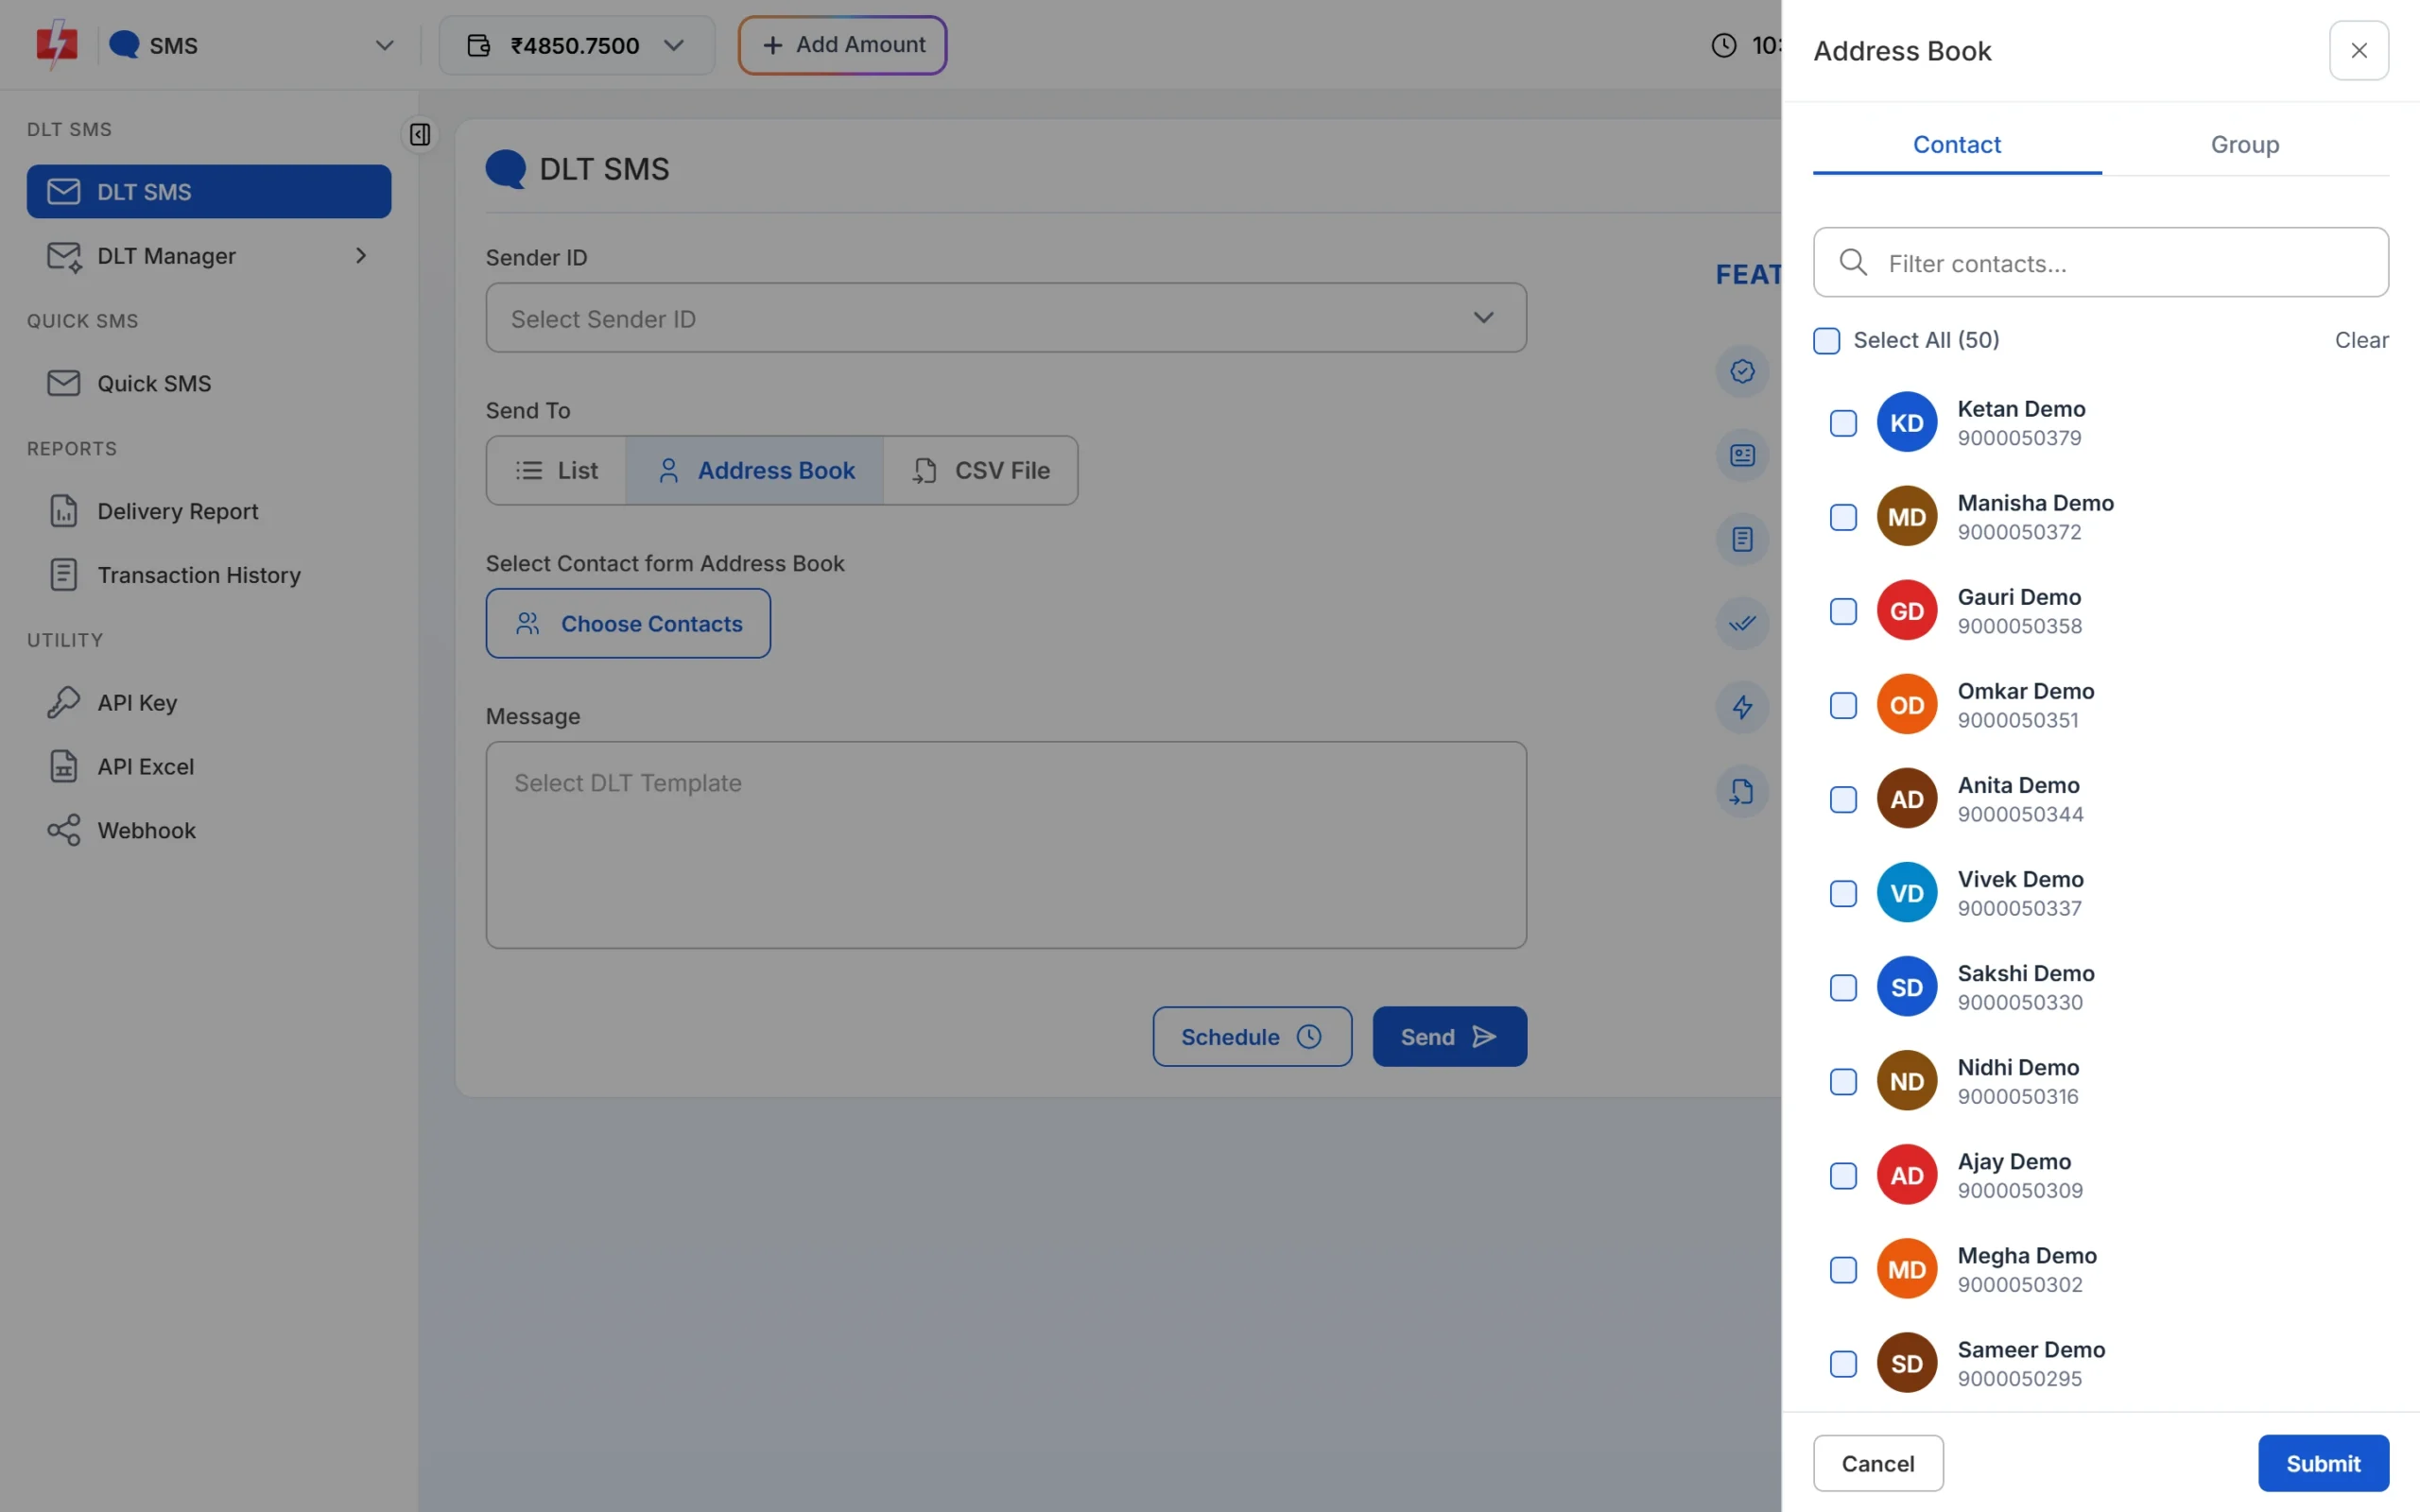
Pick contacts or a whole group when you send. With Address Book you type the variable values once, and the same values go to everyone. For a different name or amount per person, use Method 1.
Why were some numbers skipped?
| What you see | Why | Fix |
|---|---|---|
| Invalid Number count in the popup | The number is too short, too long or not a mobile number | Check the number column. Remove letters, spaces and text like “N/A”. |
| Duplicate Numbers count | The same number appears more than once | Nothing to do. Duplicates are removed and not charged. |
| “N invalid numbers ignored” after an Address Book import | Only 10-digit numbers starting with 6, 7, 8 or 9 are saved | Fix those rows. A 91 or 0 in front is fine, the last 10 digits are kept. |
| “No new valid contacts found in the sheet.” | All numbers are invalid or already in your Address Book | Check the Number column you picked. |
| “No data found in sheet.” | The file has no header row or no rows | Add a header row and save again. |
| “Please upload a CSV or Excel file.” | Wrong file type in Address Book | Use .csv, .xlsx, .xls or .txt. |
| Only names and numbers came into Address Book | Import saves just those two columns | Use Method 1 when you need other columns in the message. |
| Numbers look like 9.1E+09 | Excel changed long numbers to scientific format | Format the column as Text or Number with 0 decimals, then save again. |
Frequently asked questions
Can I upload an .xlsx file directly to send SMS?
On the DLT SMS page the upload takes .csv files only, so save your sheet as CSV first. Address Book import accepts .xlsx and .xls directly.
How many numbers can I upload at once?
The DLT SMS page takes a CSV file of up to 20 MB, which is enough for a very large list. Your wallet balance must cover the full cost shown in the confirmation popup.
How do I send each customer’s name in the SMS?
Your DLT template needs a {#var#} where the name goes. Upload a CSV with a Name column and choose that column in “Select column to send in {#var#}”.
Do I need to add 91 before the numbers?
No. 10-digit mobile numbers work. In Address Book import, a 91 or 0 in front is removed and the last 10 digits are kept.
Am I charged for invalid or duplicate numbers in my file?
No. The confirmation popup lists them separately and only valid numbers are charged.
Can I schedule an SMS campaign from an Excel file?
Yes. After uploading and mapping, click Schedule instead of Send and pick the date and time.
Can I send Quick SMS from Excel?
Yes. The Quick SMS page also has a CSV File option. Quick SMS from a CSV with fewer than 4 numbers is always held for review before sending.
Can I send SMS from Google Sheets?
Download the sheet as a CSV file (File > Download > Comma-separated values) and upload it on the DLT SMS page.