This guide shows how to send DLT SMS from the Fast2SMS panel, one click at a time. It is for anyone whose DLT Sender ID and template are already approved and who wants to send a campaign without writing code. By the end you will know how to pick numbers in three ways, fill template variables, schedule, check the cost and read the report.
Before you start
- A Fast2SMS account with enough wallet balance. You can recharge any time with Add Amount at the top of the panel.
- An Approved Entity ID, Sender ID and Content Template in DLT Manager, with the template linked to that Sender ID. If you have not done this yet, follow the DLT Manager guide.
- Your PE-TM binding done, so operators do not block your SMS.
- Your mobile numbers: typed, saved in Address Book, or in a .csv file.
How to send DLT SMS from the Fast2SMS panel
-
Open the DLT SMS page
From the home screen, open the SMS app and click DLT SMS in the left menu. You will see the form with Sender ID, Send To and Message, and the Schedule and Send buttons at the bottom.
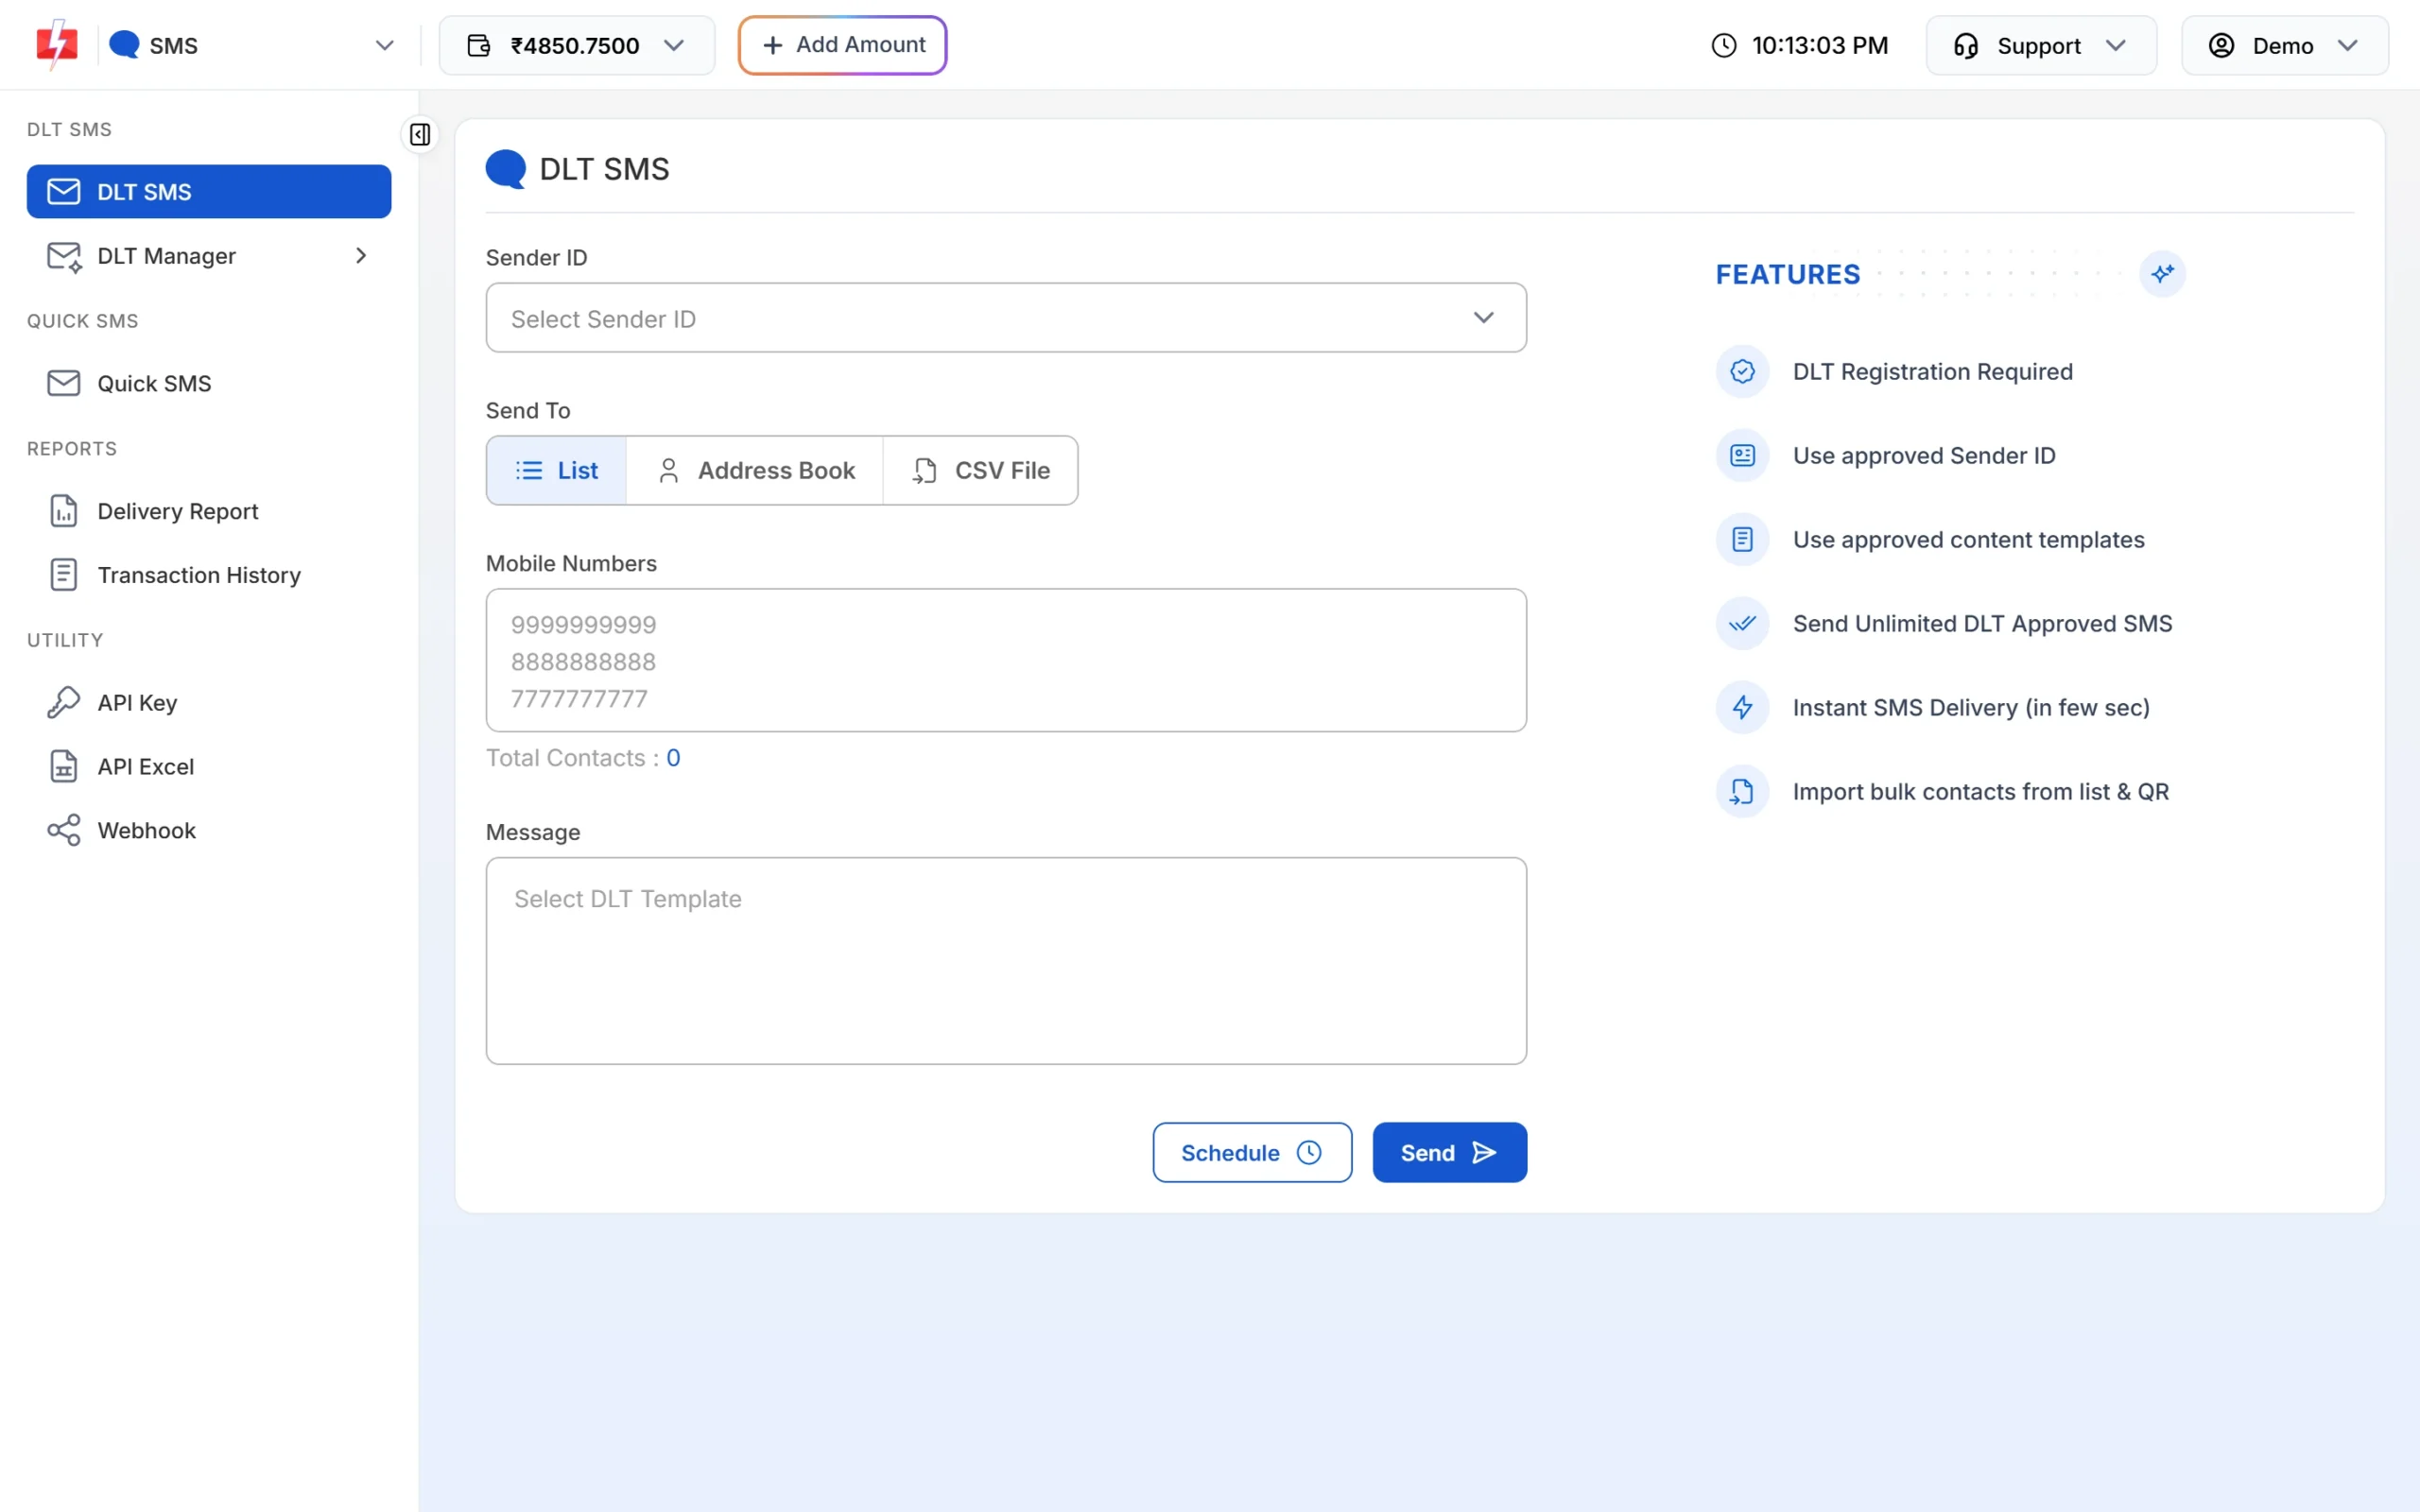
The DLT SMS form in the SMS app. If you see “DLT Registration Required” instead, your account has no Entity ID yet. Add it first in DLT Manager.
-
Choose your Sender ID
Click Select Sender ID. The list shows only your approved Sender IDs. Type in the search box to find one quickly. If the one you need is missing, it is not approved yet. You can click Add New Sender ID at the bottom of the list to add it.
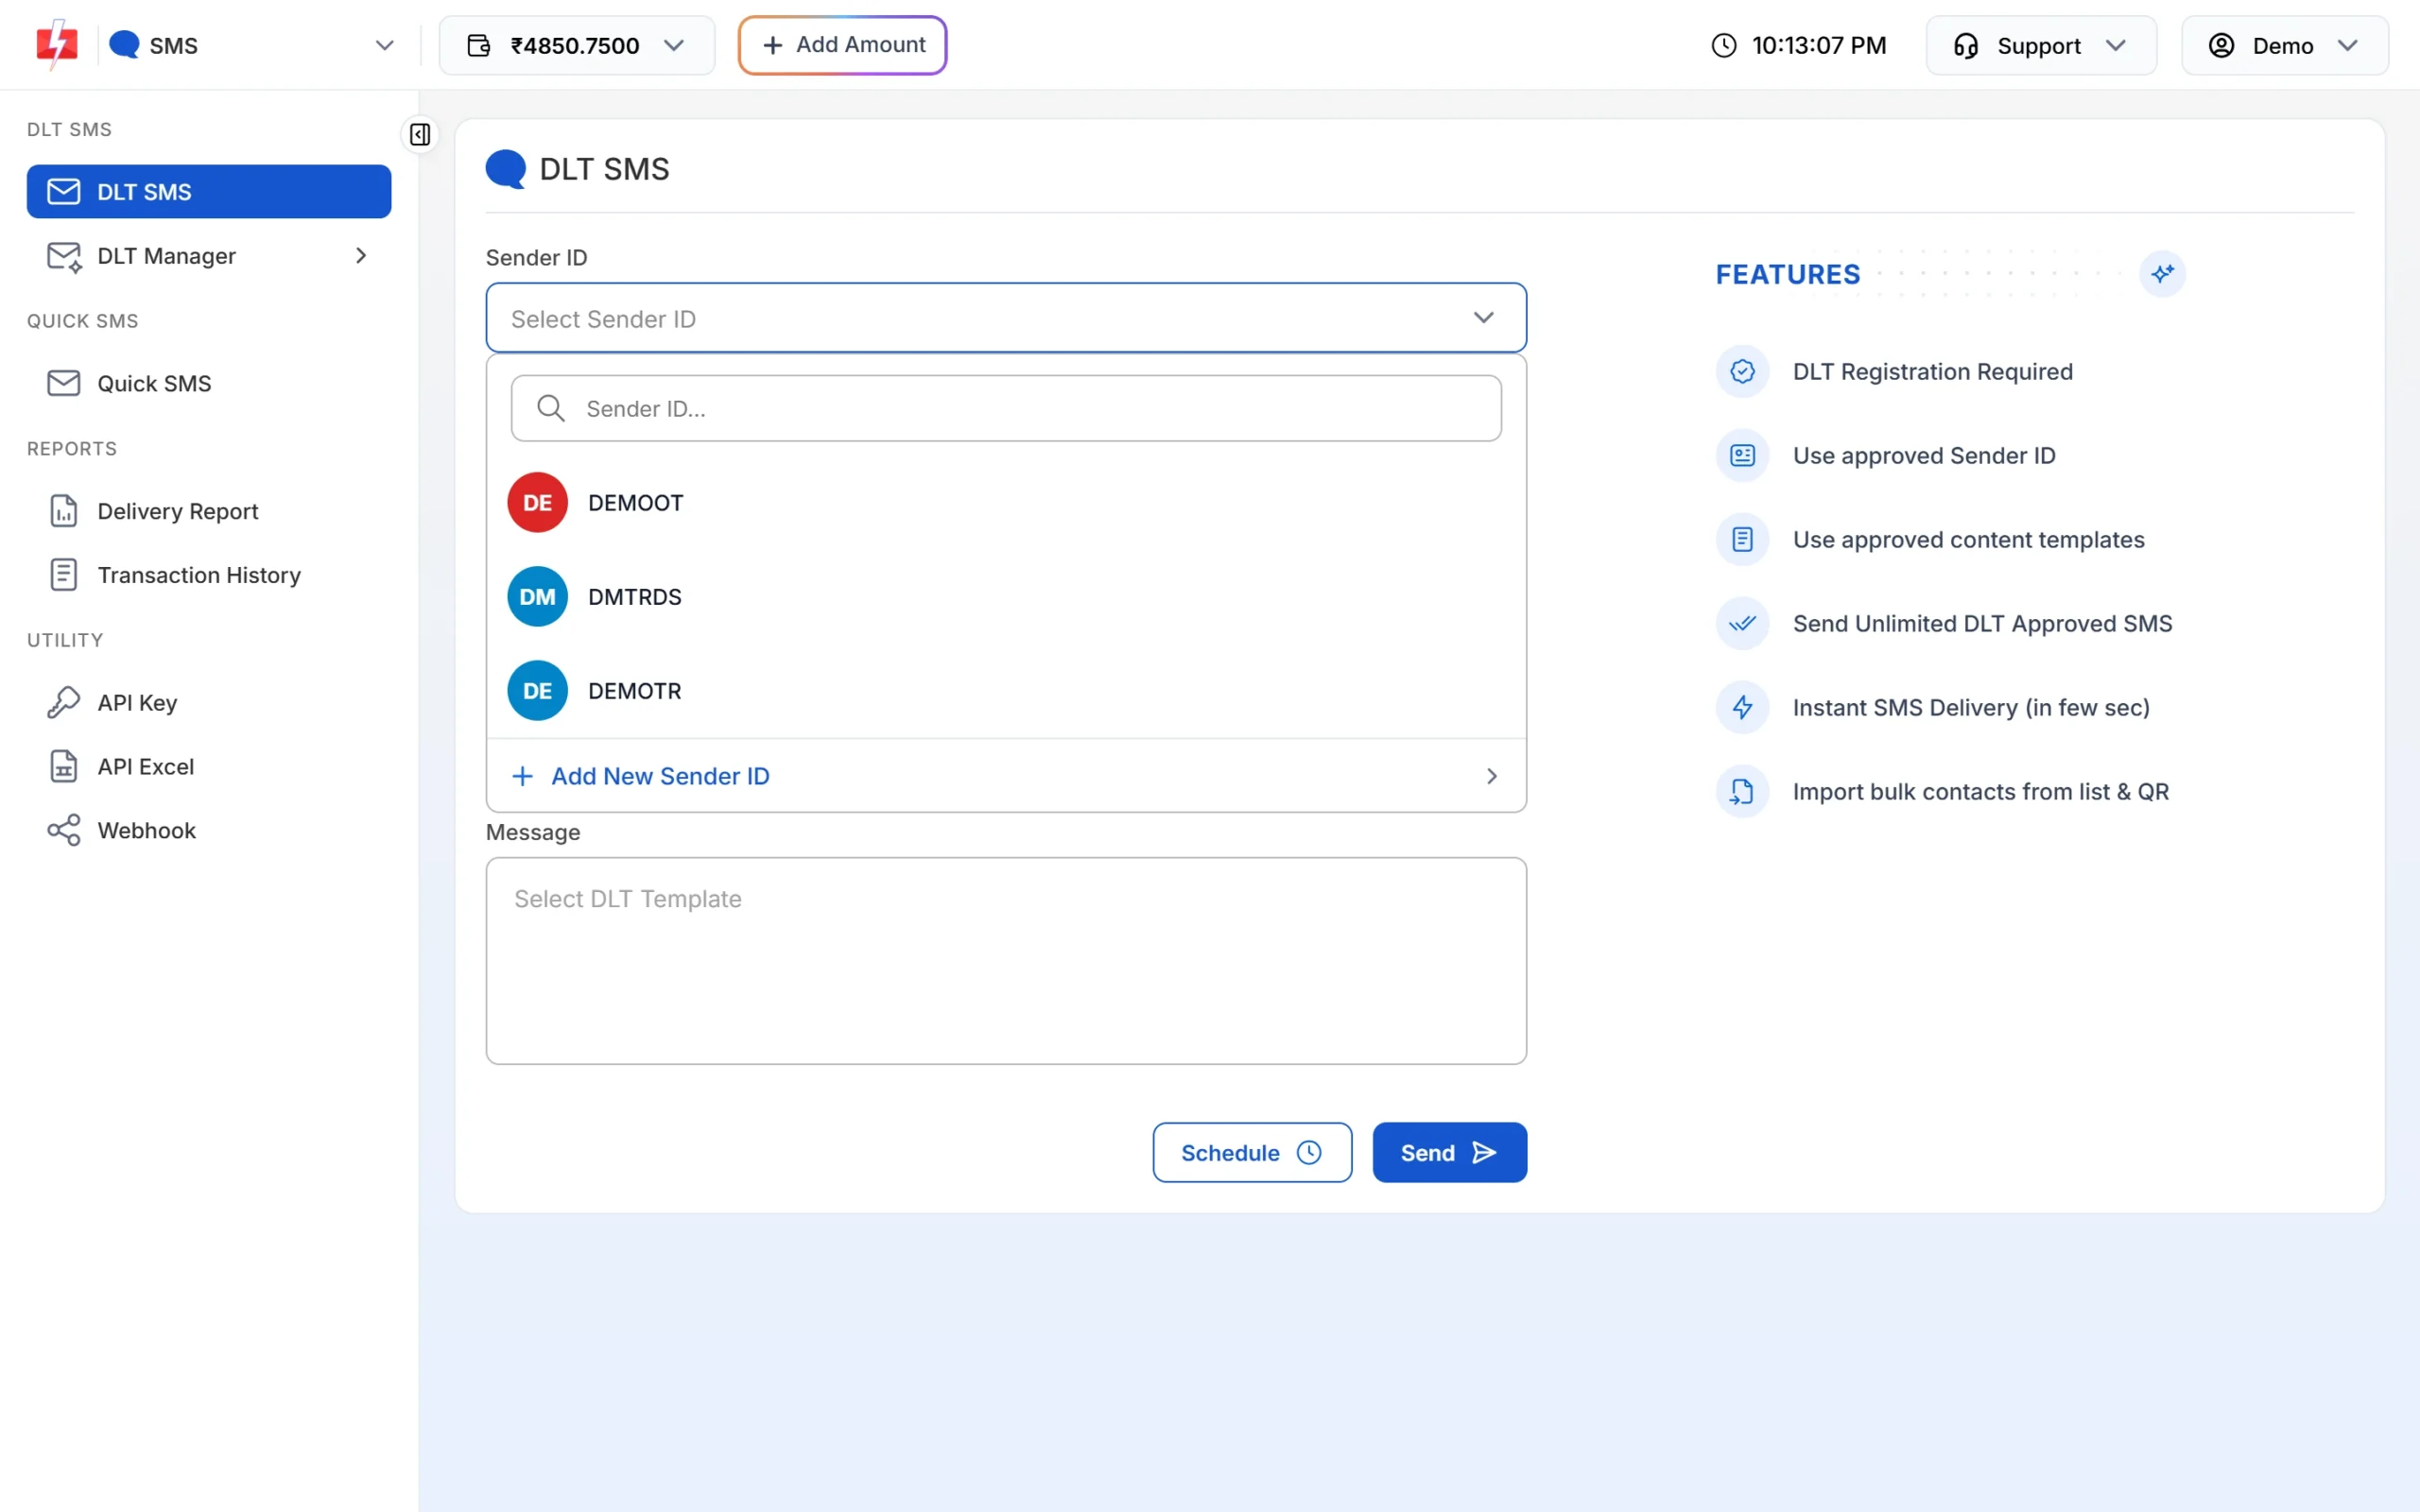
Only approved Sender IDs appear here. -
Add your numbers: type or paste a list
Under Send To, the List tab is open by default. Type or paste 10-digit mobile numbers, one per line. The Total Contacts count below the box updates as you add numbers, and each number gets a small x to remove it.
If your list has a few repeated or wrong numbers, that is fine. Before sending, the panel counts them as duplicate or invalid, removes them and does not charge for them.
-
Or pick contacts from Address Book
Click the Address Book tab, then Choose Contacts. A panel opens on the right with two tabs: Contact and Group. Search with “Filter contacts…”, tick the people you want or use Select All, then click Submit. Your choice shows under Selected Recipients with a total count.
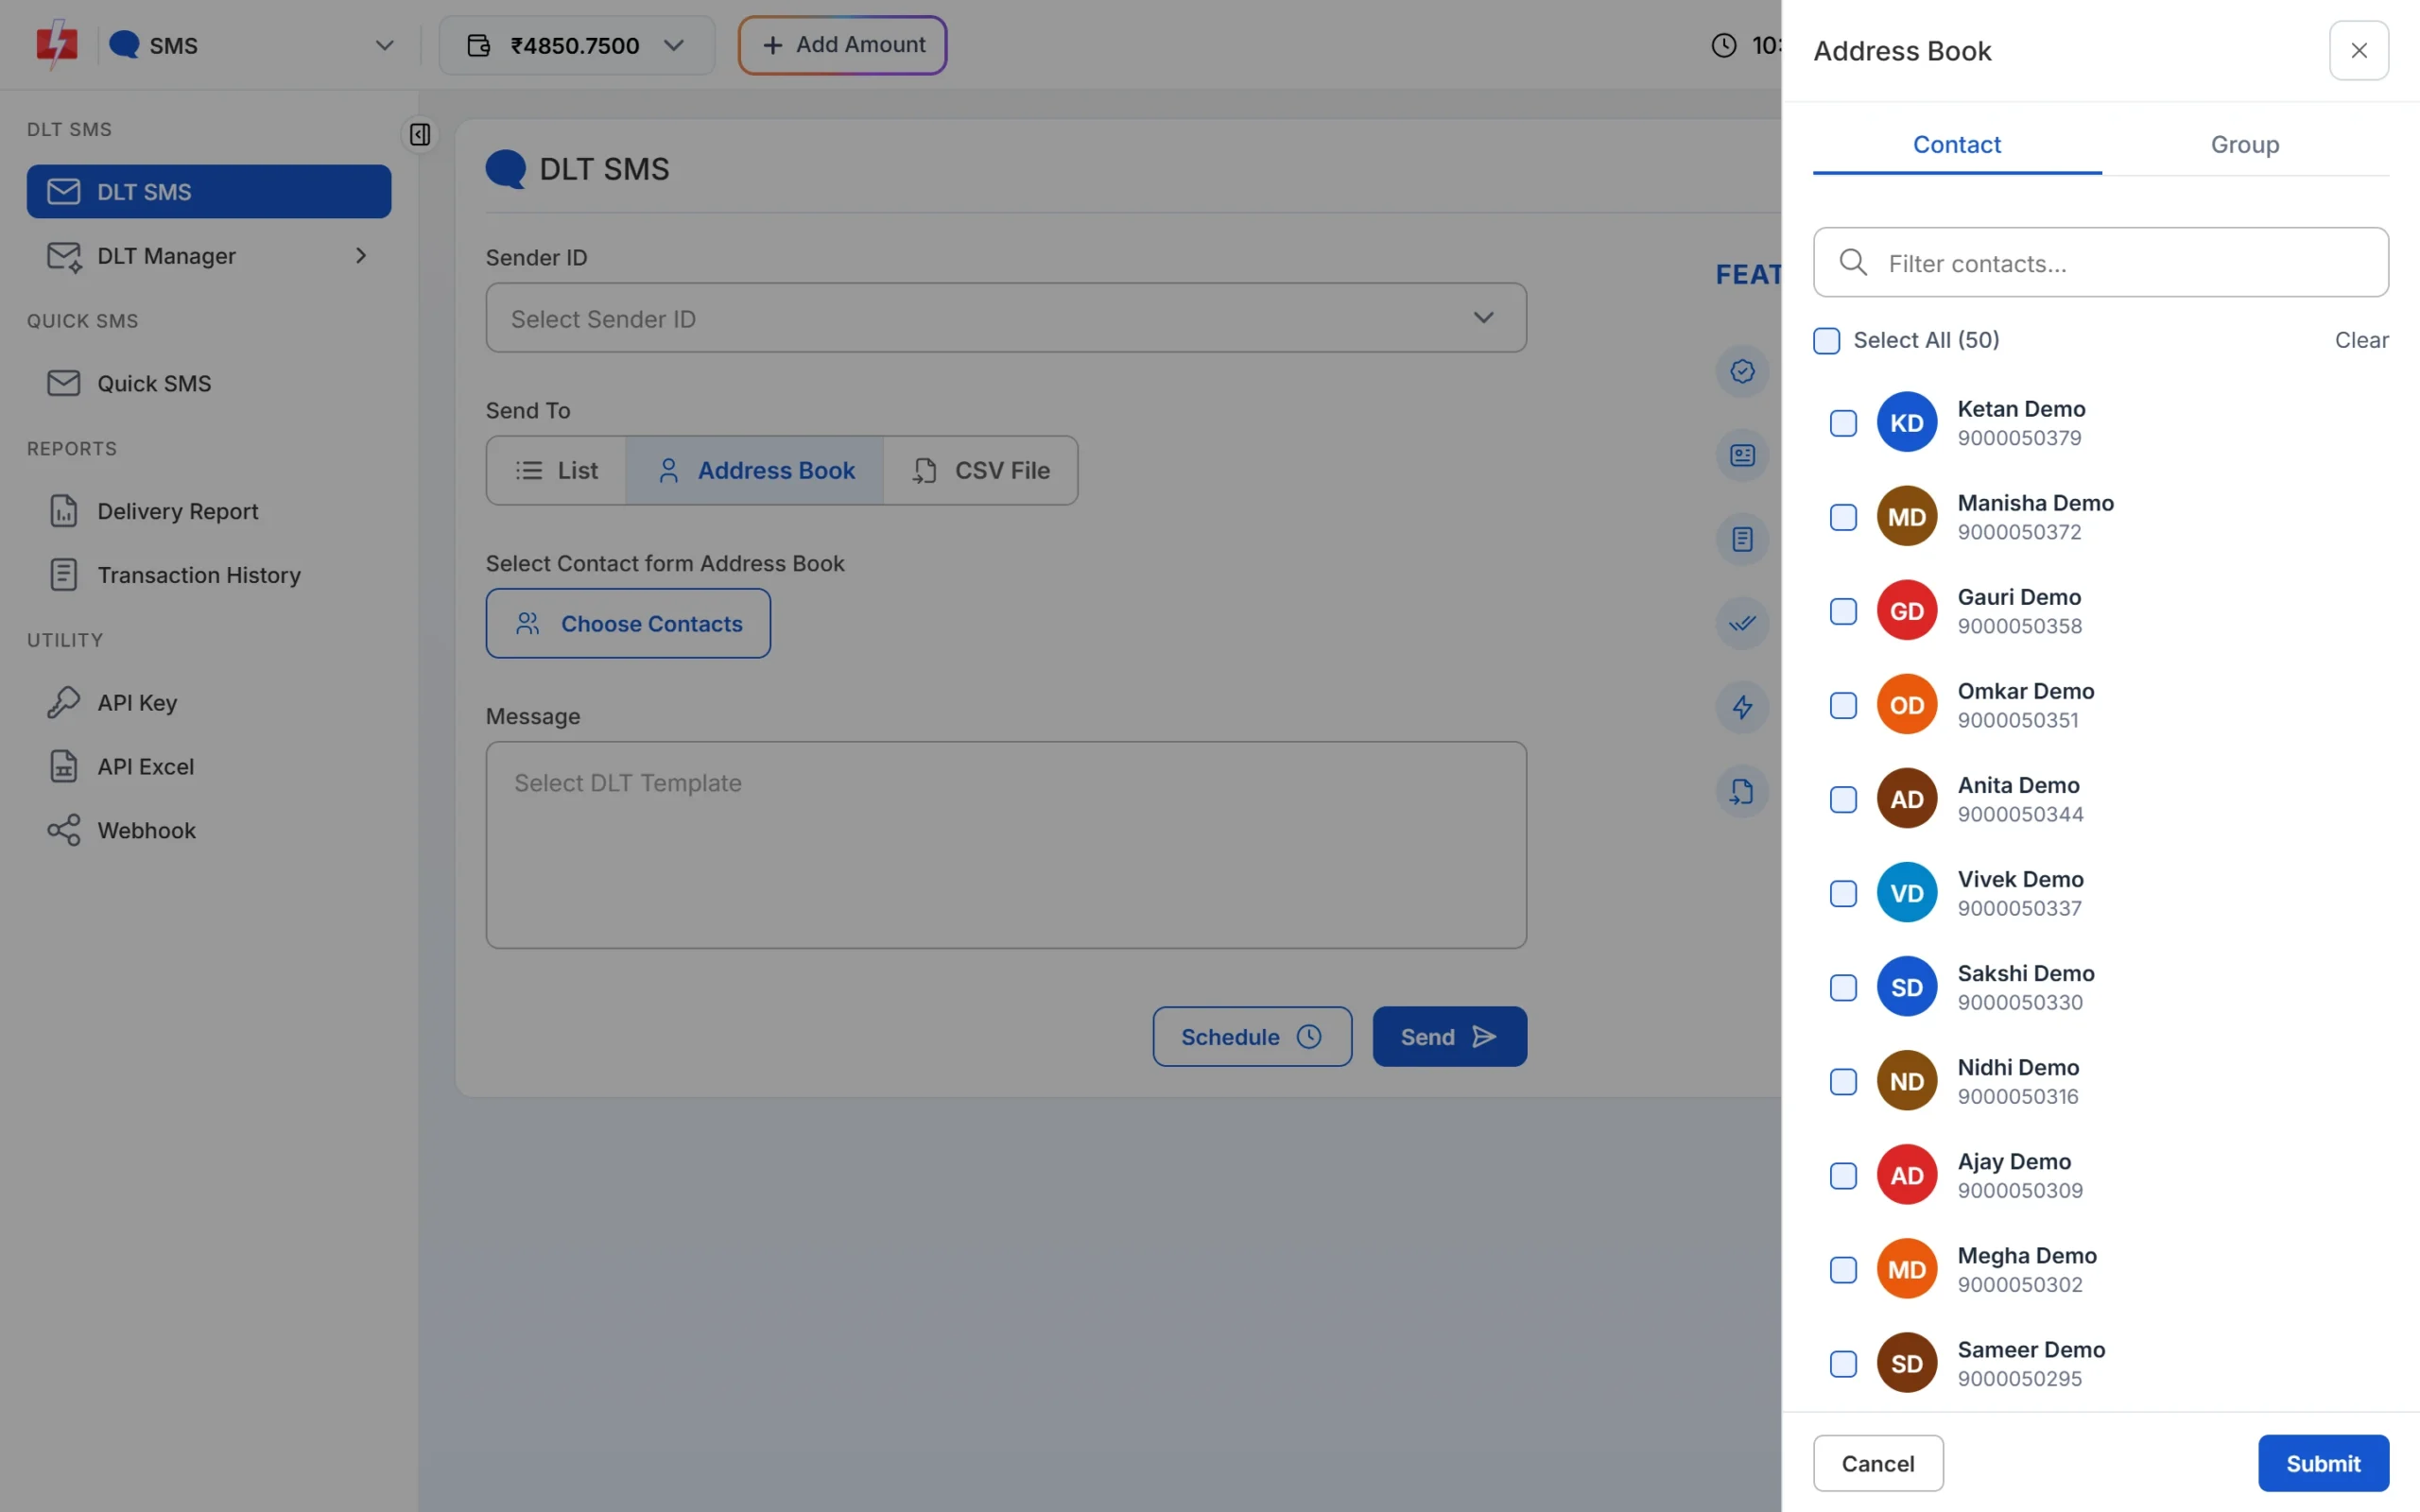
Pick single contacts or whole groups from your Address Book. -
Or upload a CSV file
Click the CSV File tab and then Click to upload. The file must be a .csv and not more than 20 MB. Use the Sample CSV link if you want a ready format. After upload you see a preview of the first rows. Then choose the column under “Select Column Name which has Mobile Numbers”.
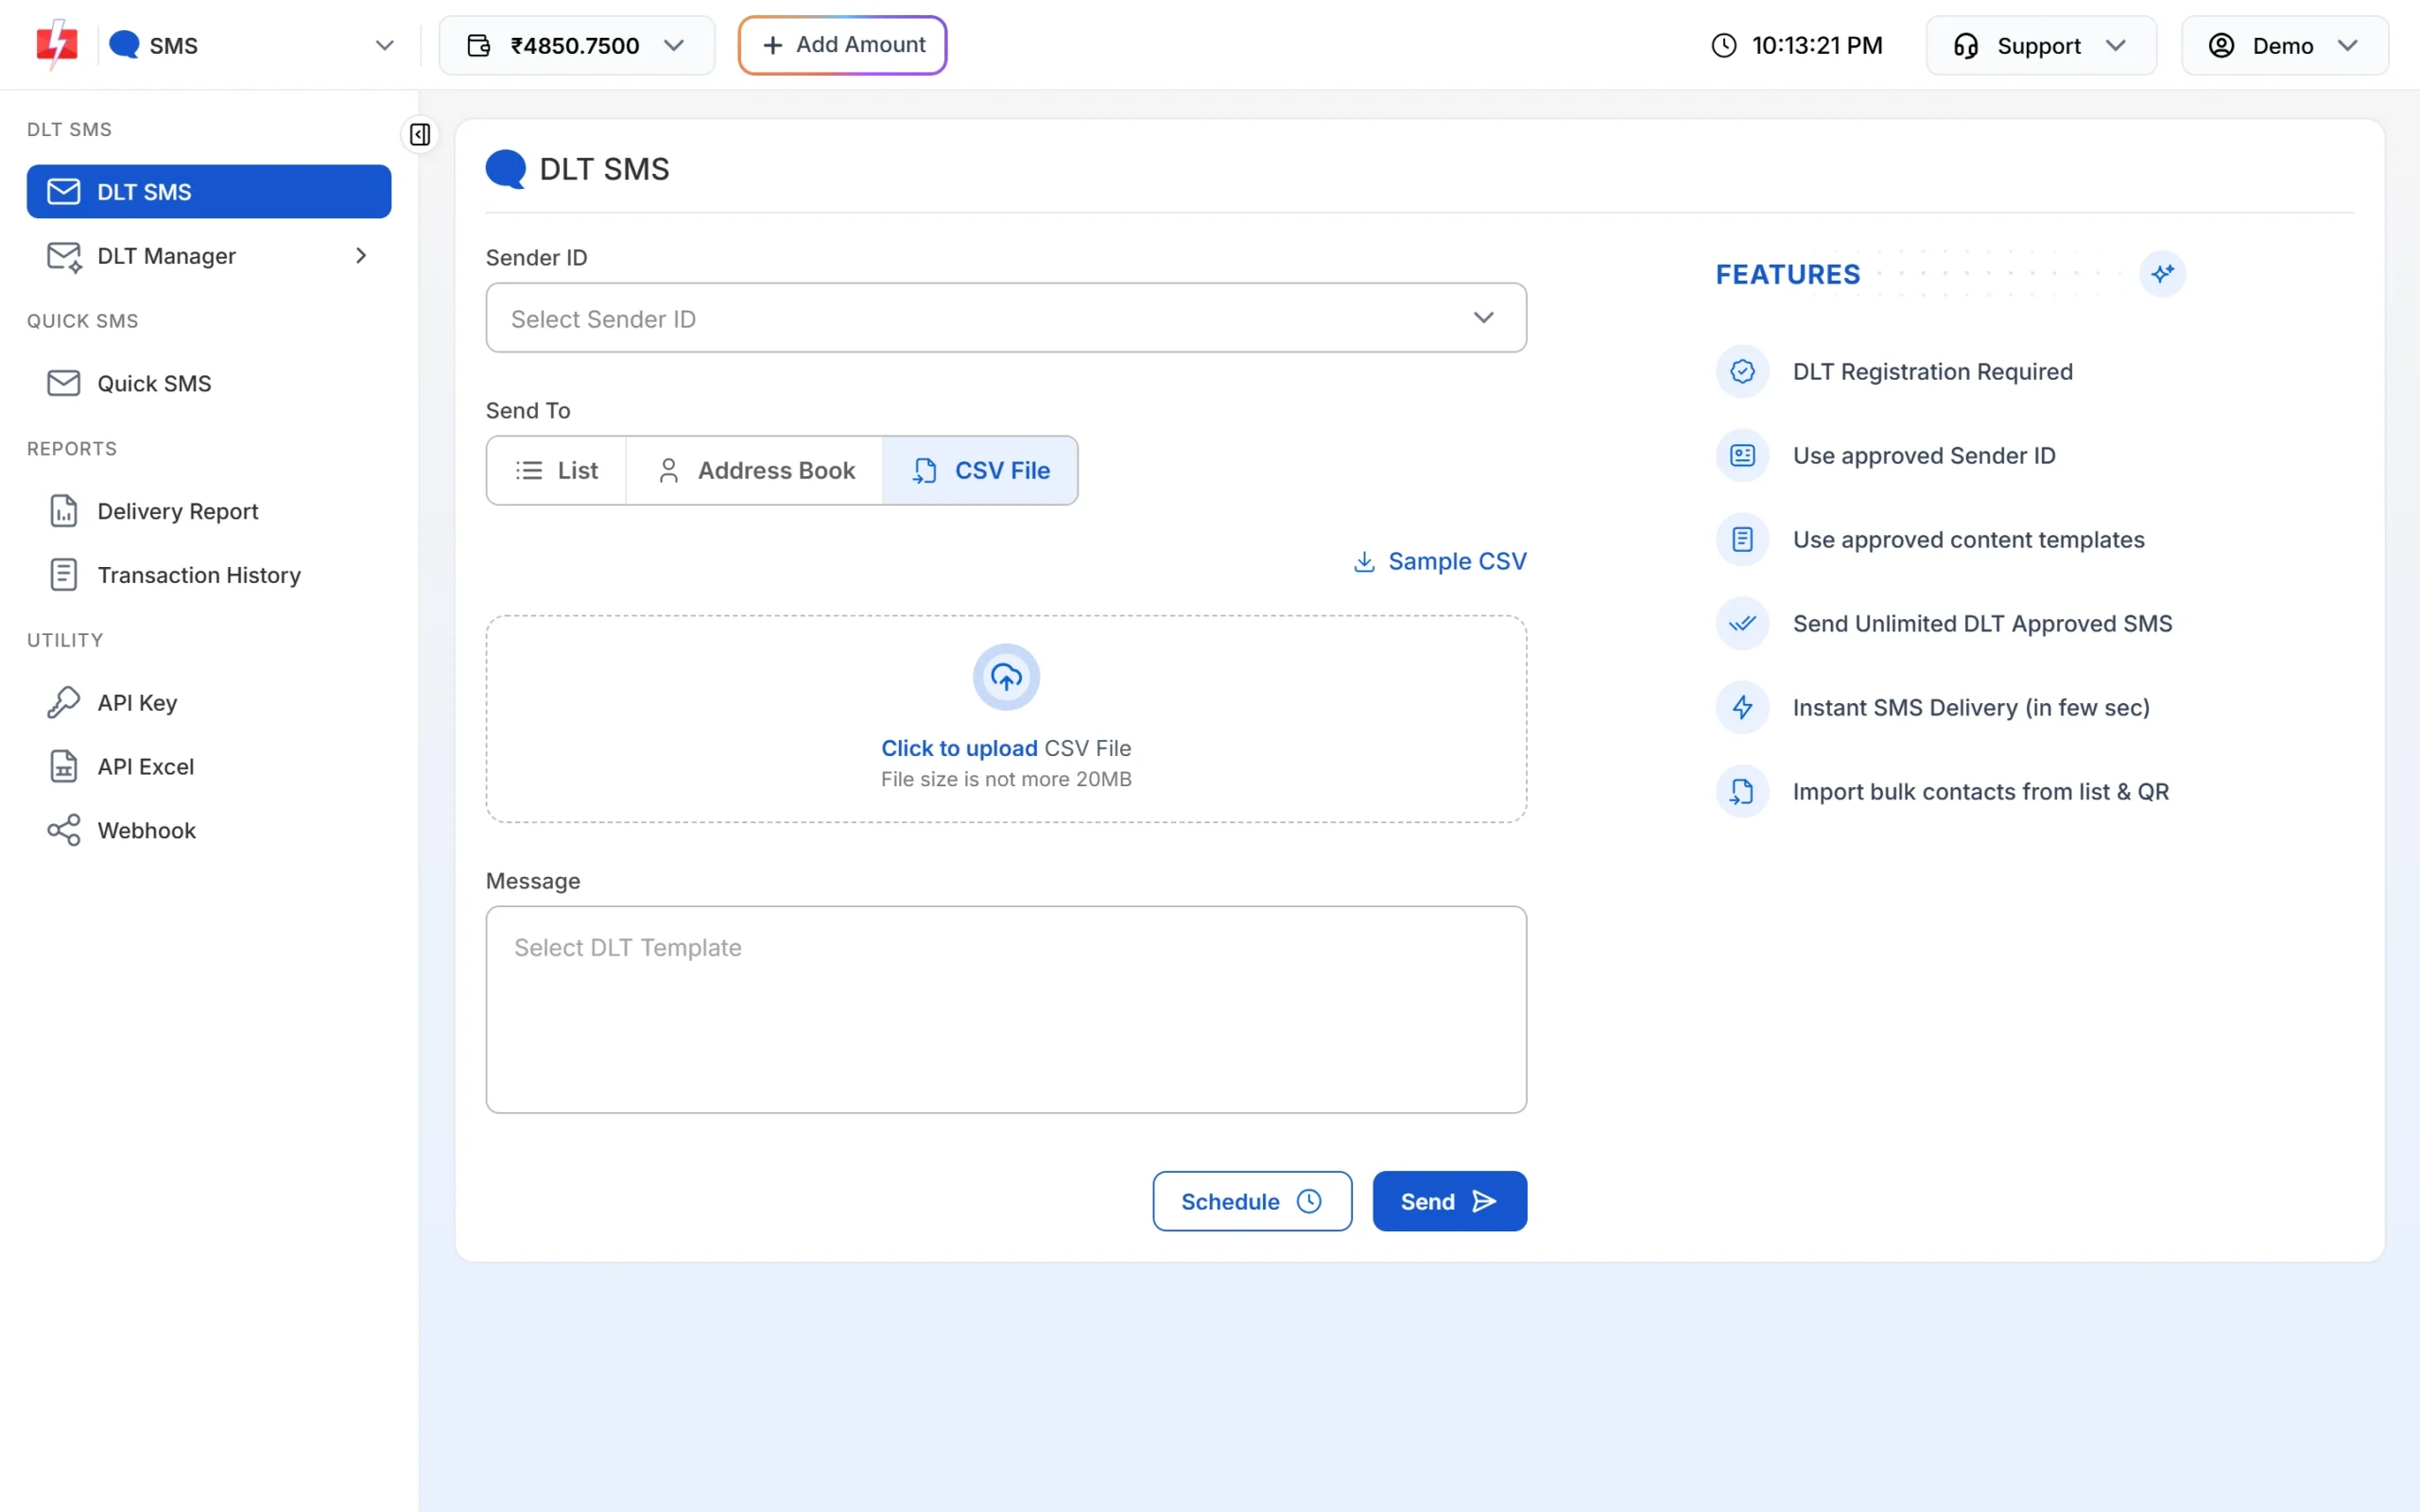
Upload a CSV when each person needs different values, like name or amount. A CSV is the best choice for personal messages. In the next steps you can fill each template variable from a column of the file, so every customer gets their own name, order number or amount.
-
Select your DLT template
Click the Message box that says “Select DLT Template”. A window opens with the templates linked to the Sender ID you picked. Use the tabs All, Service Implicit (transactional) and Service Explicit (promotional), or search by “Message Text Or Template ID”. Each template is shown as a phone preview with your sender name on top, a Service Implicit or Service Explicit label, and red {#var#} boxes where the variable parts go. Click a template to choose it.
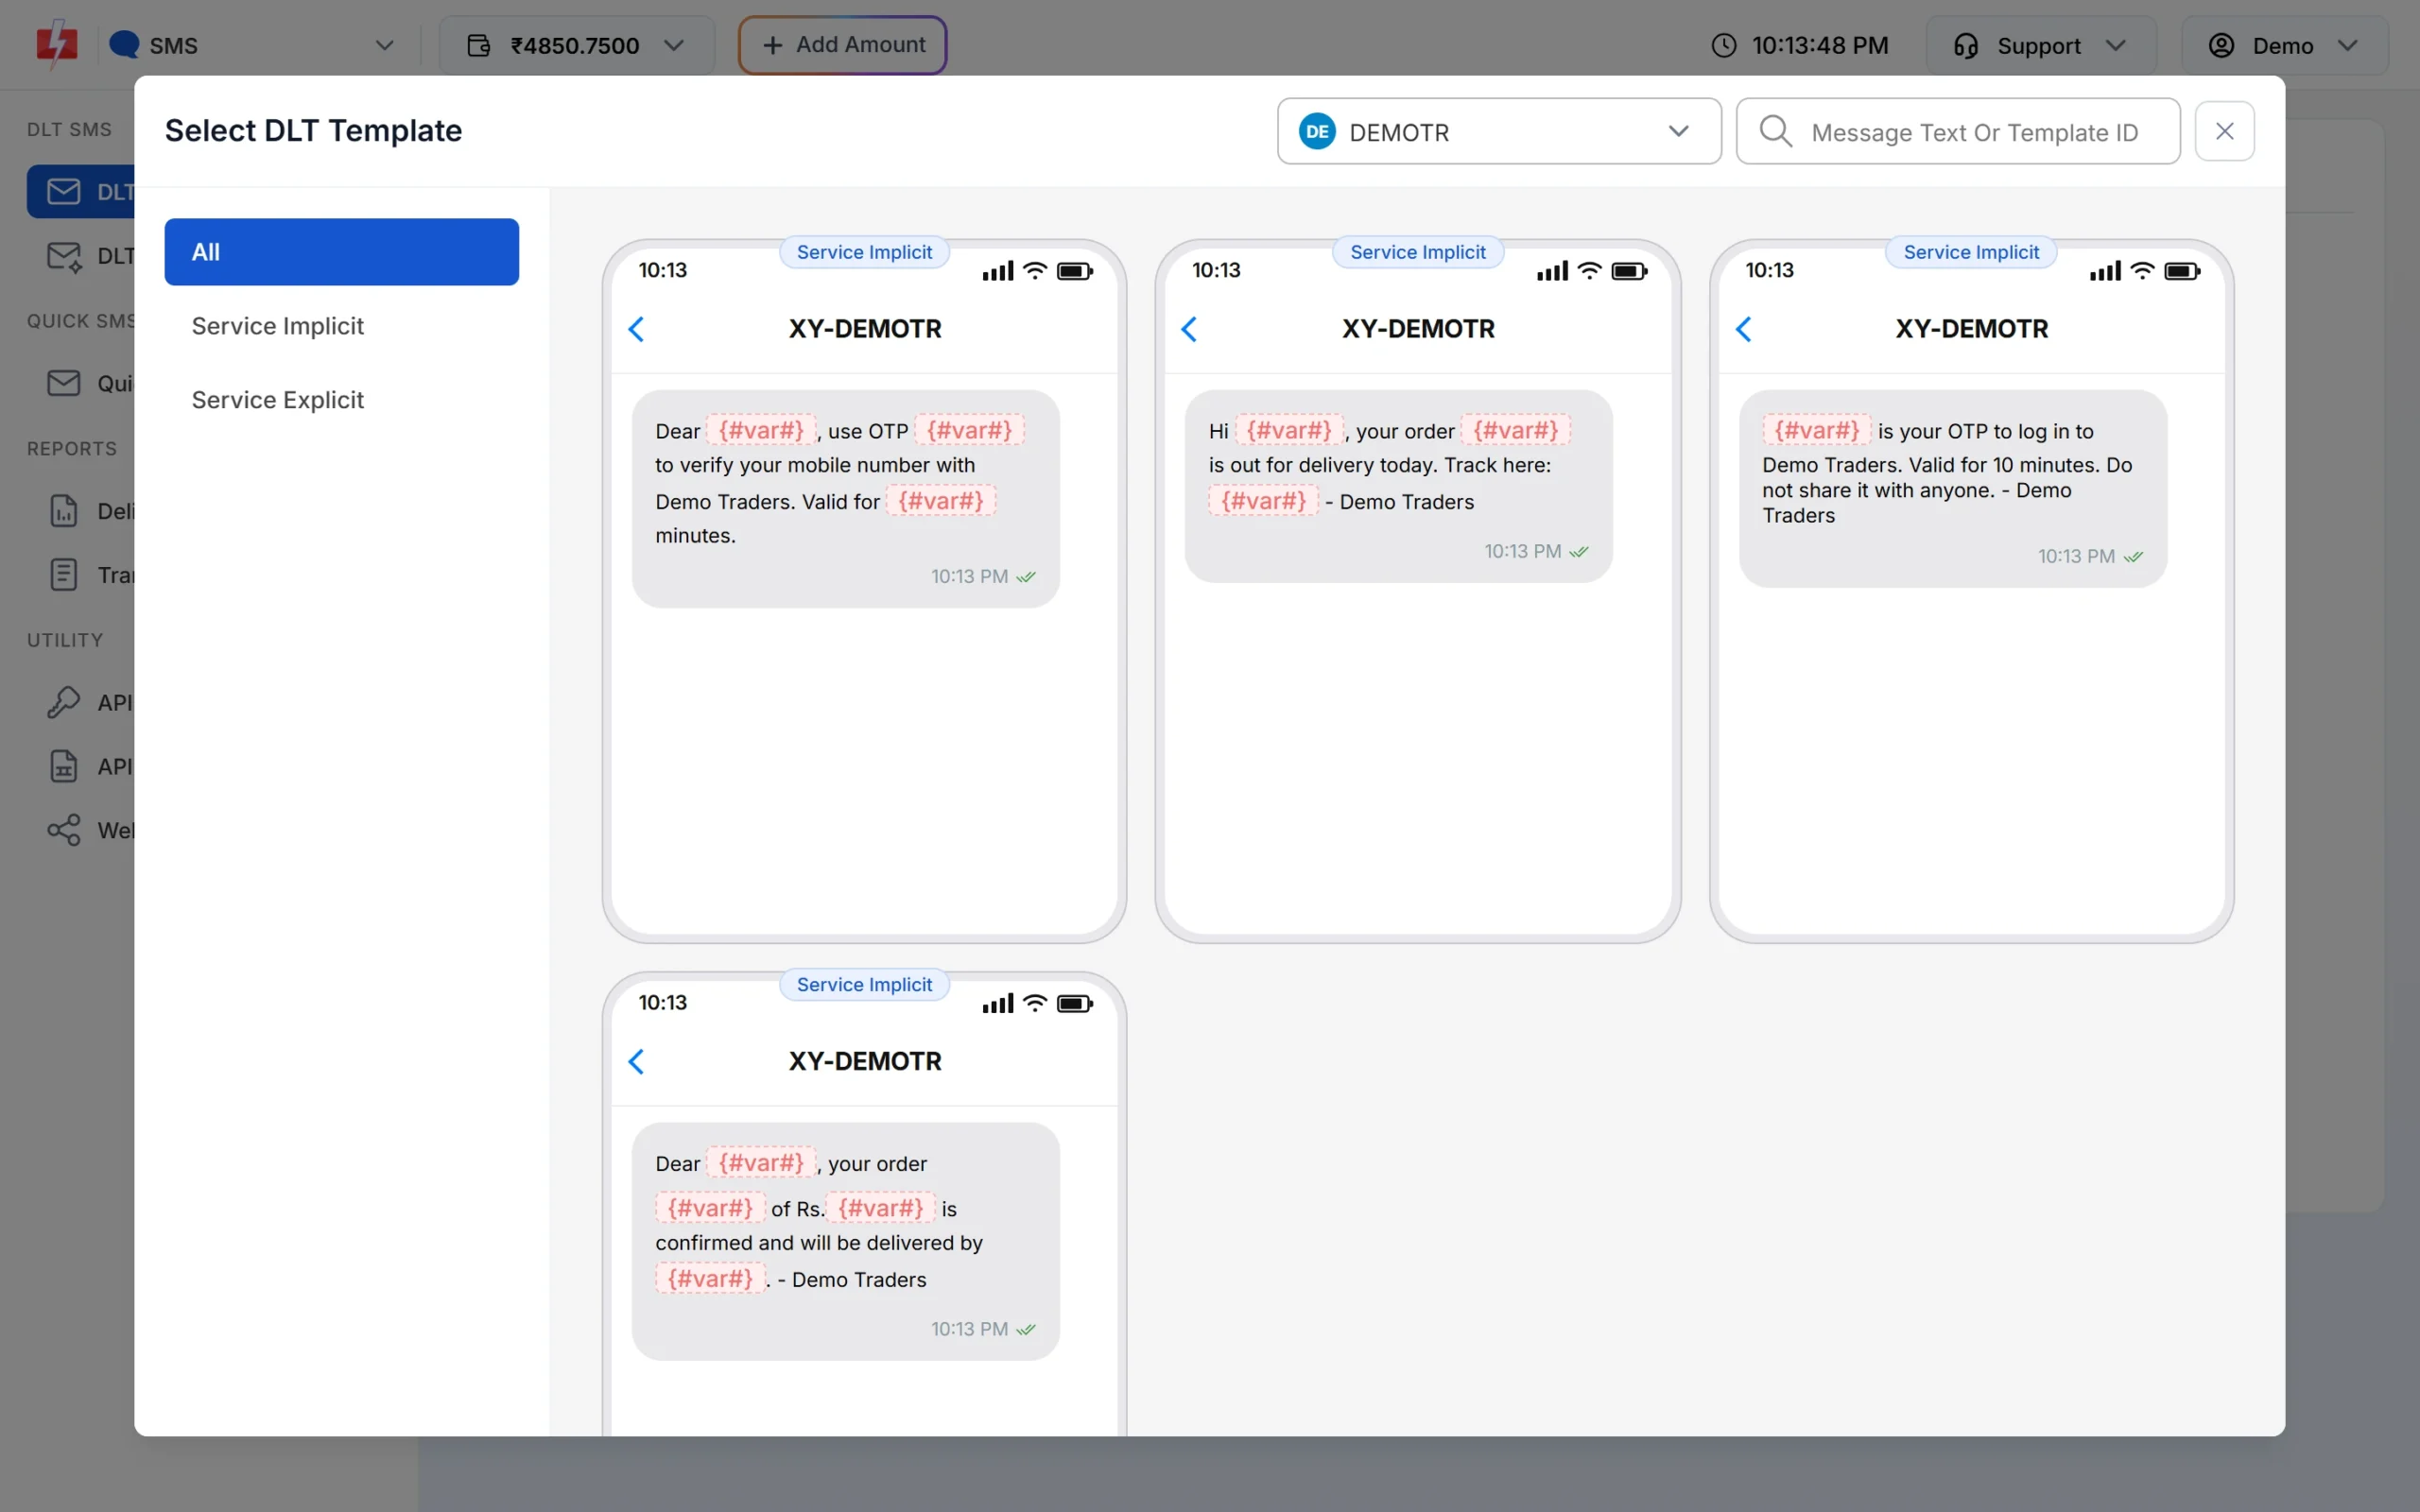
The template picker shows only approved templates linked to the chosen sender. After you pick one, the Message area shows a card such as “Template 10001” with “Template Type : DLT”. The number is the template’s Message ID. Use Change Template if you picked the wrong one.
Only Approved templates linked to the chosen Sender ID are listed. If a template is missing, check its status and linked senders in DLT Manager > Content Template. -
Fill the variables
Every {#var#} place in your template gets its own field below the template card, named Variable 1 ({#var#}), Variable 2 ({#var#}) and so on, in the same order as in the text. For a List or Address Book send, type a value in each field. The same values go to every number.
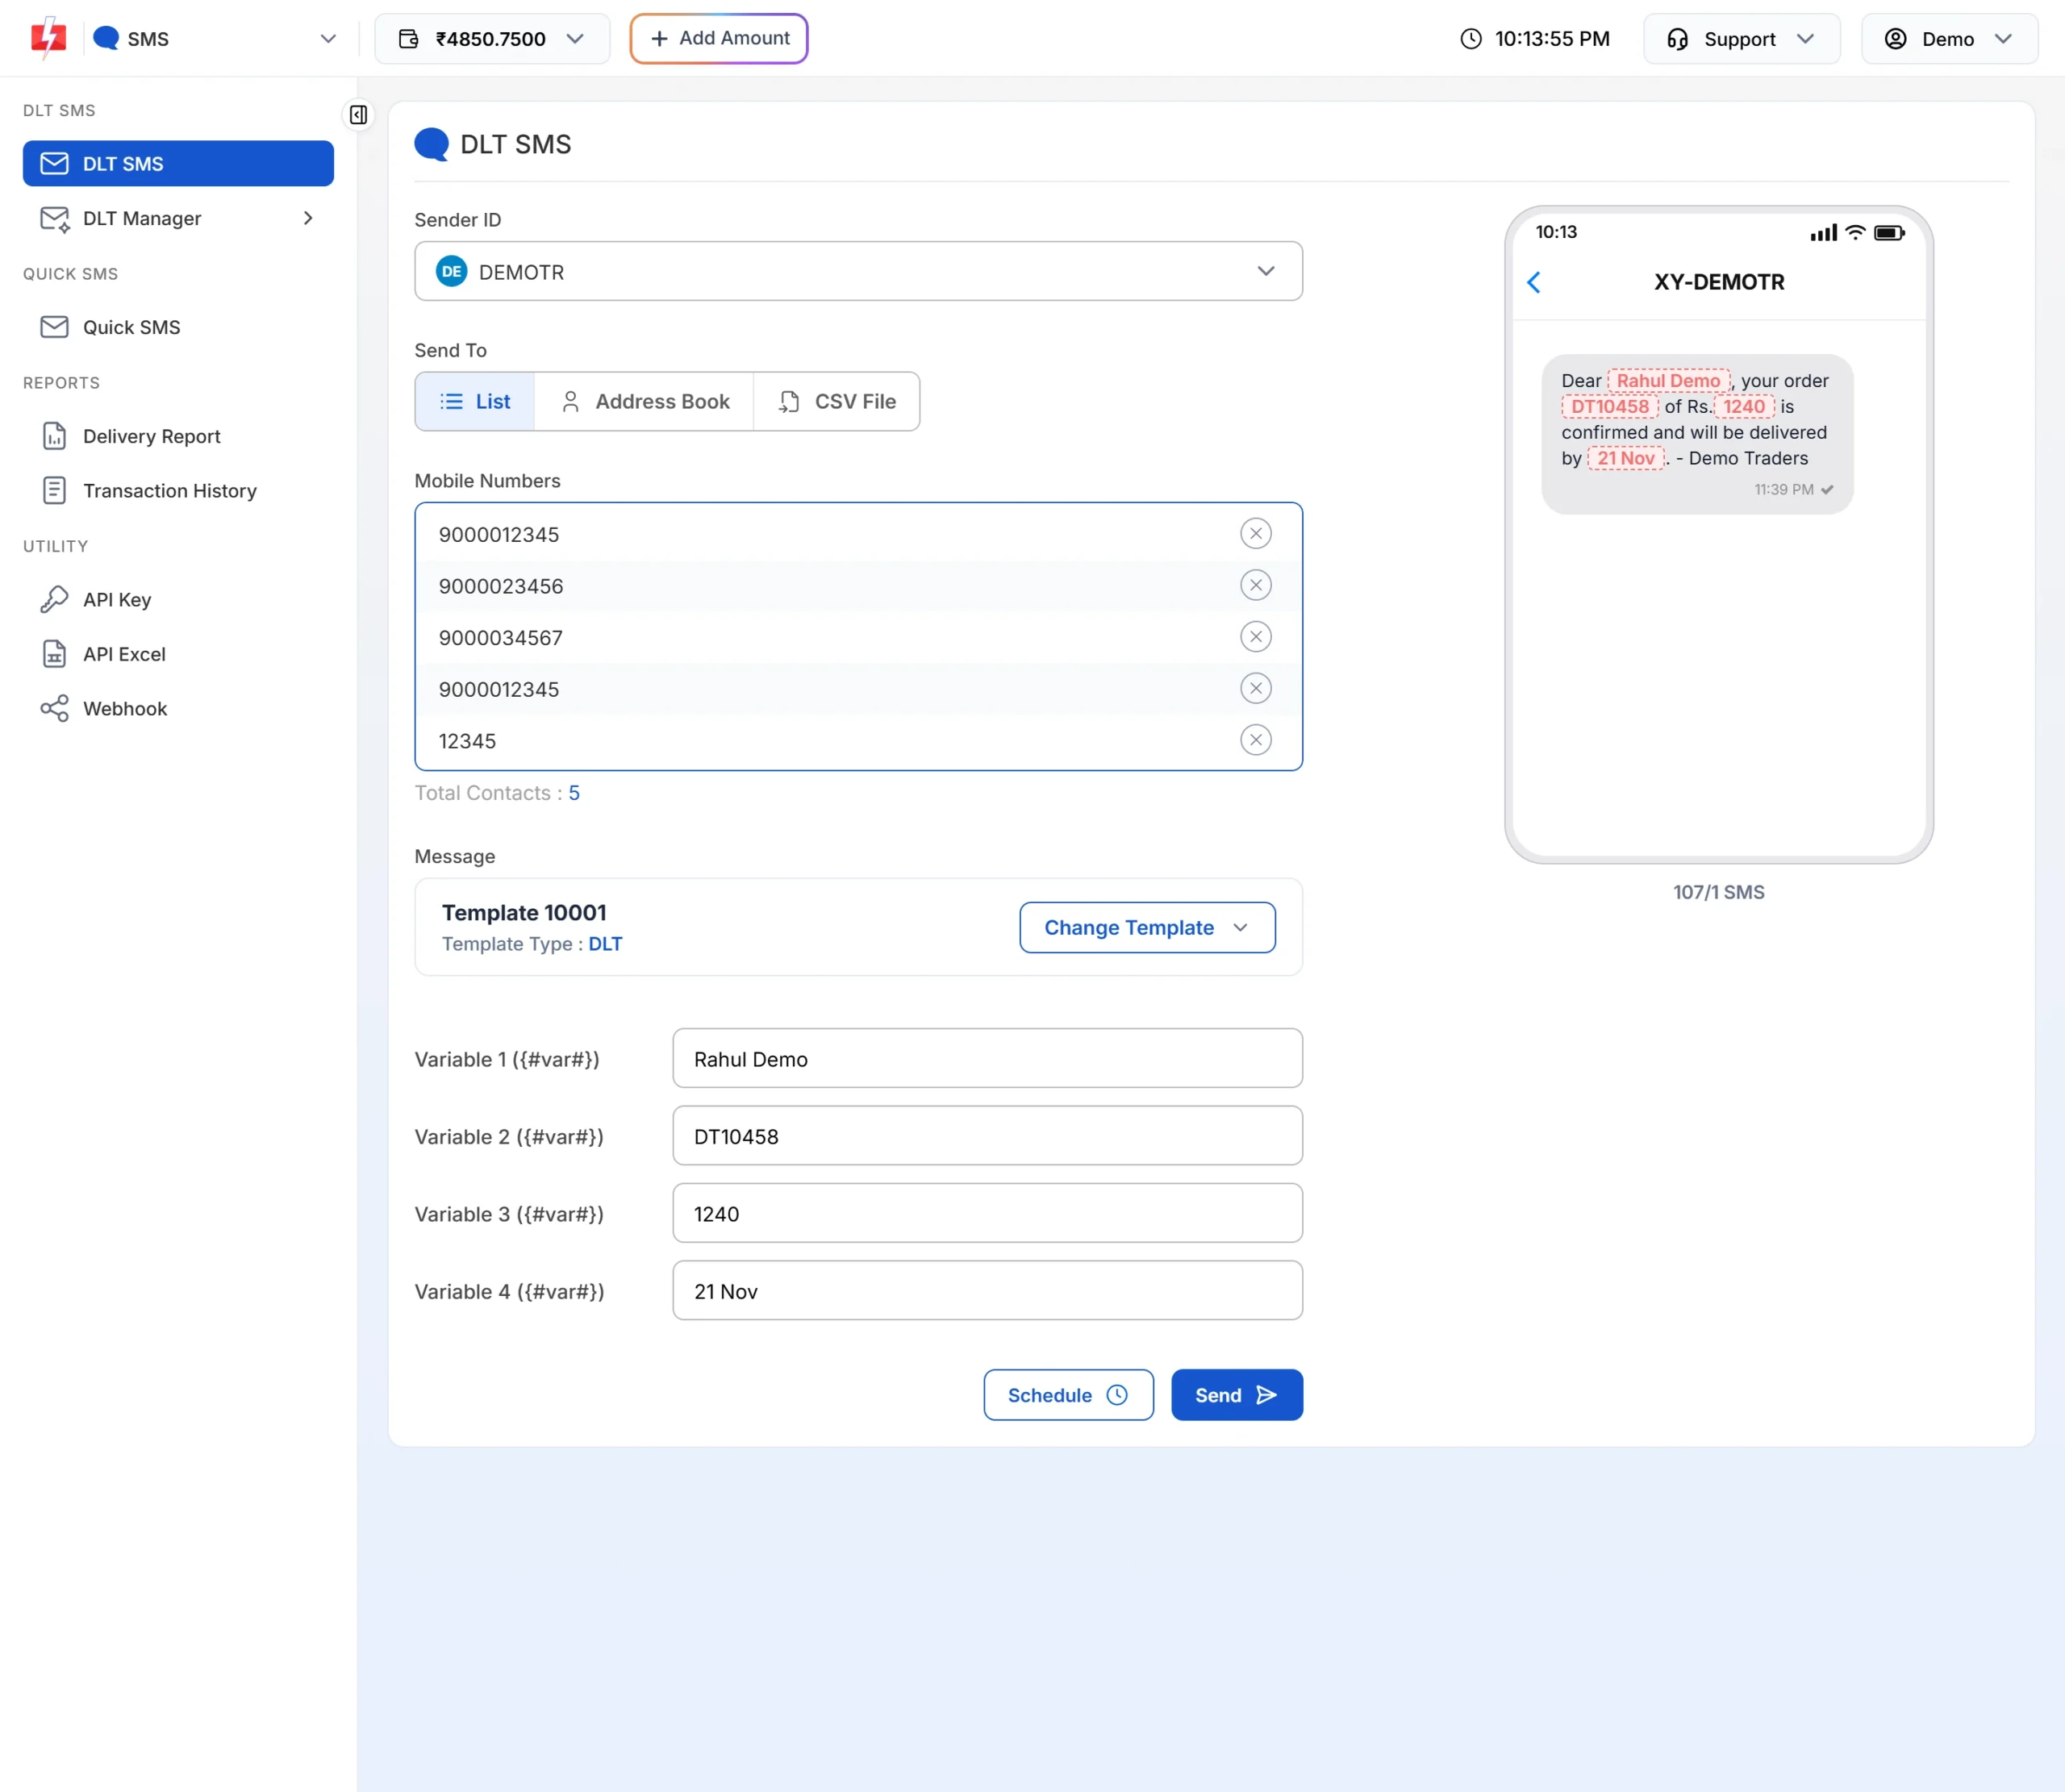
Template 10001 with four variables filled. The preview on the right shows the final SMS and 107/1 SMS. For a CSV send, click “Select column to send in {#var#}” and choose the column from your file, or type a fixed value in “Or type a custom value”.
The phone preview on the right shows the final message with your sender name and the values you typed. The counter below it shows characters and SMS parts: 107/1 SMS means 107 characters in 1 SMS part. An English SMS fits 160 characters in one part. Hindi or any non-English text is Unicode and fits 70 characters in one part. Longer text uses more parts, and each part is charged.
-
Schedule it (optional)
To send later, click Schedule instead of Send. In the panel that opens, choose the Select Date range and Enter Time, then click Schedule.
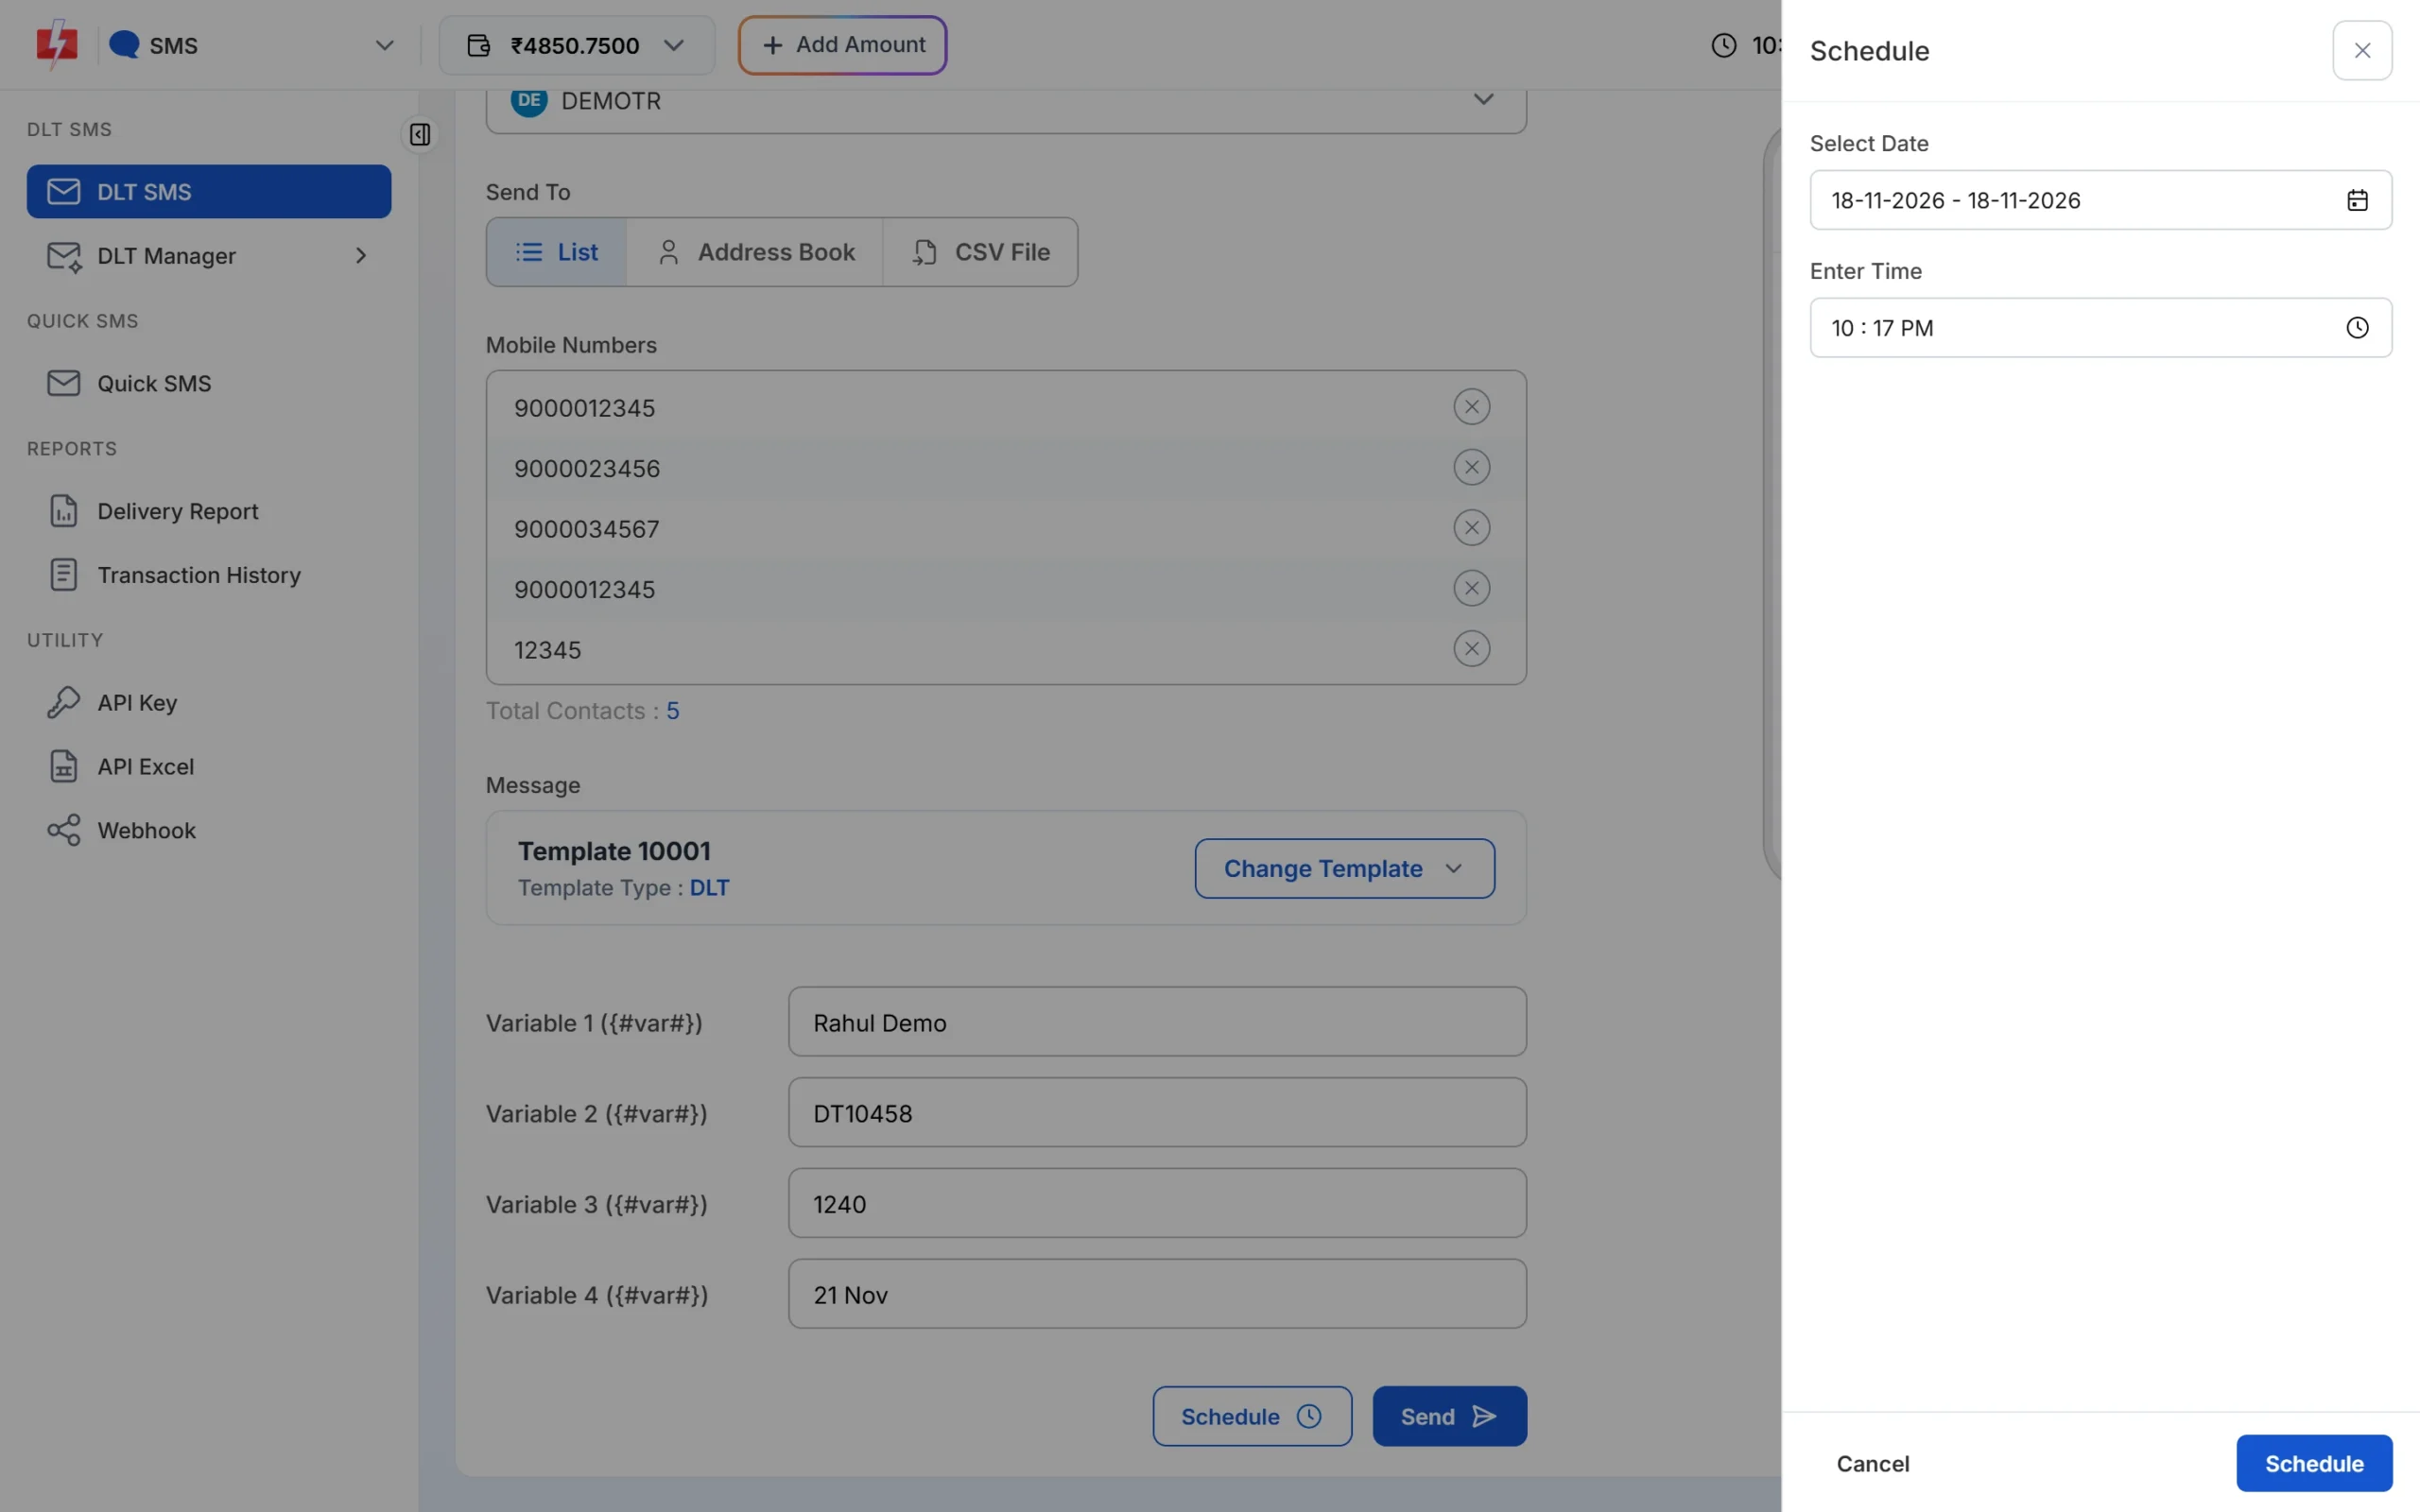
Pick one date to send once, or a range to send every day. - One date sends the campaign once.
- A date range sends it once every day at the same time. The cost is multiplied by the number of days.
- The time must be at least one minute in the future.
-
Click Send and check the confirmation popup
Click Send. The panel checks your sender, template, numbers and balance, but does not send anything yet. You then see the Message Preview & Confirmation popup with:
- Cost per SMS: your current rate per SMS part
- Total Messages: SMS parts per number
- Total Numbers, Duplicate Numbers, Valid Numbers and Invalid Number
- No. of Schedule Days, only for a date-range schedule
- The total, shown as Cost: [numbers x rate x parts]
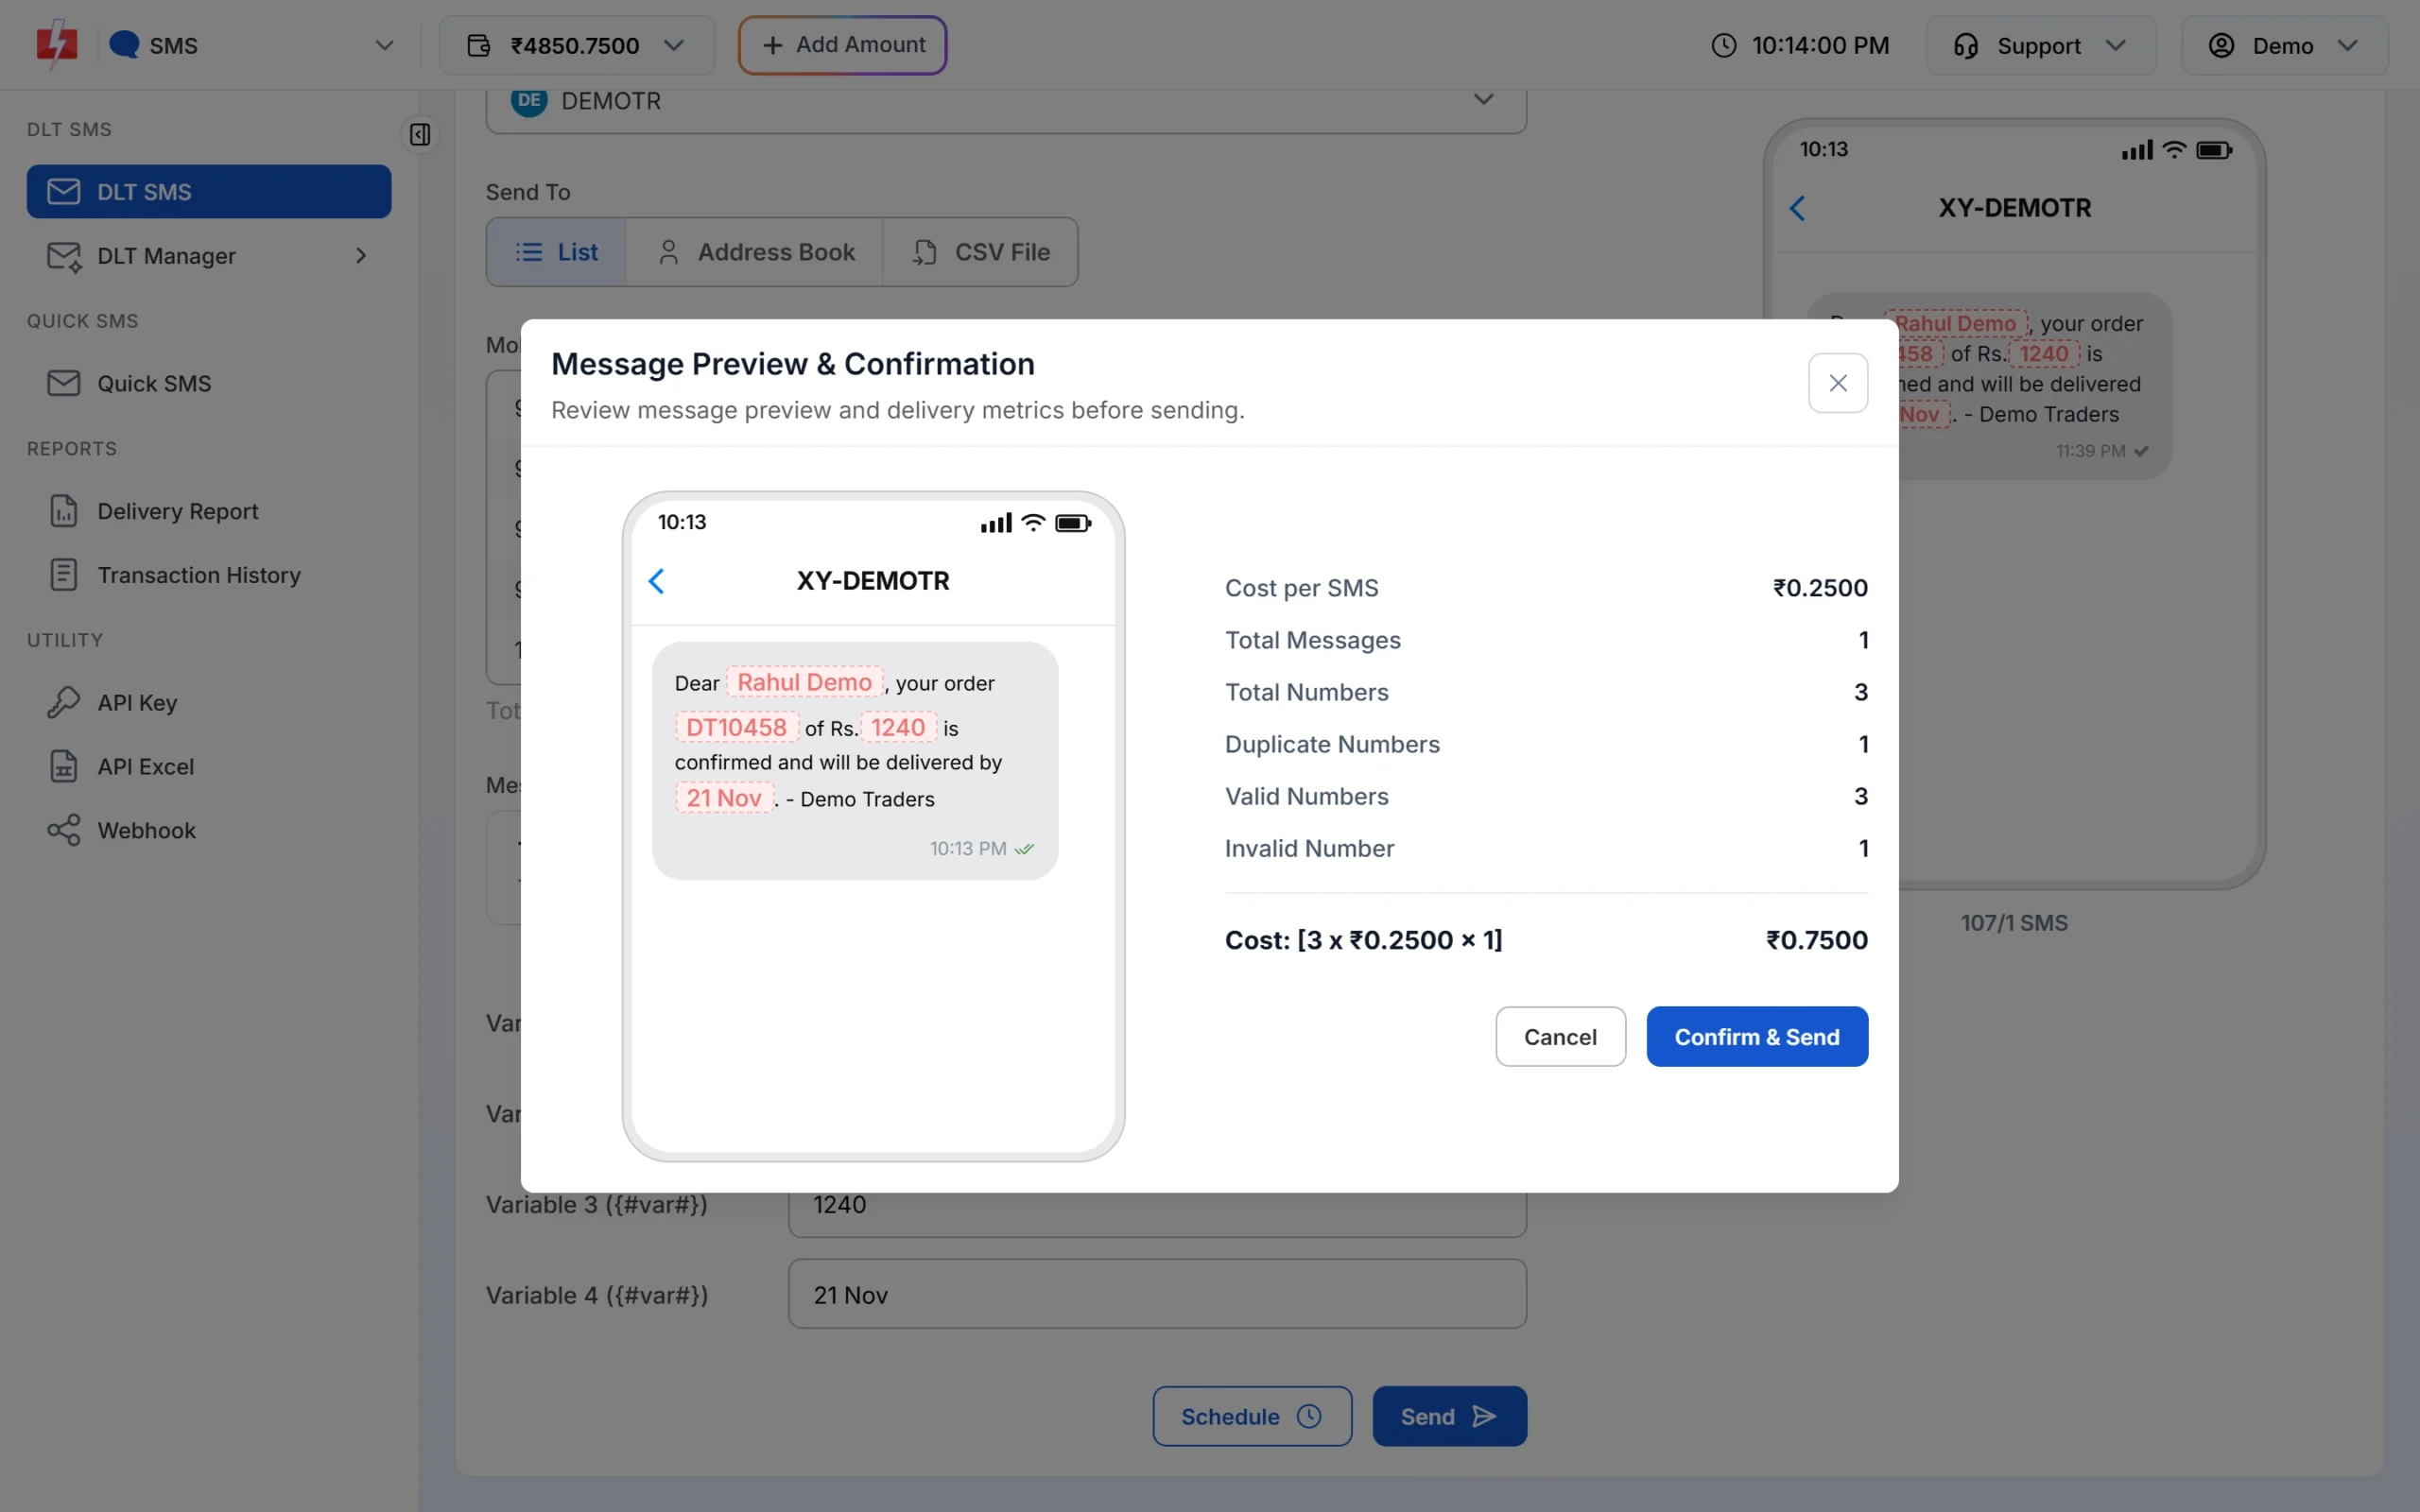
The popup shows the final SMS and the full cost before anything is sent. In this example, five numbers were typed. One was a repeat and one (12345) was too short, so the popup shows 1 duplicate, 1 invalid and 3 valid numbers. The cost line reads Cost: [3 x ₹0.2500 x 1], which is ₹0.7500. Your own rate depends on your recharge slab.
Sending in bulk? For high SMS volumes our team offers discounted rates. Talk to our team or see SMS pricing.
If it looks right, click Confirm & Send (or Confirm & Schedule). Click Cancel to go back and change something. The amount is taken from your wallet when the campaign is created.
Promotional (Service Explicit) templates sent after about 9 PM are held and sent the next morning after 10 AM. Service Implicit templates are not held. -
Check the delivery report
Open Delivery Report from the SMS menu. Your campaign appears in the SMS Report list with its sent time, message, recipient (“Campaign” when there is more than one number), status and number of SMS. Click the message to open Delivery Details and see the status of every number. Scheduled sends wait under Schedule, where you can cancel them and get the amount back in your wallet.
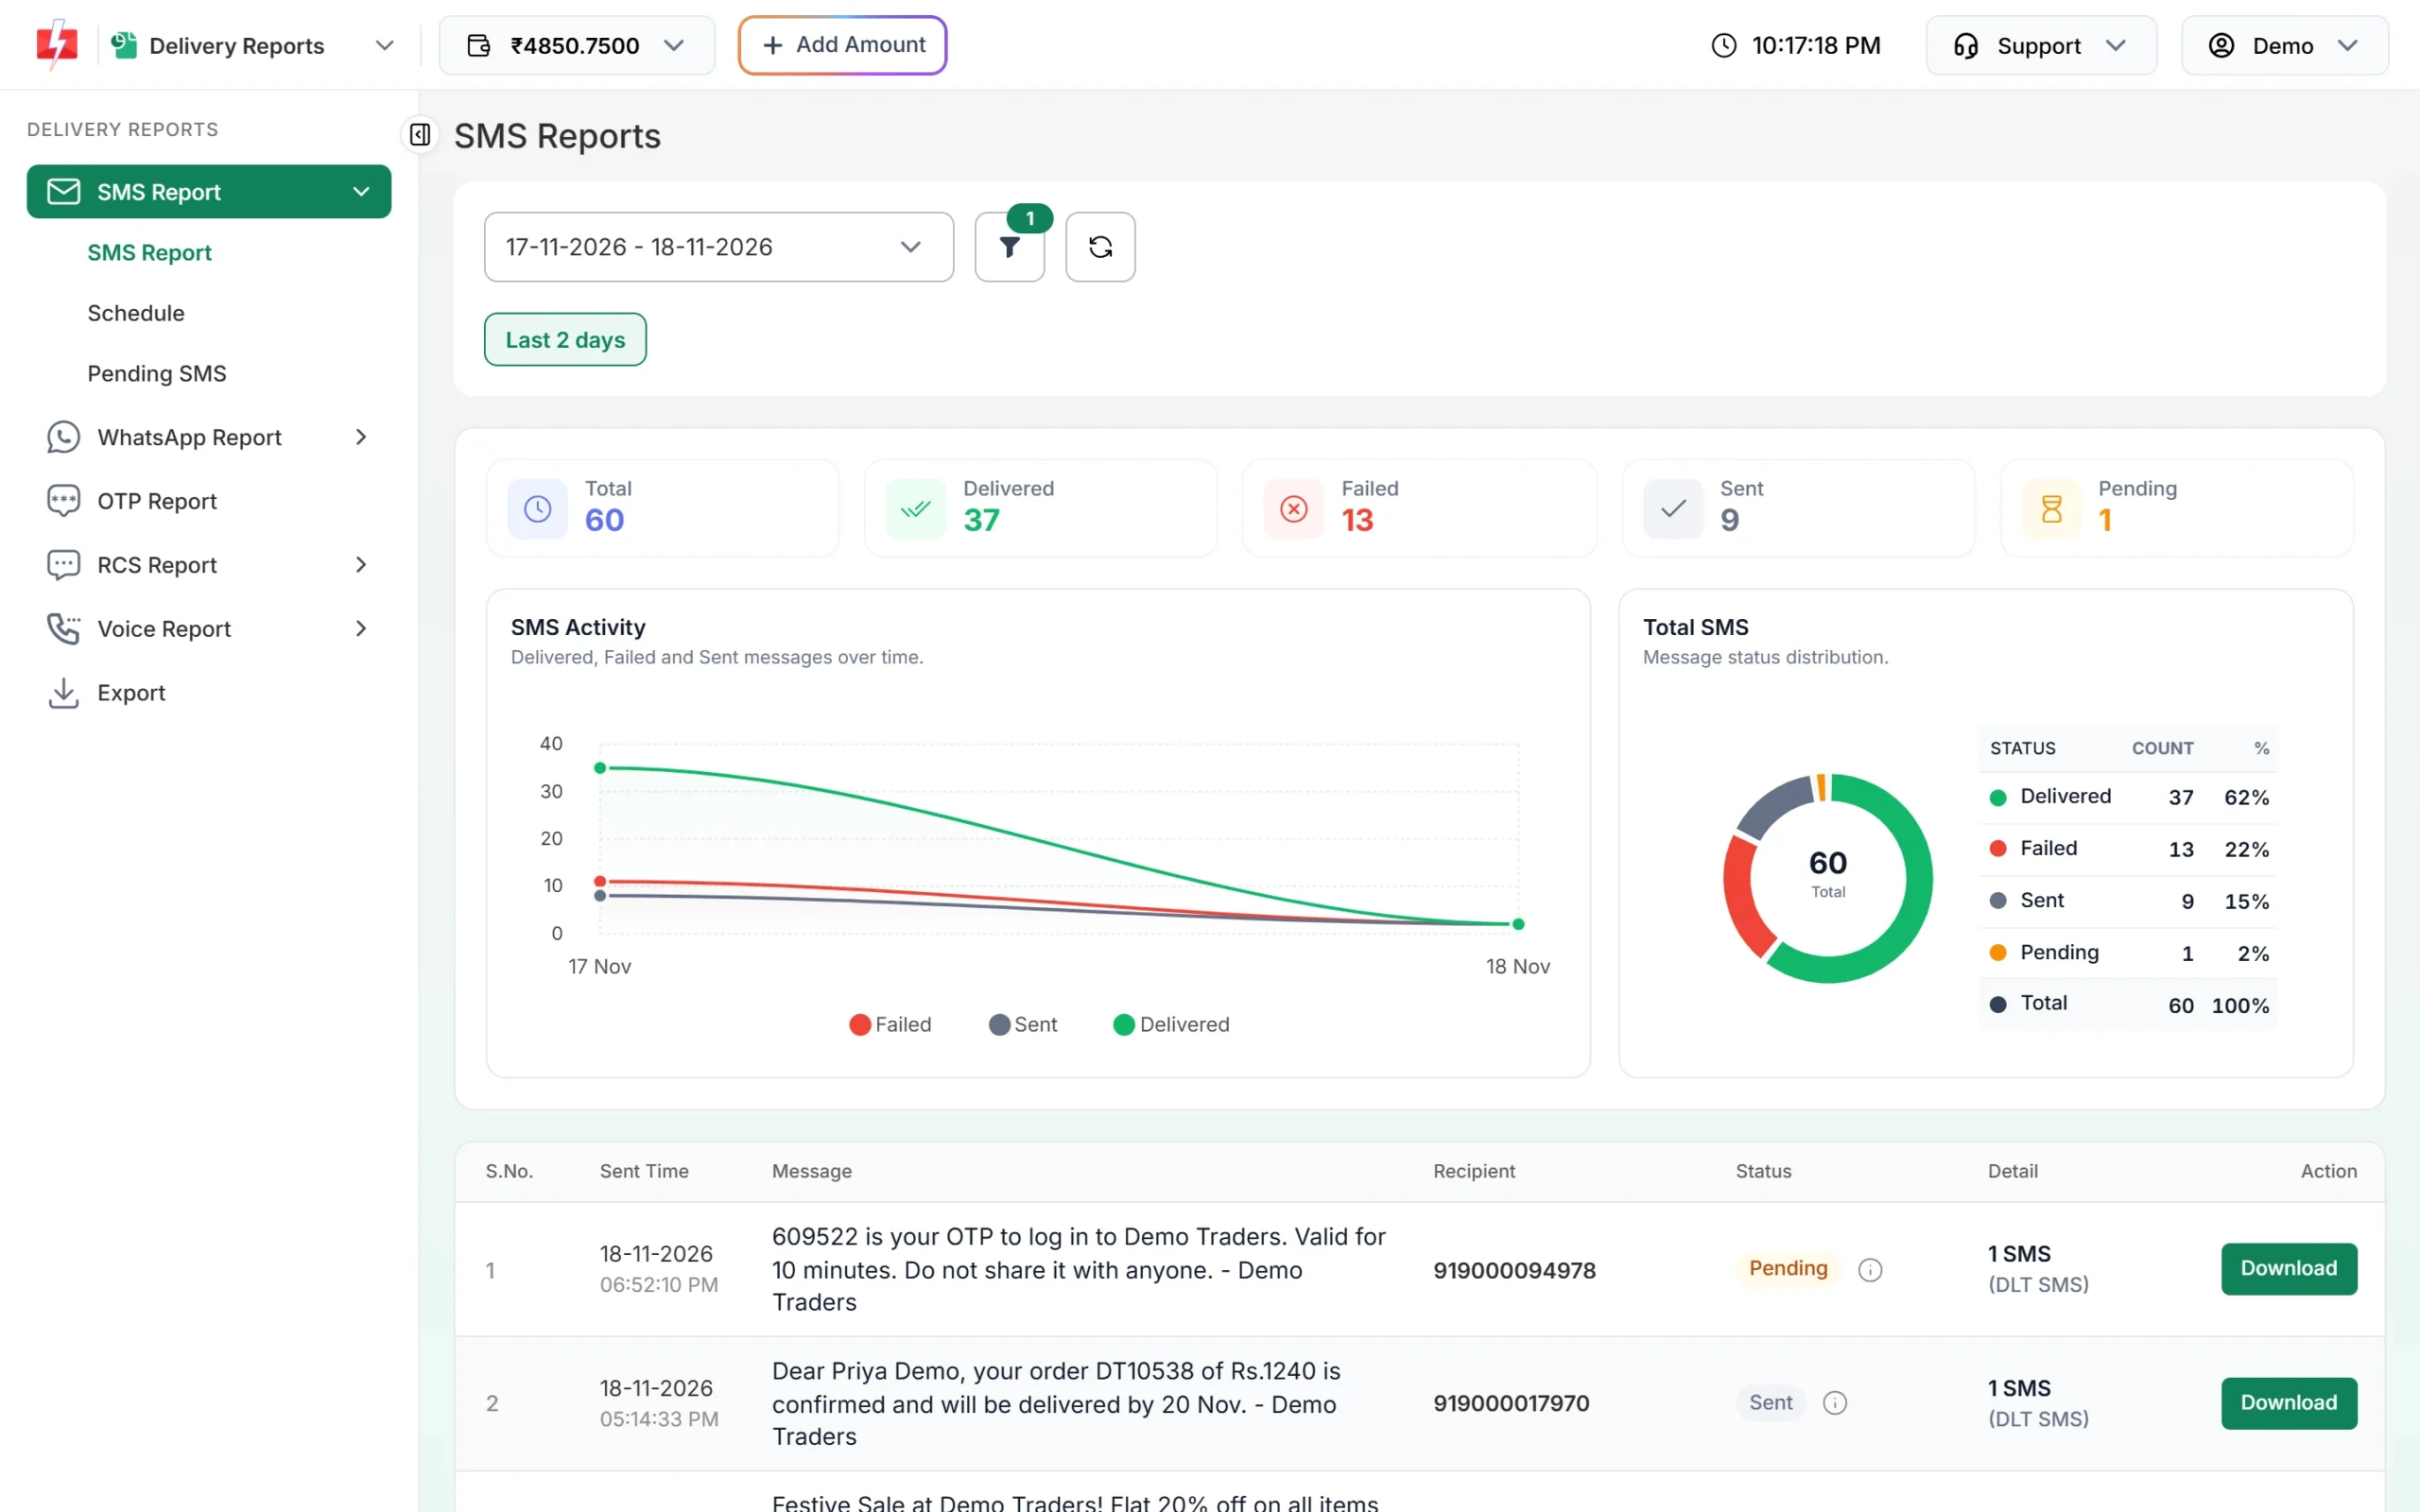
Your sent campaigns in the SMS Report. “Sent” means the operator has not returned the delivery report yet. It is not a failure. The debit for the campaign, and any credit to your wallet, shows in Transaction History. If you have a question about a charge or failed numbers, contact support with the request ID from Delivery Details. For all statuses, read SMS delivery report status meanings.
Error messages and fixes
| Message you see | What to do |
|---|---|
| Please select Sender ID | Pick a Sender ID from the dropdown first. |
| Please select a DLT template. | Click the Message box and choose a template. |
| Please enter mobile numbers. | Add at least one number in the List tab. |
| Please select at least one contact or group. | Open Choose Contacts, tick contacts or a group, then click Submit. |
| Please upload CSV file. / Select Column Name which has Mobile Numbers. | Upload the .csv and choose the mobile number column. |
| Please select schedule date and time. / Schedule time must be in the future. | Choose a date and a time at least one minute ahead. |
| Sender ID is not valid. | The sender is not approved in your account. Check DLT Manager > Sender ID. |
| Message is not valid. | The template is not approved or not linked to this sender. |
| Entity blocked / Sender ID blocked / Content template blocked | The record is on the DLT block list. Contact Fast2SMS support. |
| Only English alphabets are allowed in message text or select Unicode SMS. | A variable value has non-English text but the template is English. Use English text or a Unicode template. |
| Insufficient wallet balance, you need at least ₹X… | Click Add Amount, recharge, and send again. |
Frequently asked questions
Why is my template not showing in Select DLT Template?
Only Approved templates linked to the Sender ID you chose are listed. Pick the right sender, or check the template’s status and linked senders in DLT Manager.
Can I send different names to each customer?
Yes. Upload a CSV with a name column and map that column to the template variable. Each number gets its own value.
Am I charged for duplicate or wrong numbers?
No. The confirmation popup shows duplicate and invalid numbers, and only valid numbers are charged.
How do I know the cost before sending?
Click Send. The Message Preview & Confirmation popup shows the rate, the number of valid numbers, SMS parts and the total before anything is sent.
Can I cancel a scheduled DLT SMS?
Yes. Go to Delivery Report > Schedule and click Cancel, then Yes, Cancel. The amount is credited back to your wallet if the campaign has not been sent yet.
Can I send the same campaign every day?
Yes. In Schedule, choose a date range. The campaign is sent once a day at the time you set, and the cost covers all the days.
Can I send DLT SMS from my software instead of the panel?
Yes, with the API. The Sample Code button on each template in DLT Manager gives a ready request using your Sender ID and the template’s Message ID.