The DLT Manager in Fast2SMS is where you add the Entity ID, Sender IDs and content templates that you have already registered on your operator’s DLT portal. This guide is for anyone who has finished DLT registration and now wants to start sending DLT SMS. By the end you will know how to add each item, what Approved, Pending and Rejected mean, and how to test a template before you use it.
Before you start
- A Fast2SMS account. You can open the SMS app from the apps dashboard.
- Your Entity ID (also called PE ID) and the entity name exactly as registered on your DLT portal (Jio, Airtel, Vi, BSNL, Smartping or any other).
- At least one approved Sender ID (header) and one approved content template on that DLT portal.
- Screenshots from your DLT portal that clearly show the approved status.
New to these terms? Read what Entity ID, Sender ID and Content Template ID mean.
Add them in order: entity, sender, template
A Sender ID can only be added under an approved entity, and a template only for Sender IDs of that entity. After all three, finish the PE-TM binding so your SMS are not blocked.
How to add your DLT details in DLT Manager
-
Open DLT SMS and choose “If yes, add details”
In the SMS app, click DLT SMS. If your account has no Entity ID yet, you will see the DLT Registration Required screen with two cards. If you are already registered on DLT, click If yes, add details. This opens DLT Manager with the Add Entity form ready. If you are not registered yet, click Check DLT signup process to see how to register with an operator first.
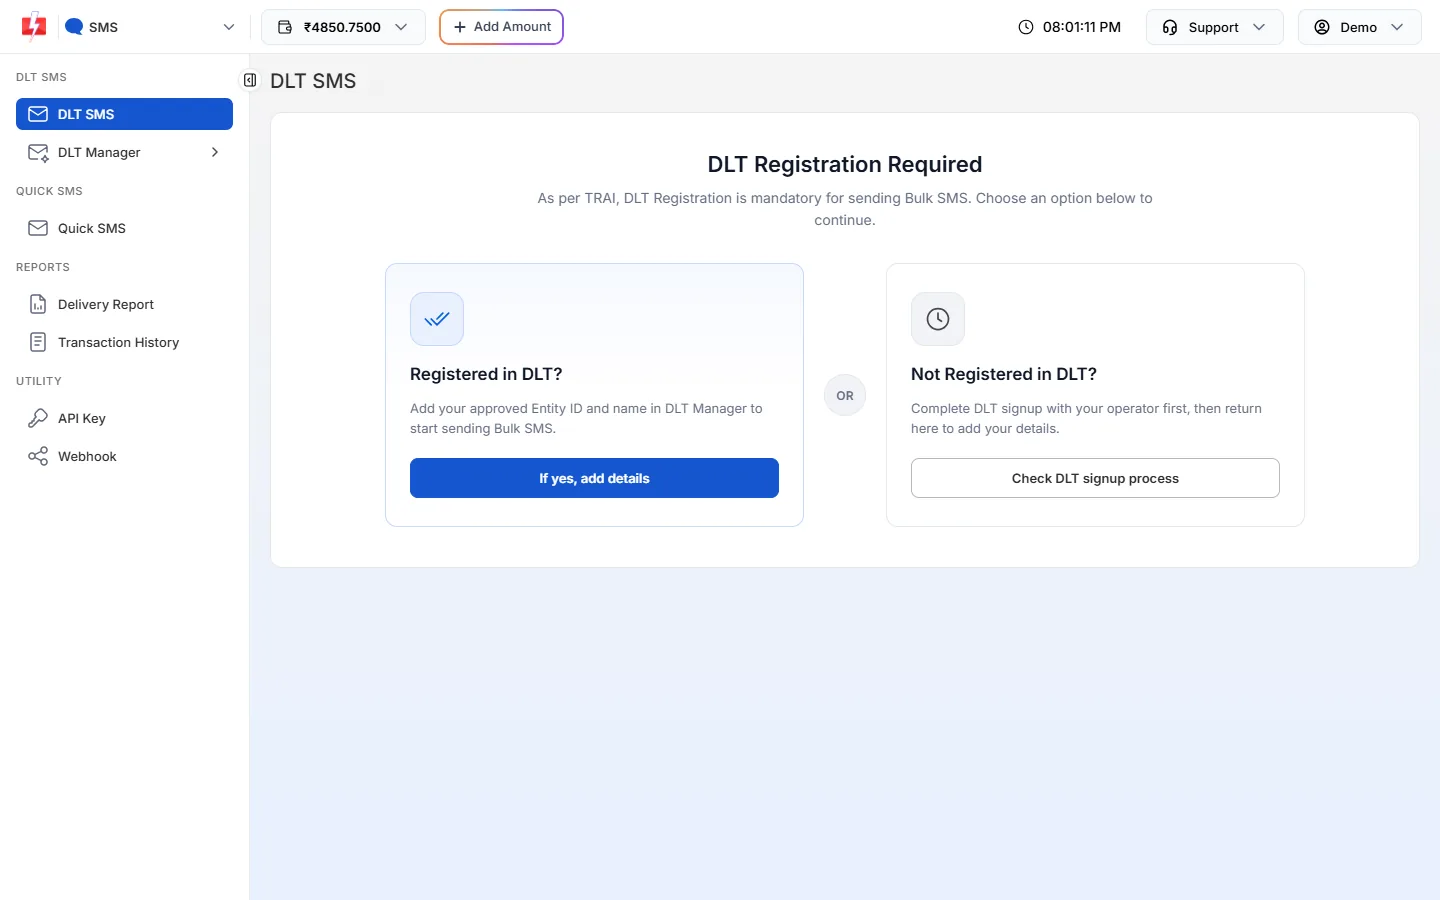
This screen shows until you add your first Entity ID. -
Add your Entity ID
Go to DLT Manager > Entity ID and click Add New Entity. In the form “Add your DLT approved entity details”, type your Entity ID (numbers only) and your Entity Name, then click Submit.
When you leave the Entity ID box, the panel checks the ID on the DLT platform:
- If the ID is found, you see “Entity ID is valid”, the entity name is filled in from DLT, and the entity is saved as Approved straight away. No screenshot is needed.
- If the ID cannot be verified, you see “Invalid Entity ID” or “Please enter entity name & upload screenshot”. An Upload Approved Screenshot box appears. Upload a clear screenshot of your DLT portal and submit. The entity is saved as Pending and our team checks it.
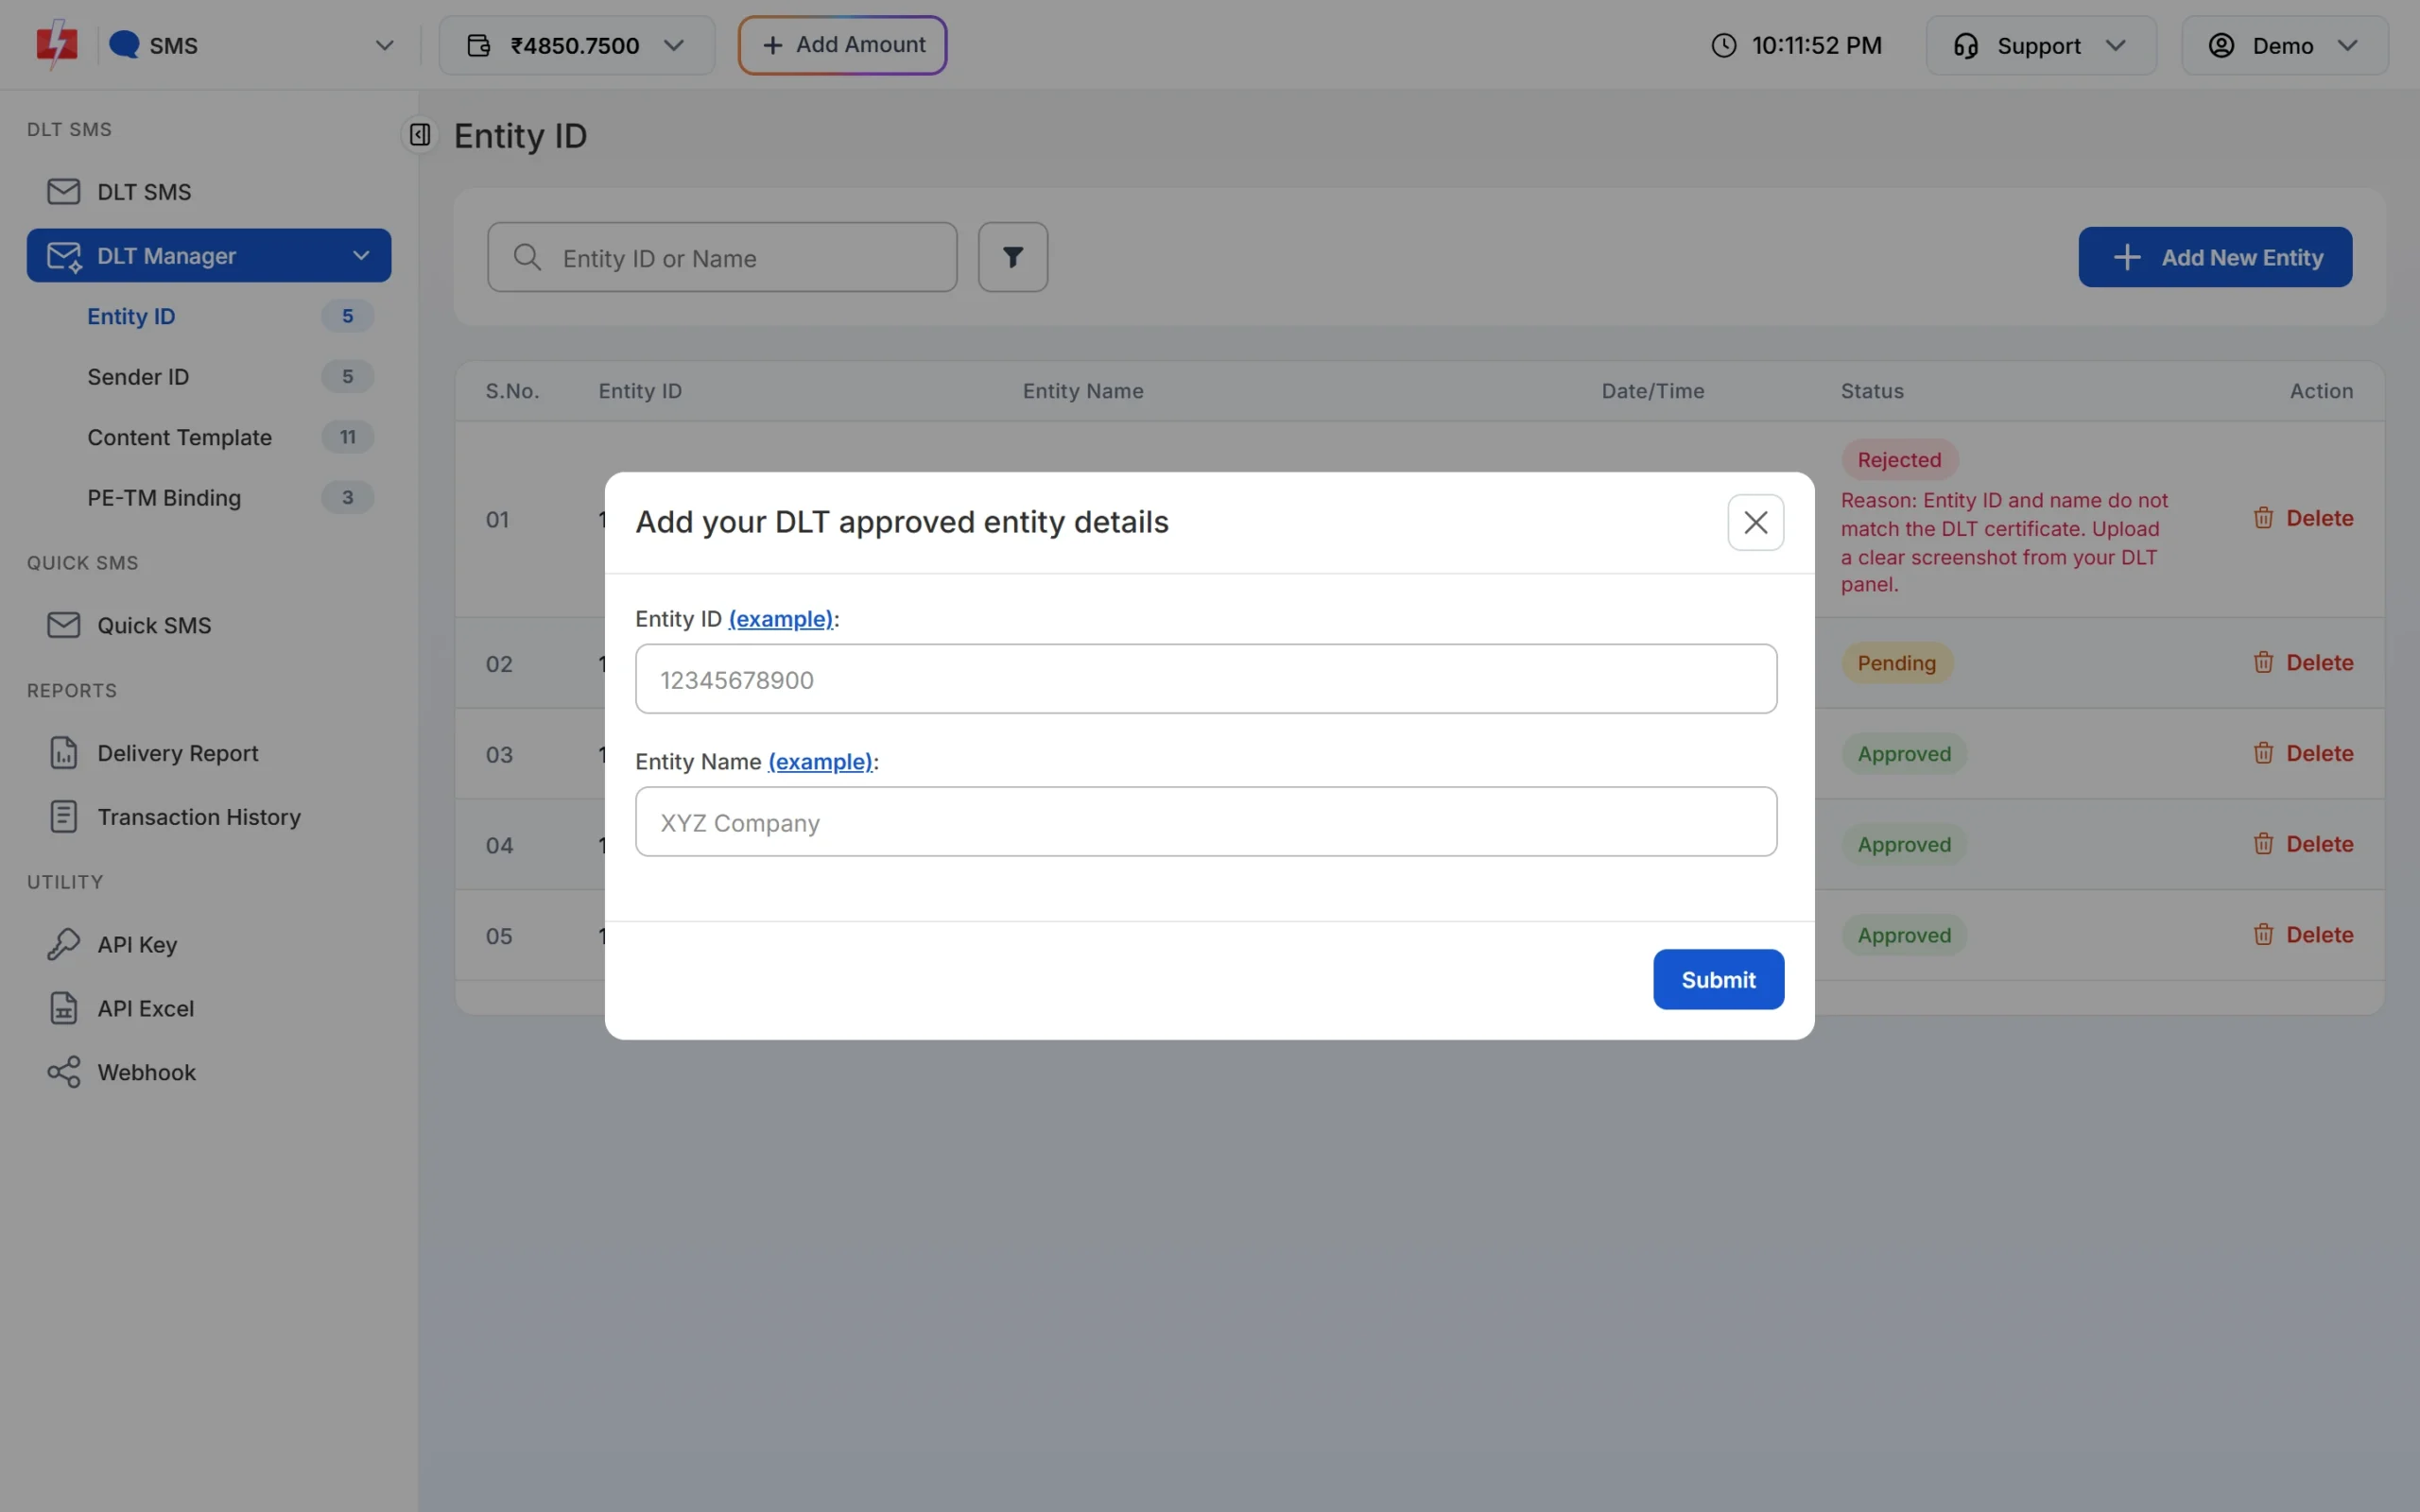
Add New Entity form. Use the “example” links if you are not sure what to enter. You can upload up to 5 screenshot files (JPG, PNG, GIF, SVG, PDF, DOC, DOCX or ODT). Keep each file under 10 MB.
-
Check the entity status
Your entity now shows in the list with its status. A rejected entity shows the reason in red under the status.
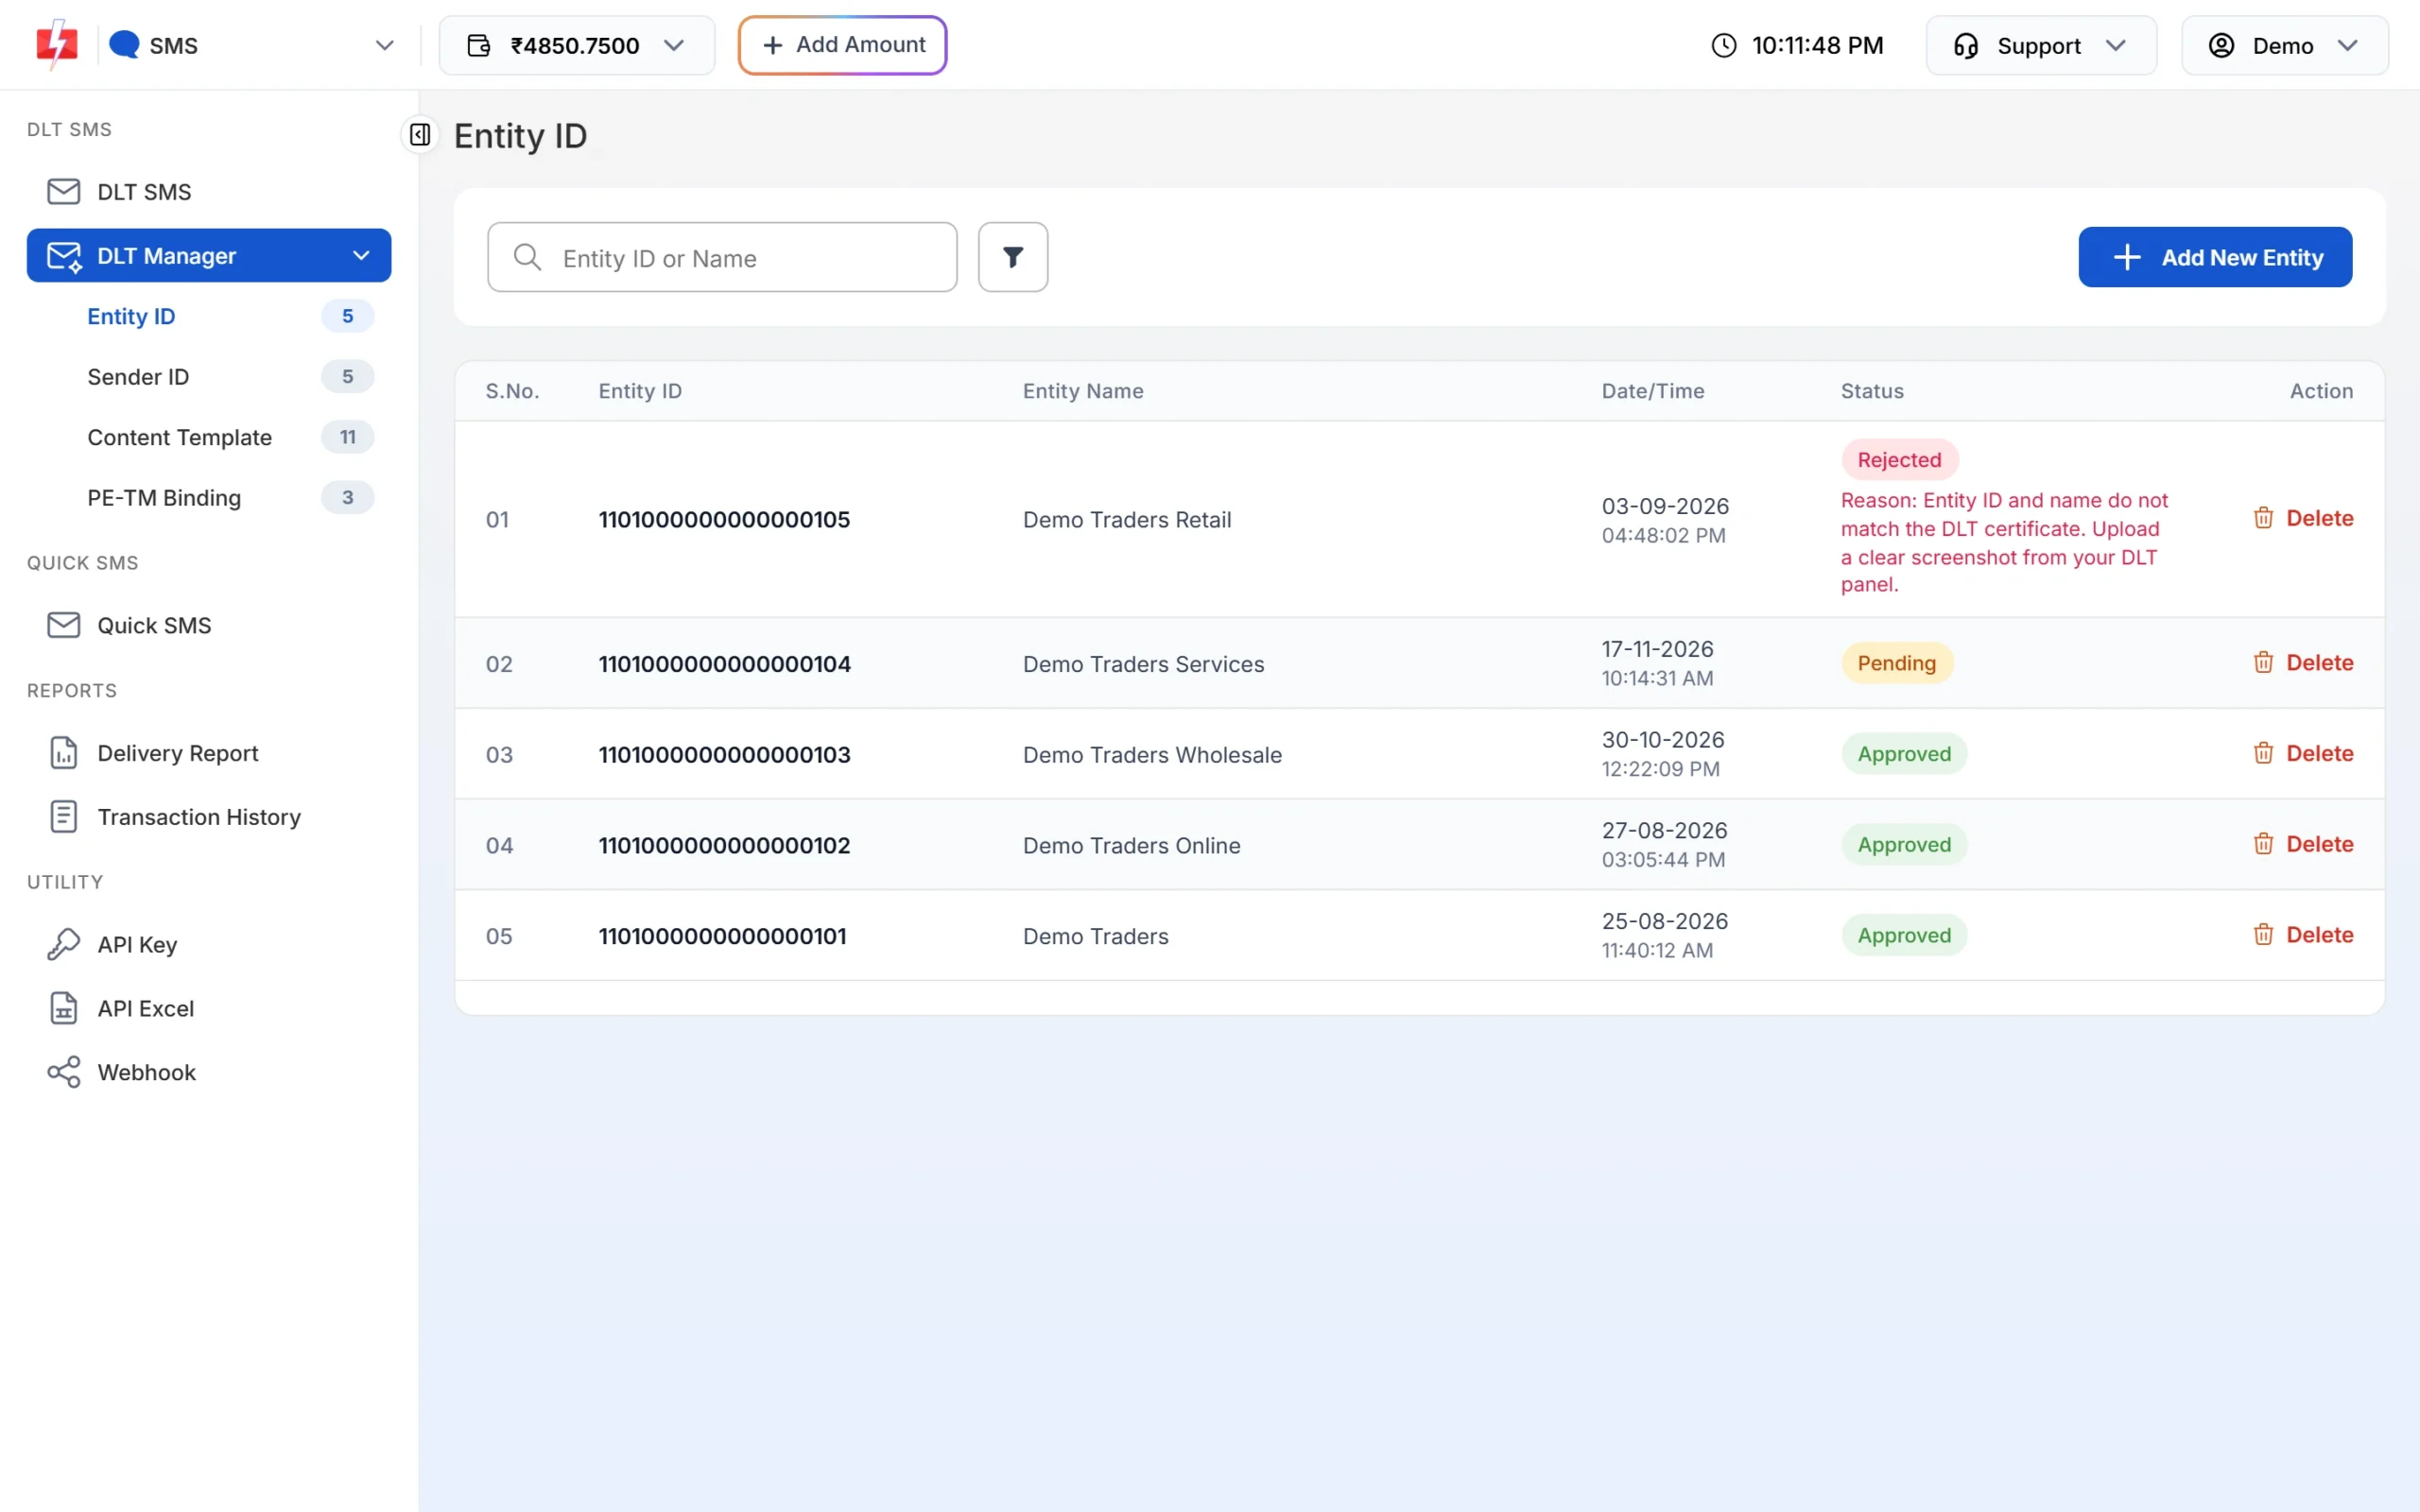
Entity ID list. The number next to each DLT Manager menu item is the count of records. -
Add a Sender ID by typing it
Go to Sender ID and click Add New Sender ID. Pick the entity in Select Entity (only approved entities are listed). Keep the type on Type Manually, type your header in Enter Approved Sender ID (3 to 6 characters, exactly as approved on DLT), and upload a screenshot in Upload DLT Approved Sender ID Screenshot that shows the Sender ID and its approved status. Click Submit.
A new Sender ID is always saved as Pending (“Sender ID is pending for approval”) until our team checks the screenshot.
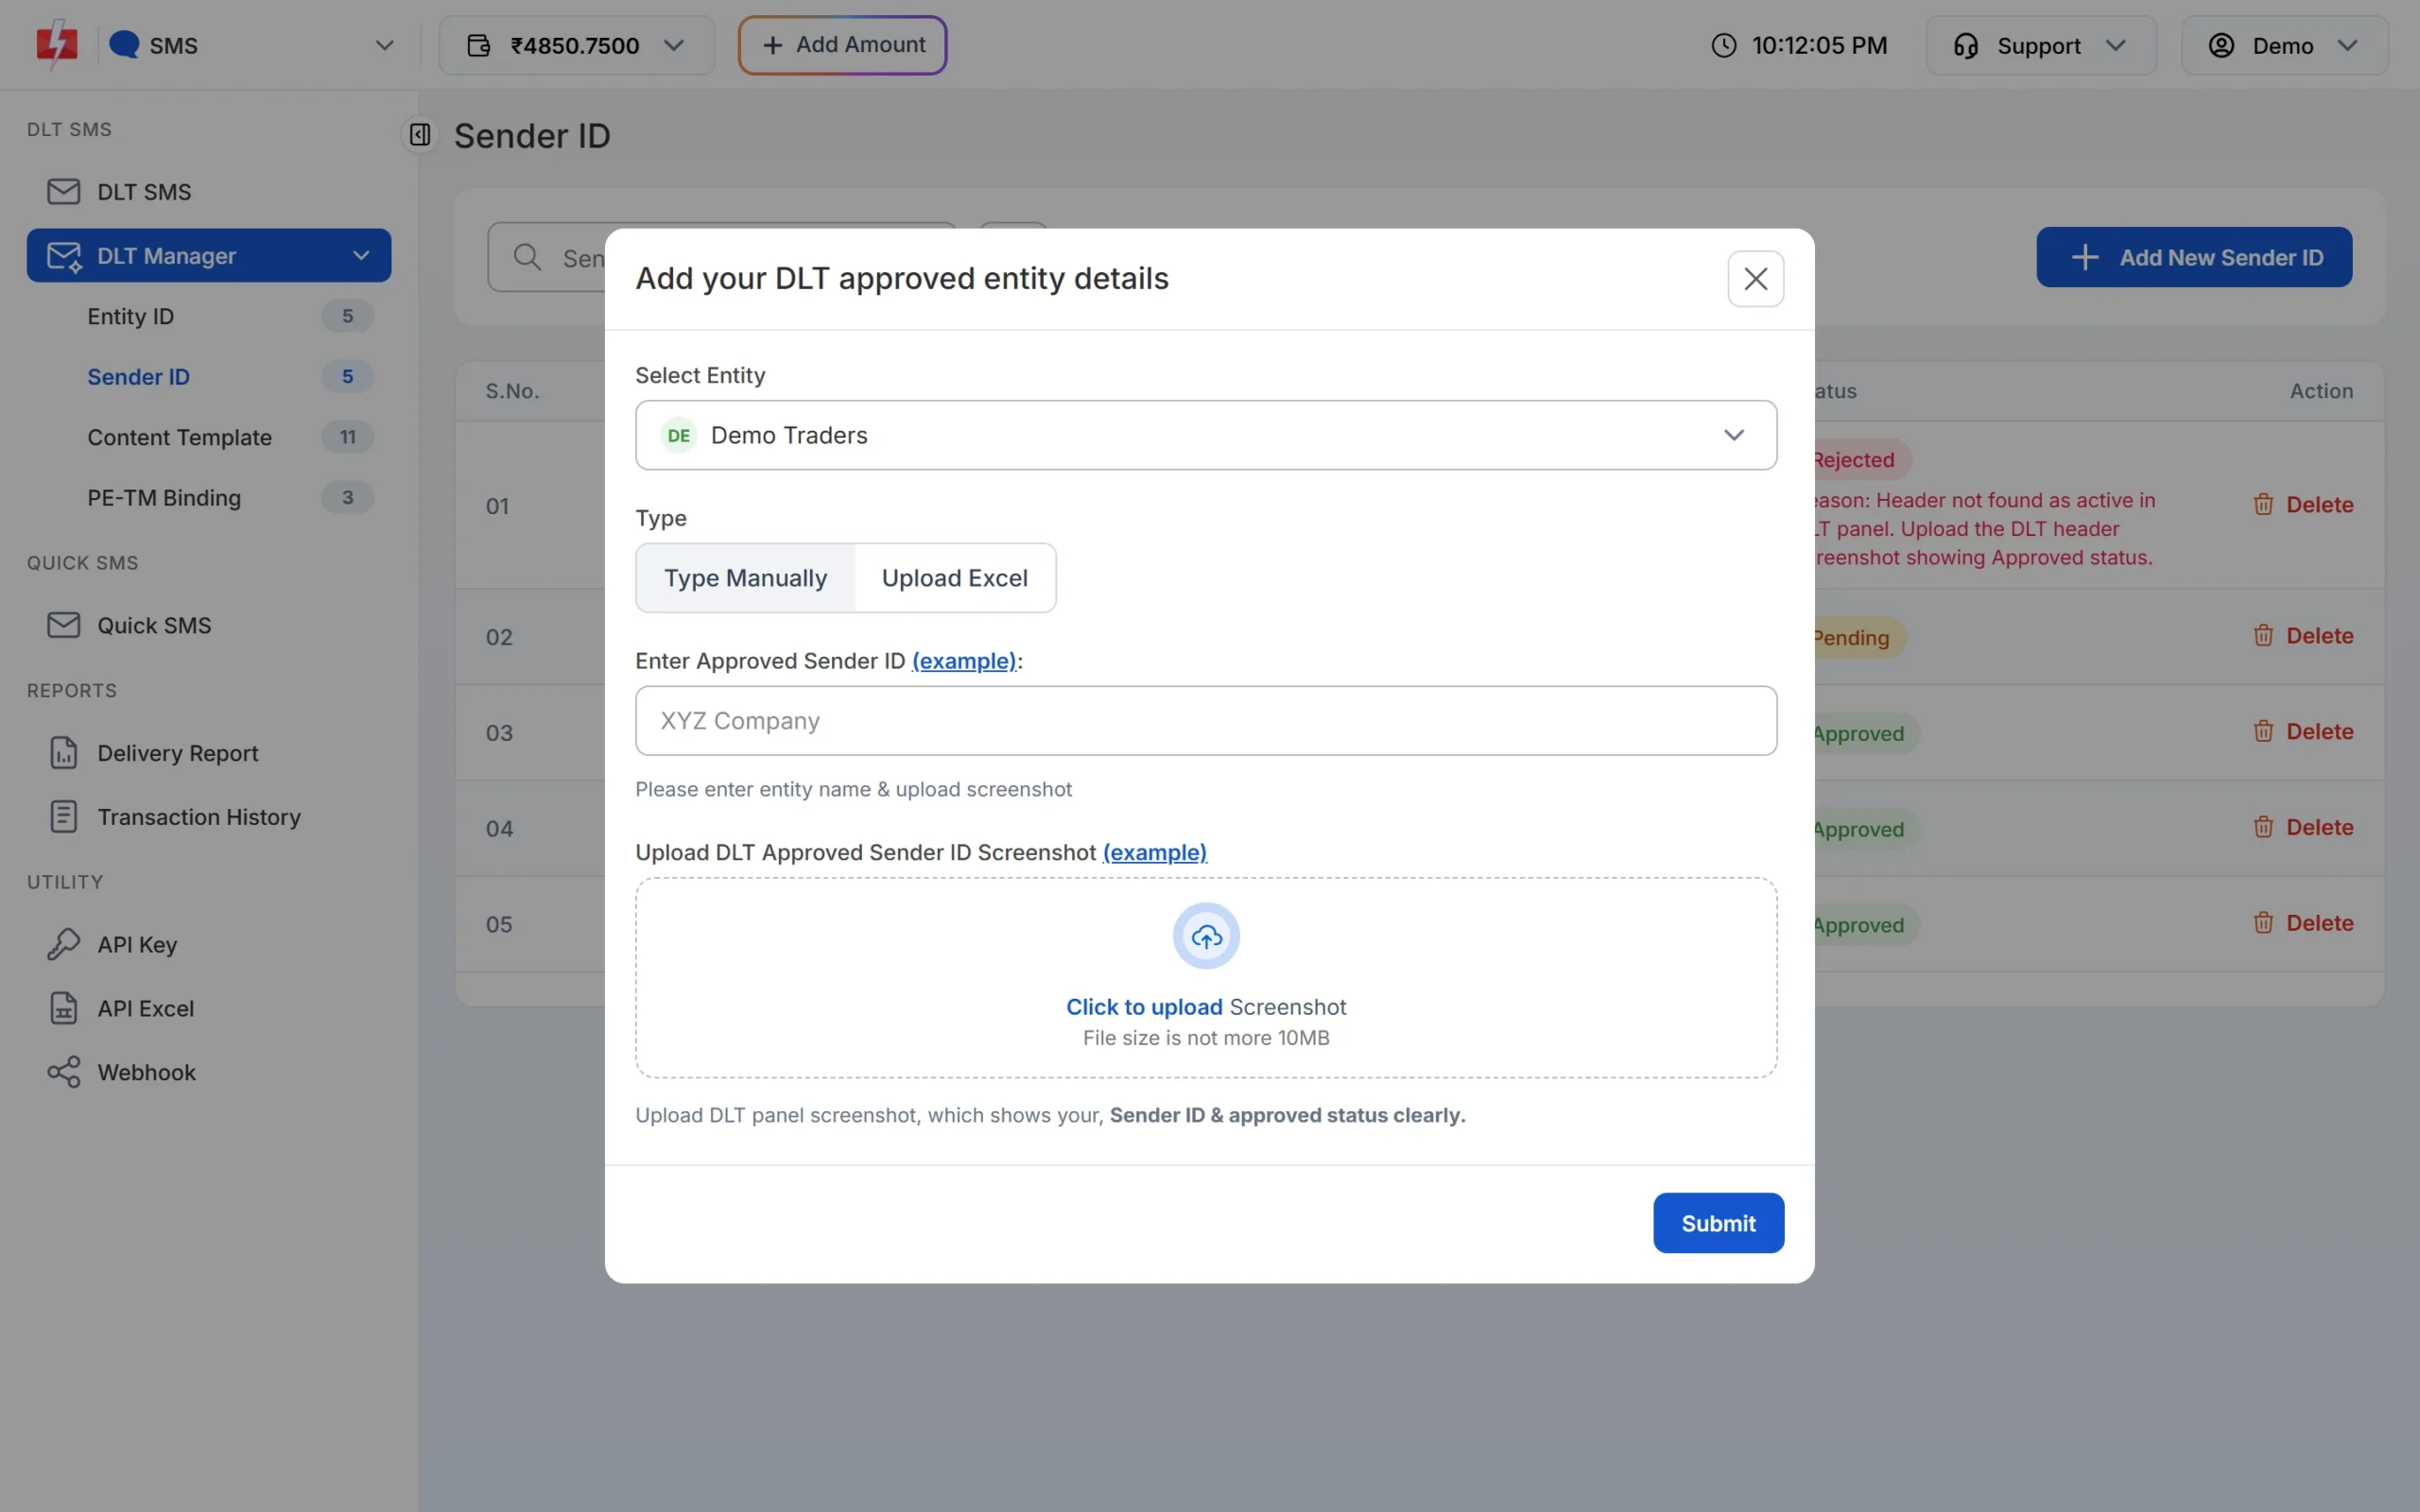
Adding one Sender ID with a screenshot. -
Or upload many Sender IDs from your DLT Excel
If you have many headers, choose Upload Excel instead. Download the header list from your operator’s DLT portal and upload it in Upload DLT Panel Excel for Sender ID. The file must be .csv or .xlsx. The panel reads the standard export formats of the operator DLT portals and imports only the rows whose status is approved, active, live or verified. All imported Sender IDs are added as Pending.
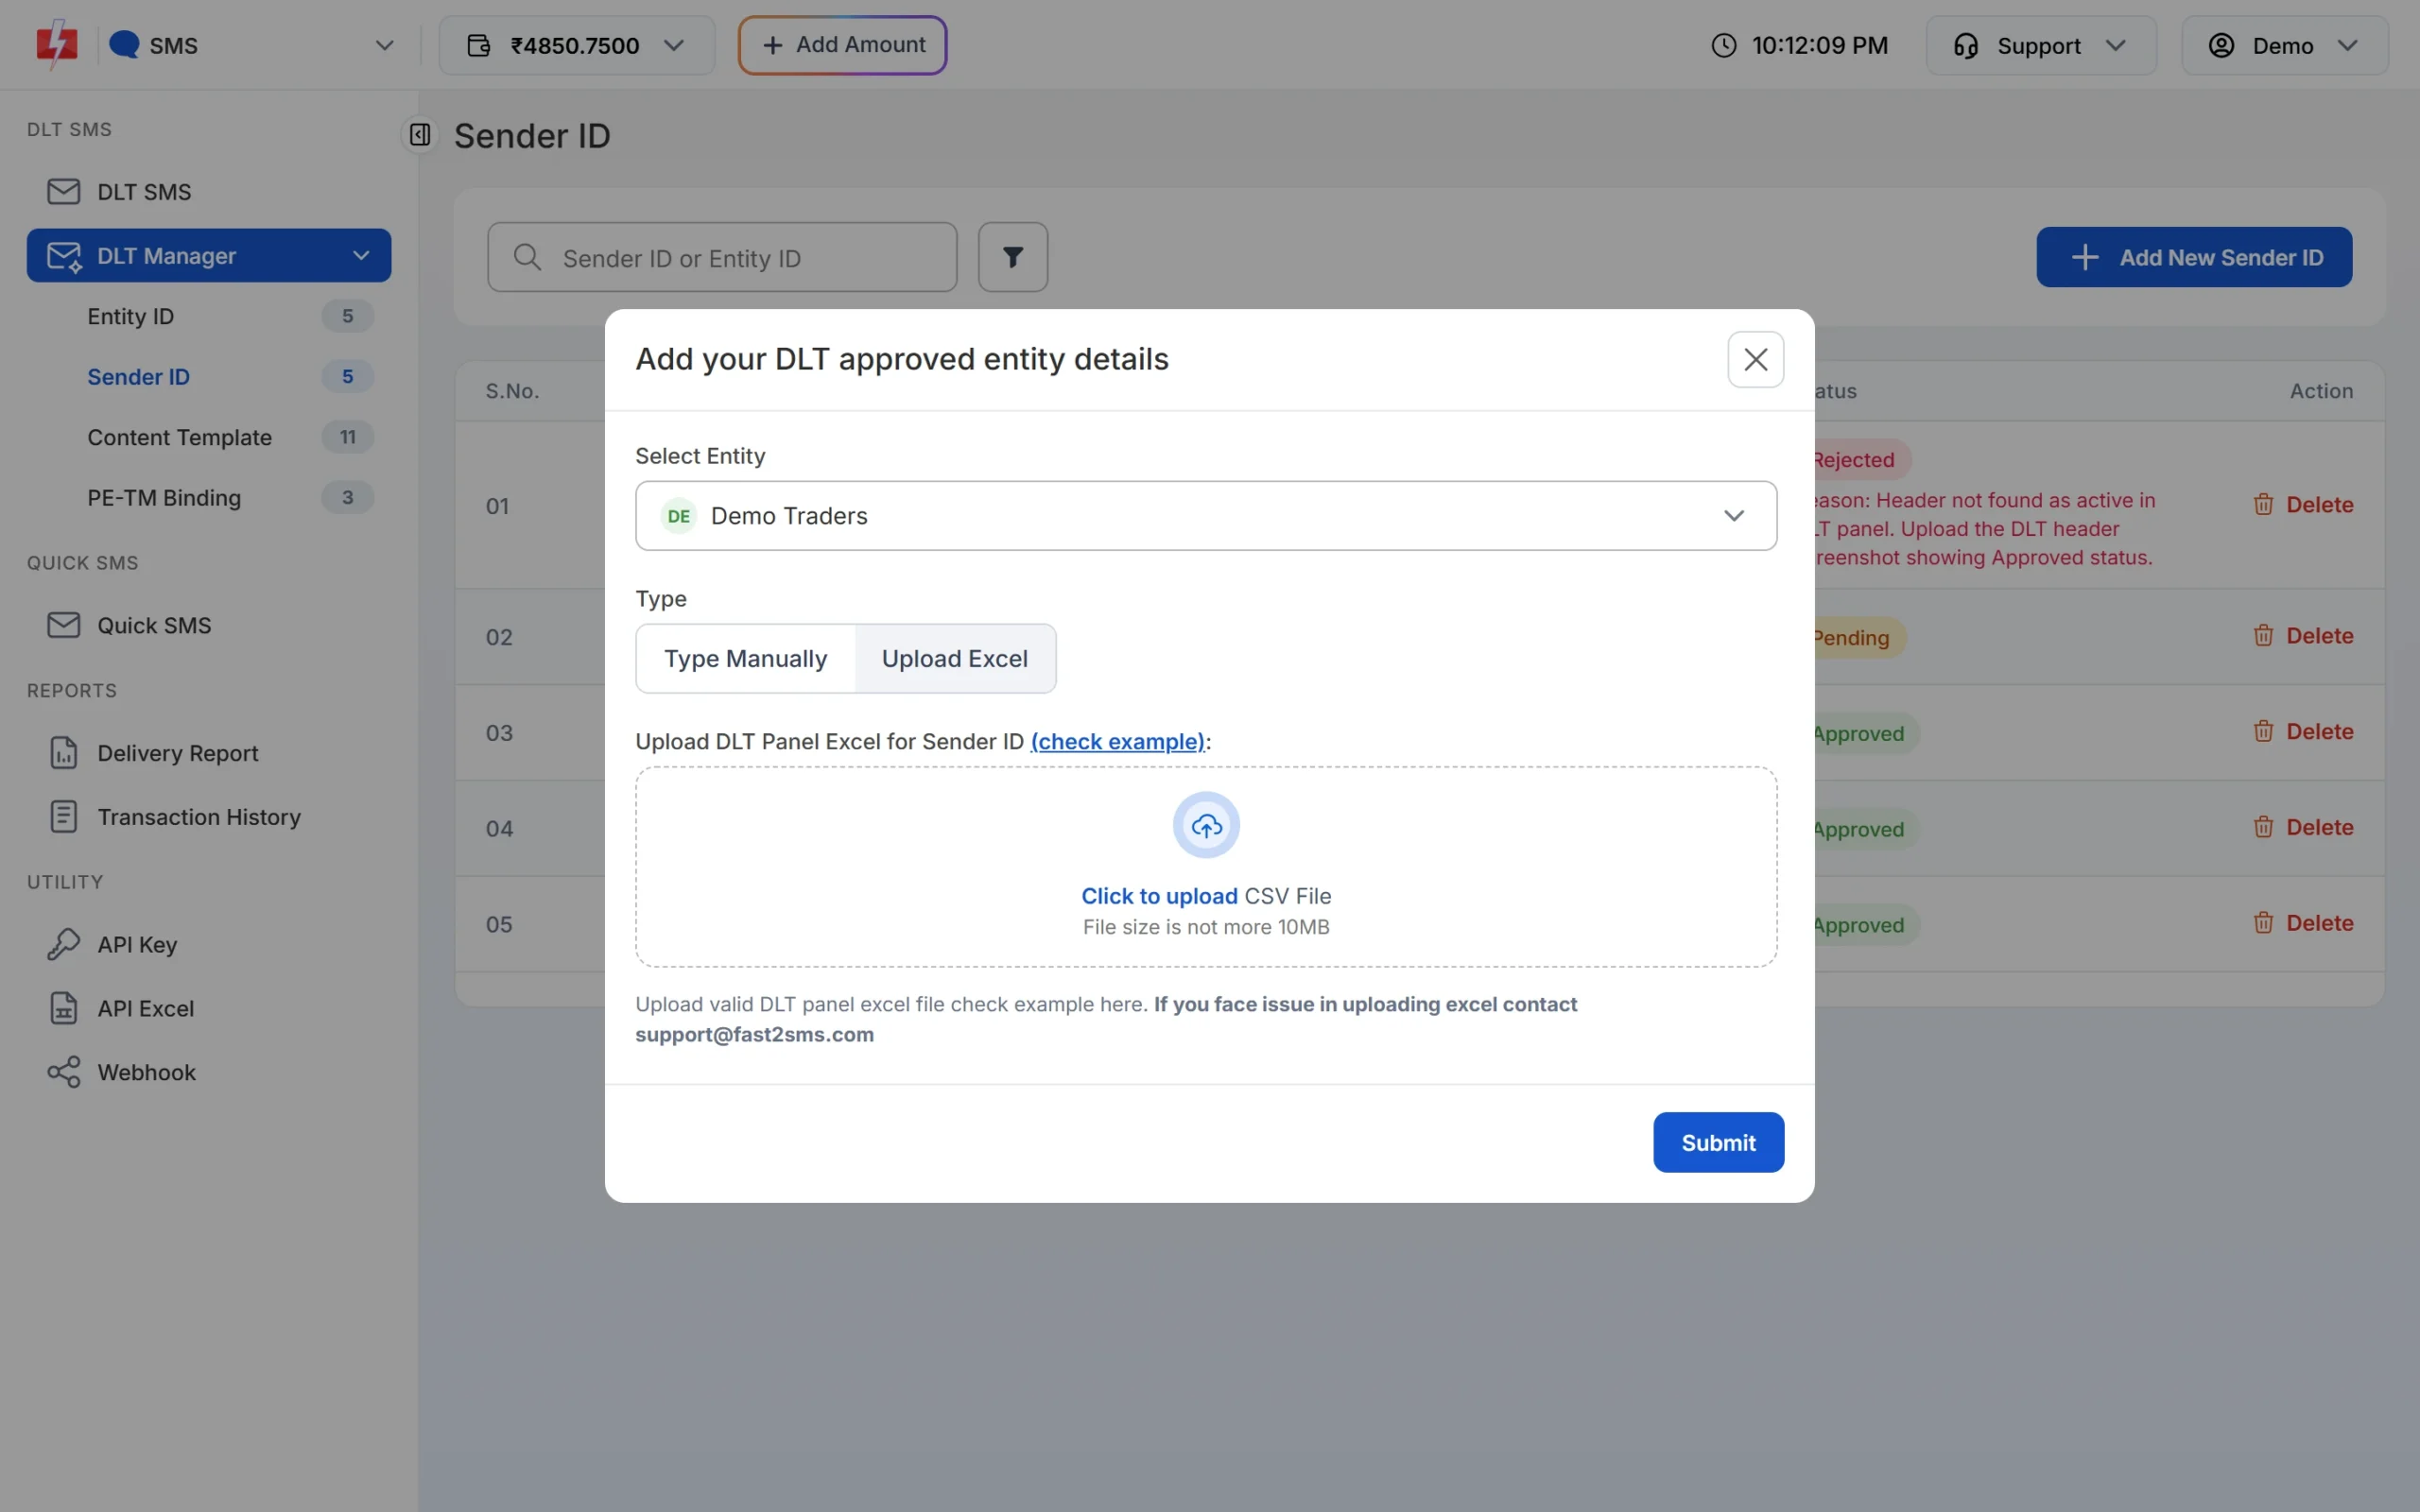
Bulk upload of Sender IDs from the DLT portal export. If you get “Upload valid DLT excel file or contact [email protected]”, open the file in Excel, save it again as .xlsx and upload it once more. An .xls file is not accepted. -
Add a content template
Go to Content Template and click Add Content Template. In the ADD CONTENT TEMPLATE form:
- Select Entity. The Sender IDs of that entity load as checkboxes.
- Select Sender ID. Tick one or more headers that this template is approved for on DLT.
- Content Template ID. The numeric template ID from your DLT portal.
- Template Type. Choose Service Implicit for transactional and service messages such as OTPs, order and payment updates. Choose Service Explicit or Promotional for offers and marketing. Pick the same category the template has on DLT.
- Copy-Paste Approved Message Text. Paste the exact text approved on DLT, with variables as they are. The counter below shows how many SMS parts the text uses.
- Upload DLT Approved Screenshot. A screenshot showing the template and its approved status.
Click Submit. The template is saved as Pending until it is checked.
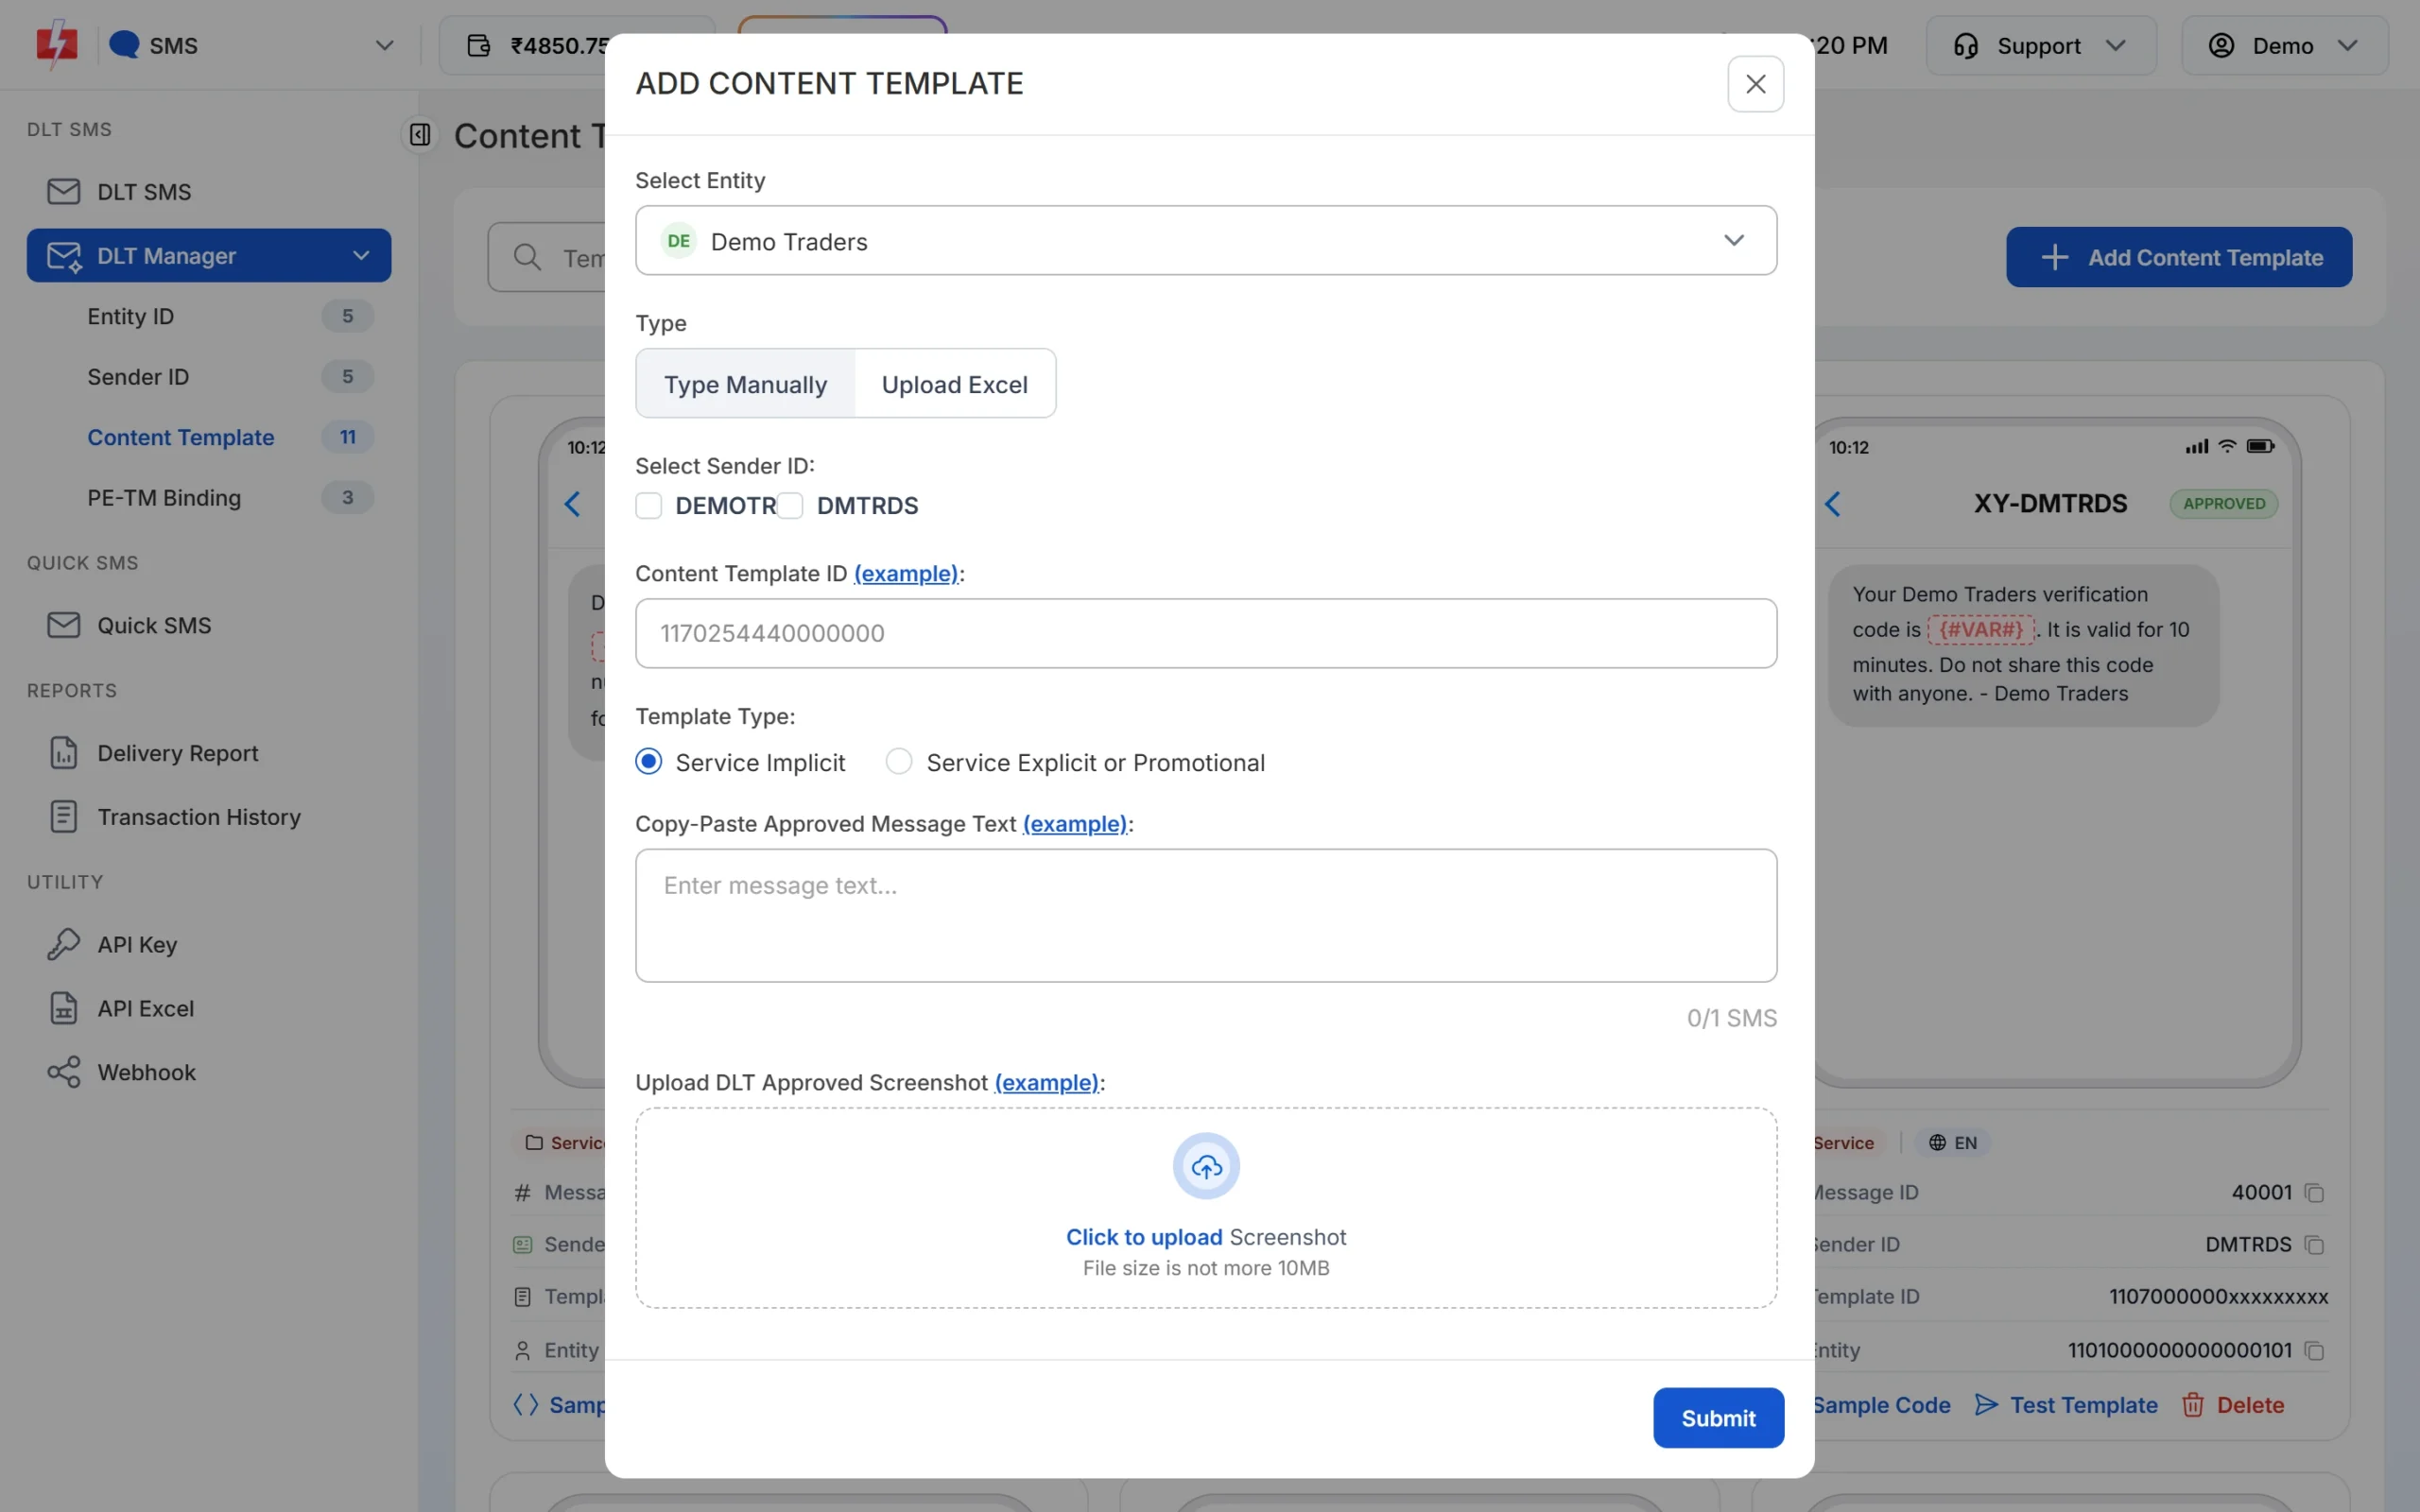
Adding one content template by hand. -
Or upload many templates from your DLT Excel
Choose Upload Excel in the same form and upload the template export from your DLT portal (.csv or .xlsx). Exports from Airtel, Jio, Vi, BSNL and Smartping are recognised. Only approved or active rows are imported. If the type column says “transactional” or “implicit”, the template is saved as Service Implicit. Everything else is saved as Service Explicit or Promotional. If the file names a Sender ID you have not added yet, that Sender ID is created as Pending too.
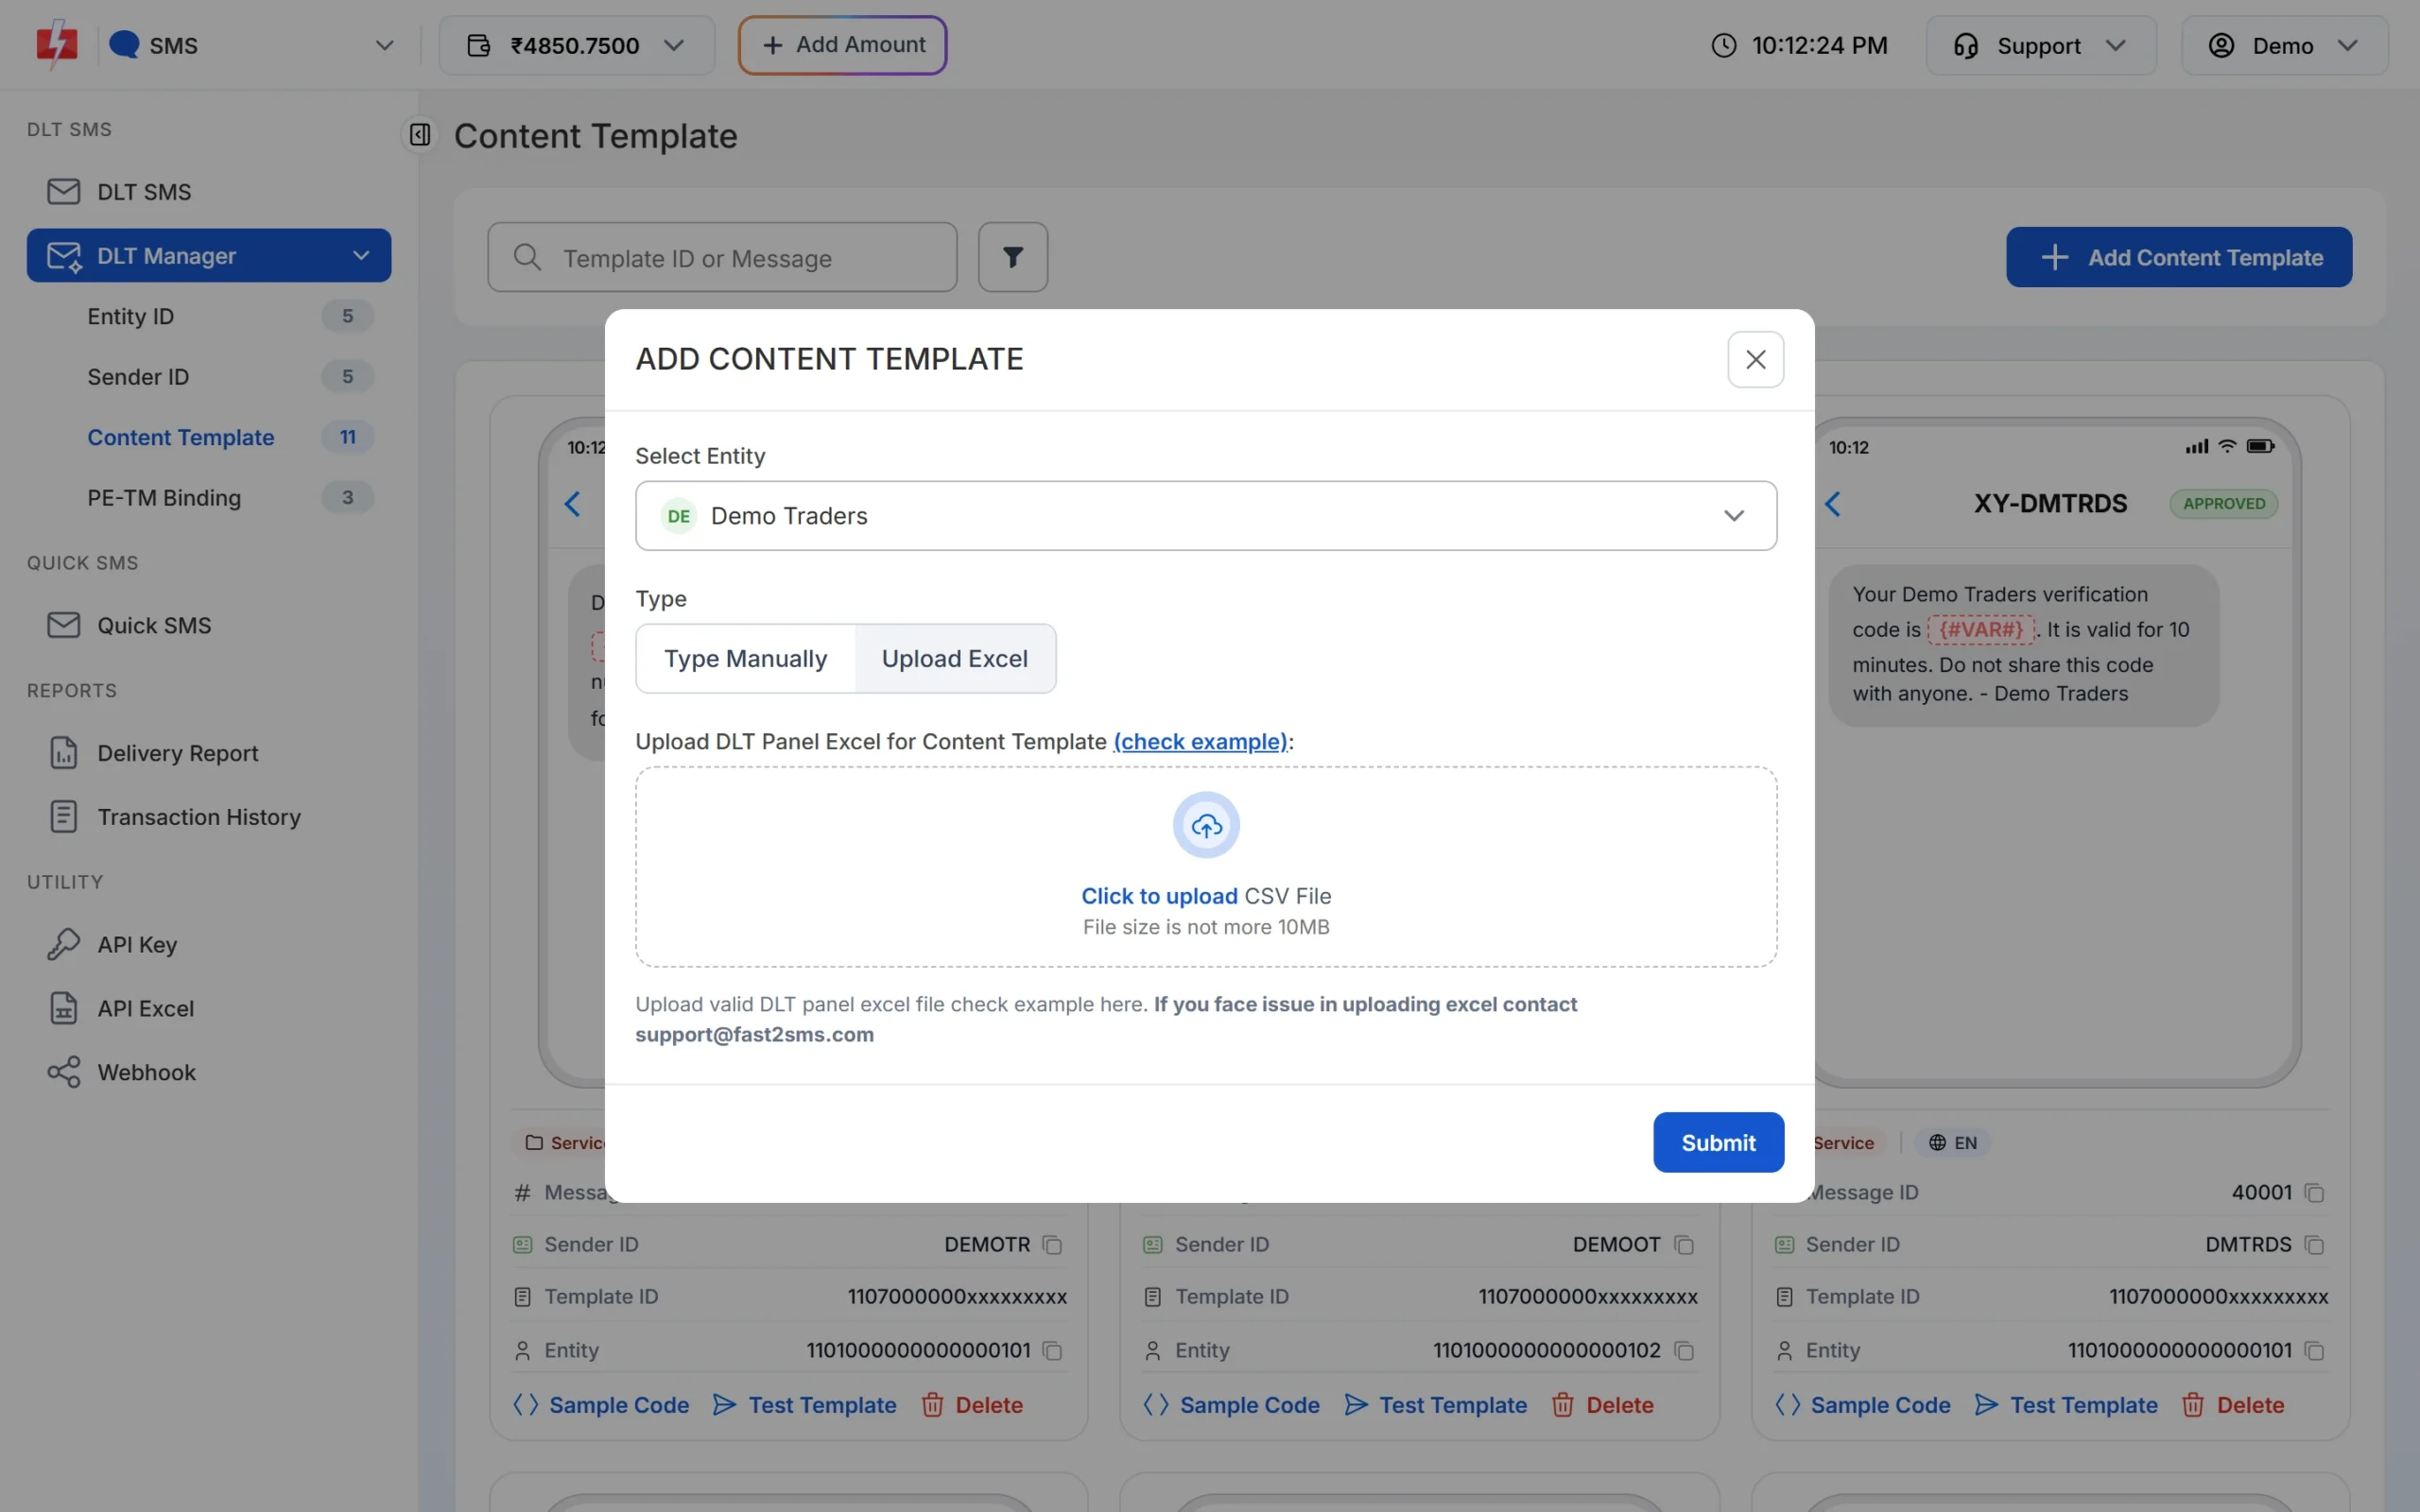
Bulk upload of content templates.
Template variables: how to paste them
Paste the template text exactly as DLT approved it, including the variable tags. The panel accepts the plain {#var#} tag and the typed tags such as {#numeric#}, {#url#}, {#urlott#}, {#cbn#}, {#email#} and {#alphanumeric#}. On the template card, every variable is shown as {#VAR#}, but the type you pasted is remembered. When you send, you fill one value for each variable.
A few more rules the panel applies on its own:
- If the text has any non-English character (Hindi or another Indian language), the template is saved as Unicode and the card shows UN. English templates show EN.
- If the first Sender ID you tick is numeric (6 digits), the template is saved as Service Explicit or Promotional, whatever you selected.
For the latest DLT variable rules, see variable tagging in content templates.
Reading a template card
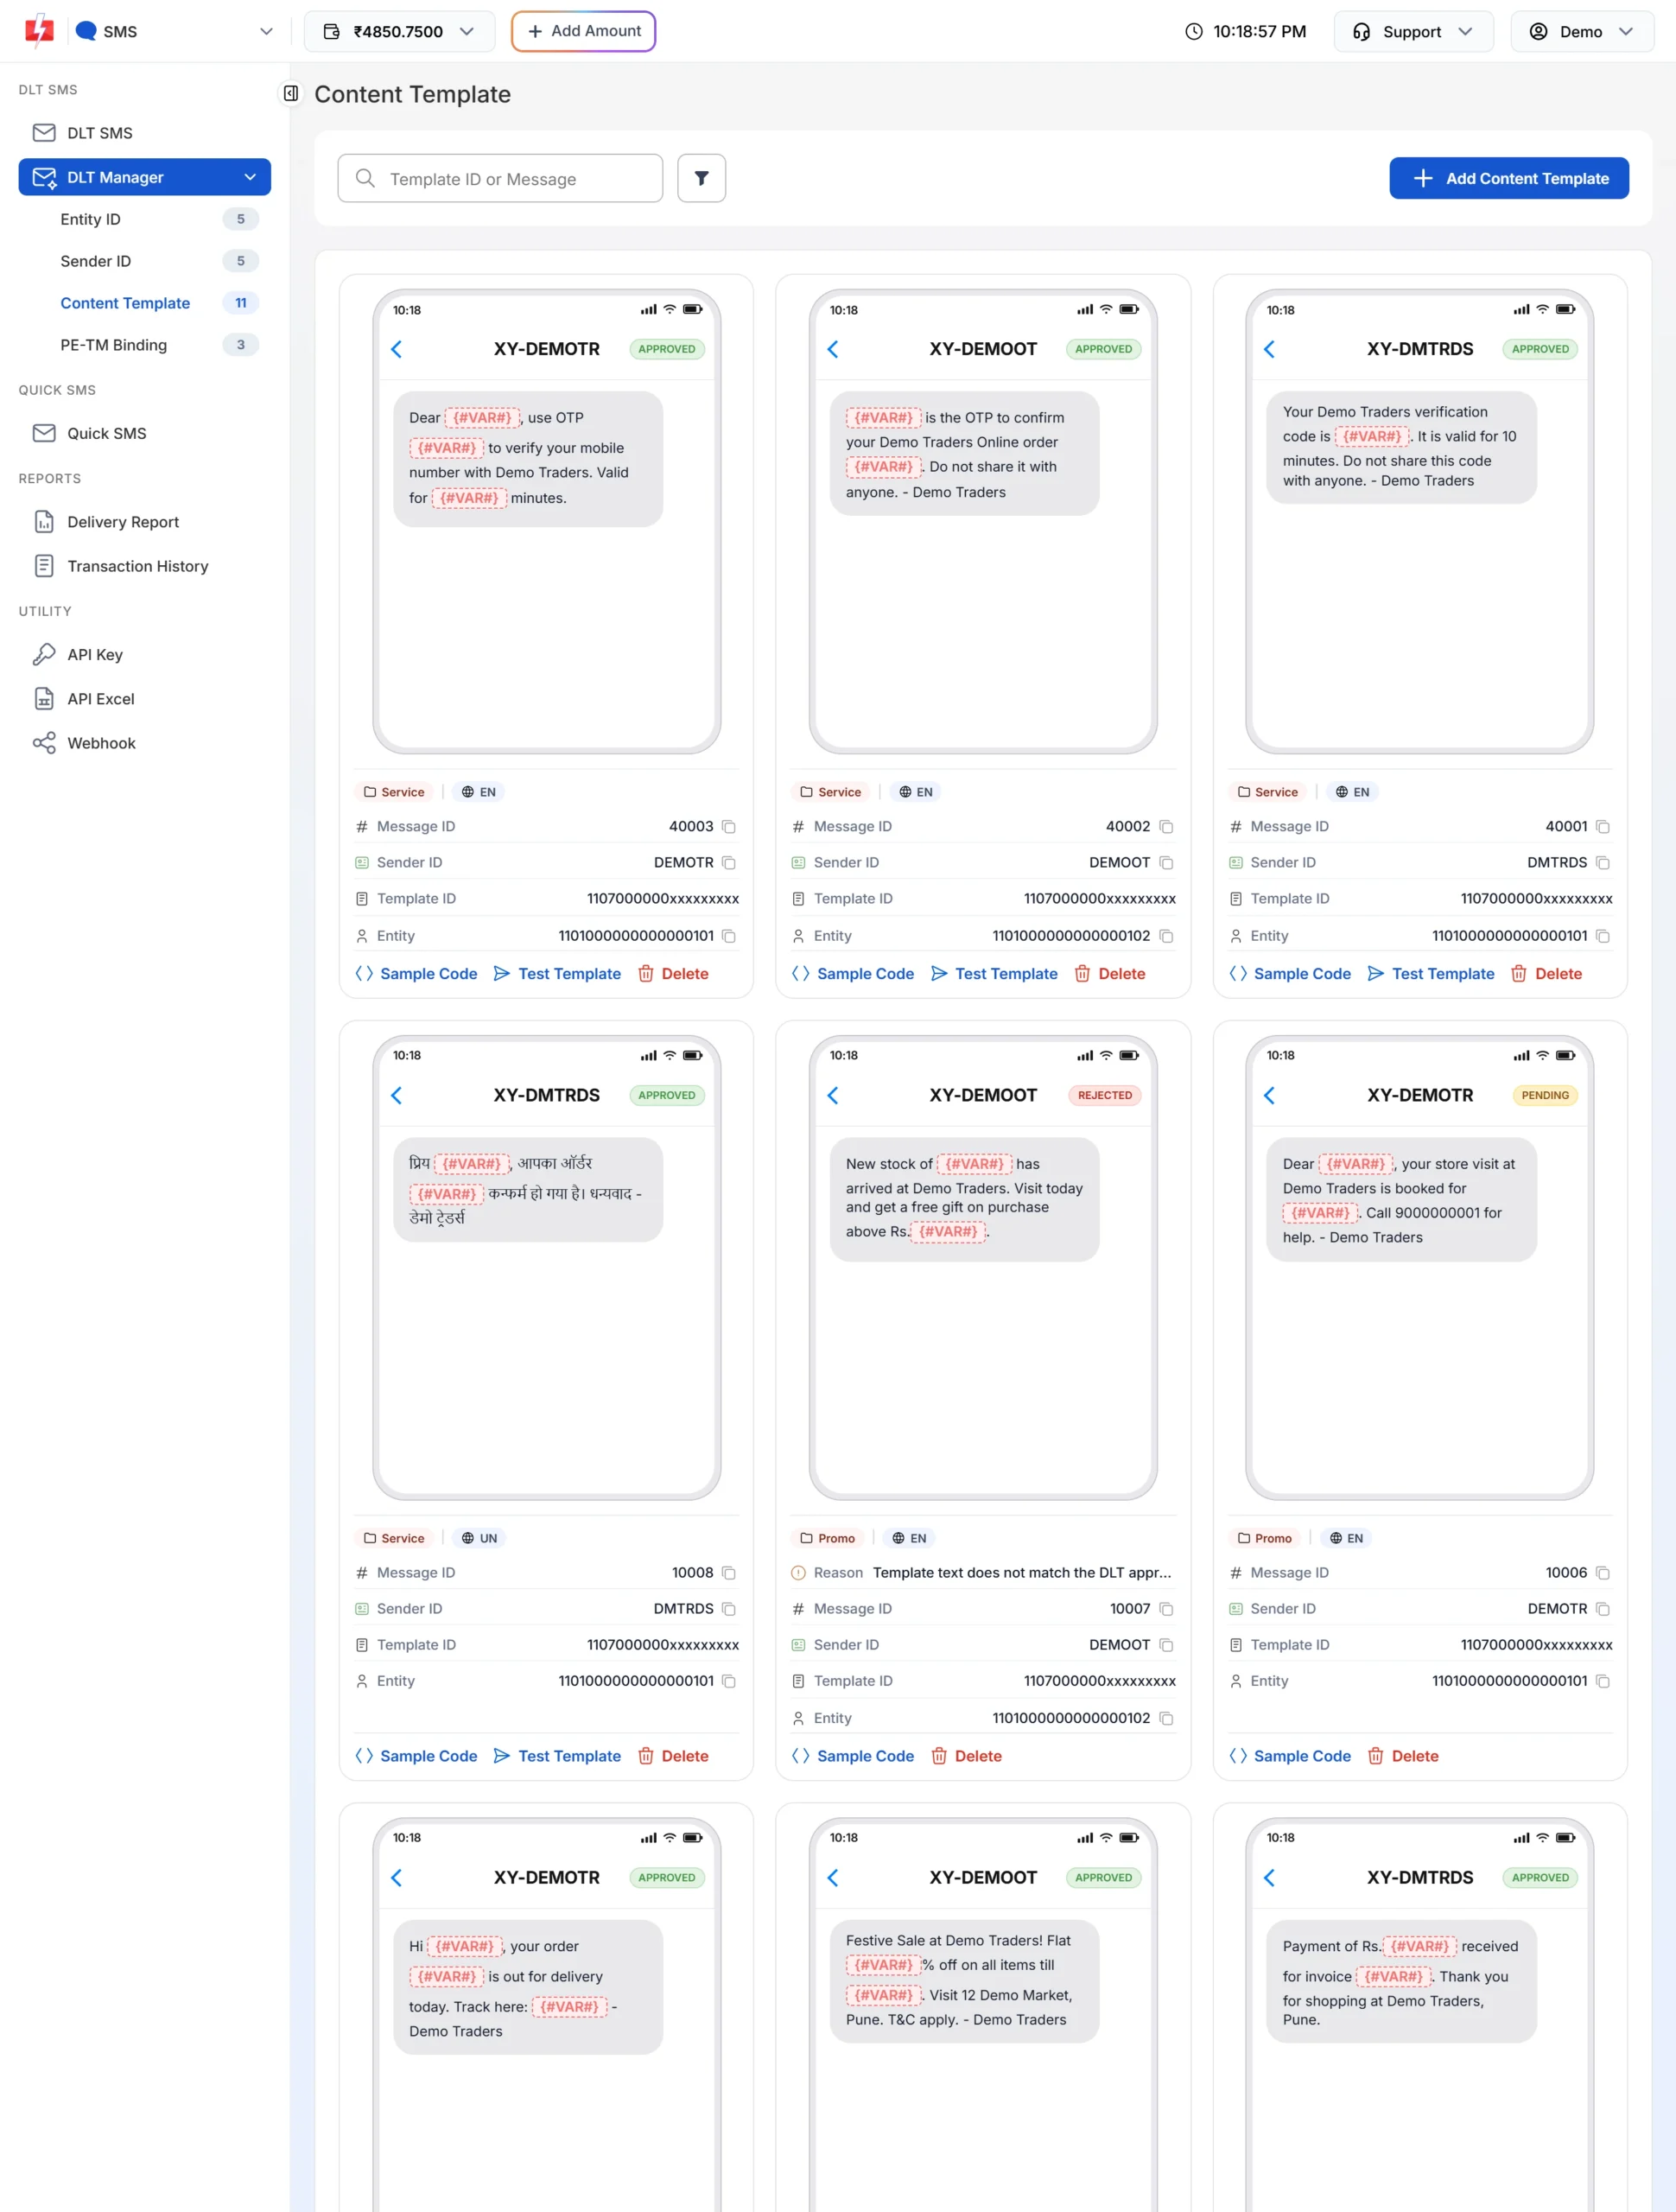
Each template is shown as a phone preview card with the header, a status badge (APPROVED, PENDING or REJECTED), the category (Service or Promo) and the language (EN or UN). Below it you see the Message ID (the short number you use as message in the API), the linked Sender ID, your DLT Template ID (partly hidden), the Entity, and a Reason on rejected templates.
Test a template before you use it
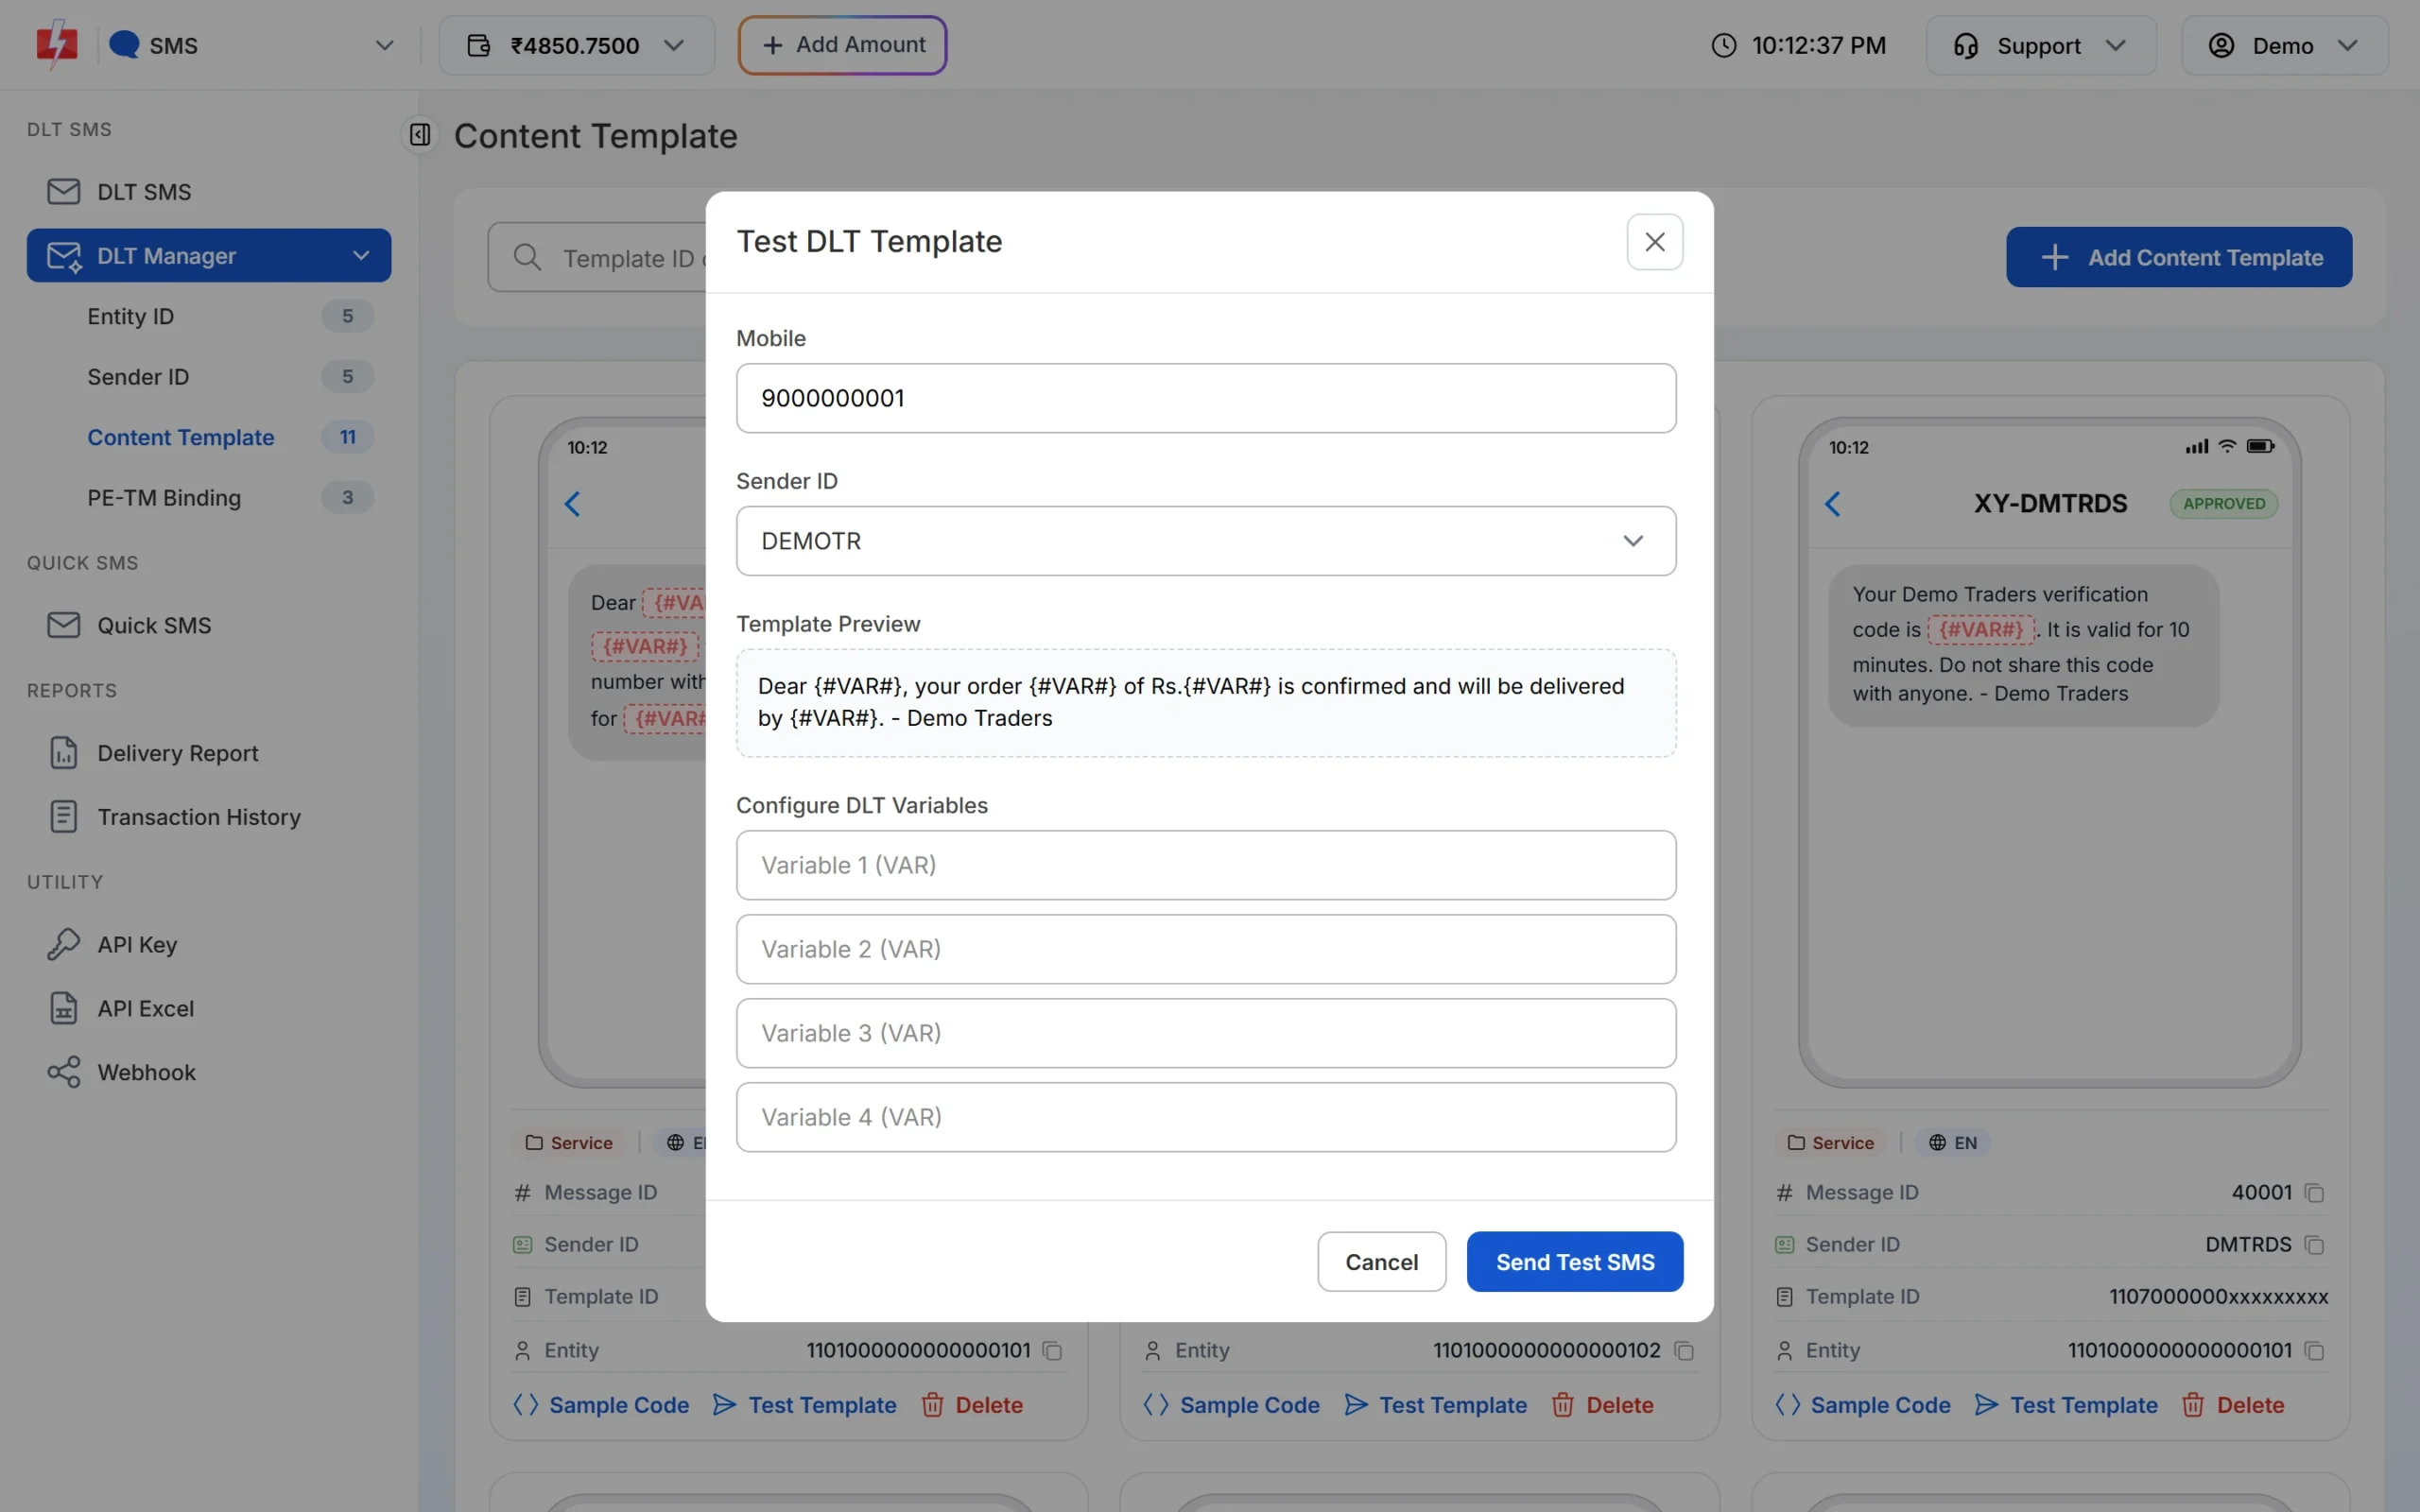
On any approved template, click Test Template. Enter a 10-digit Mobile number, pick the Sender ID, fill one value for each variable under Configure DLT Variables, and click Send Test SMS. This sends a real DLT SMS from your account, the same way a normal send does. The form then says the message was sent and it is checking the DLR, and finally shows whether it was delivered or the delivery report is still pending.
Get sample code for the API
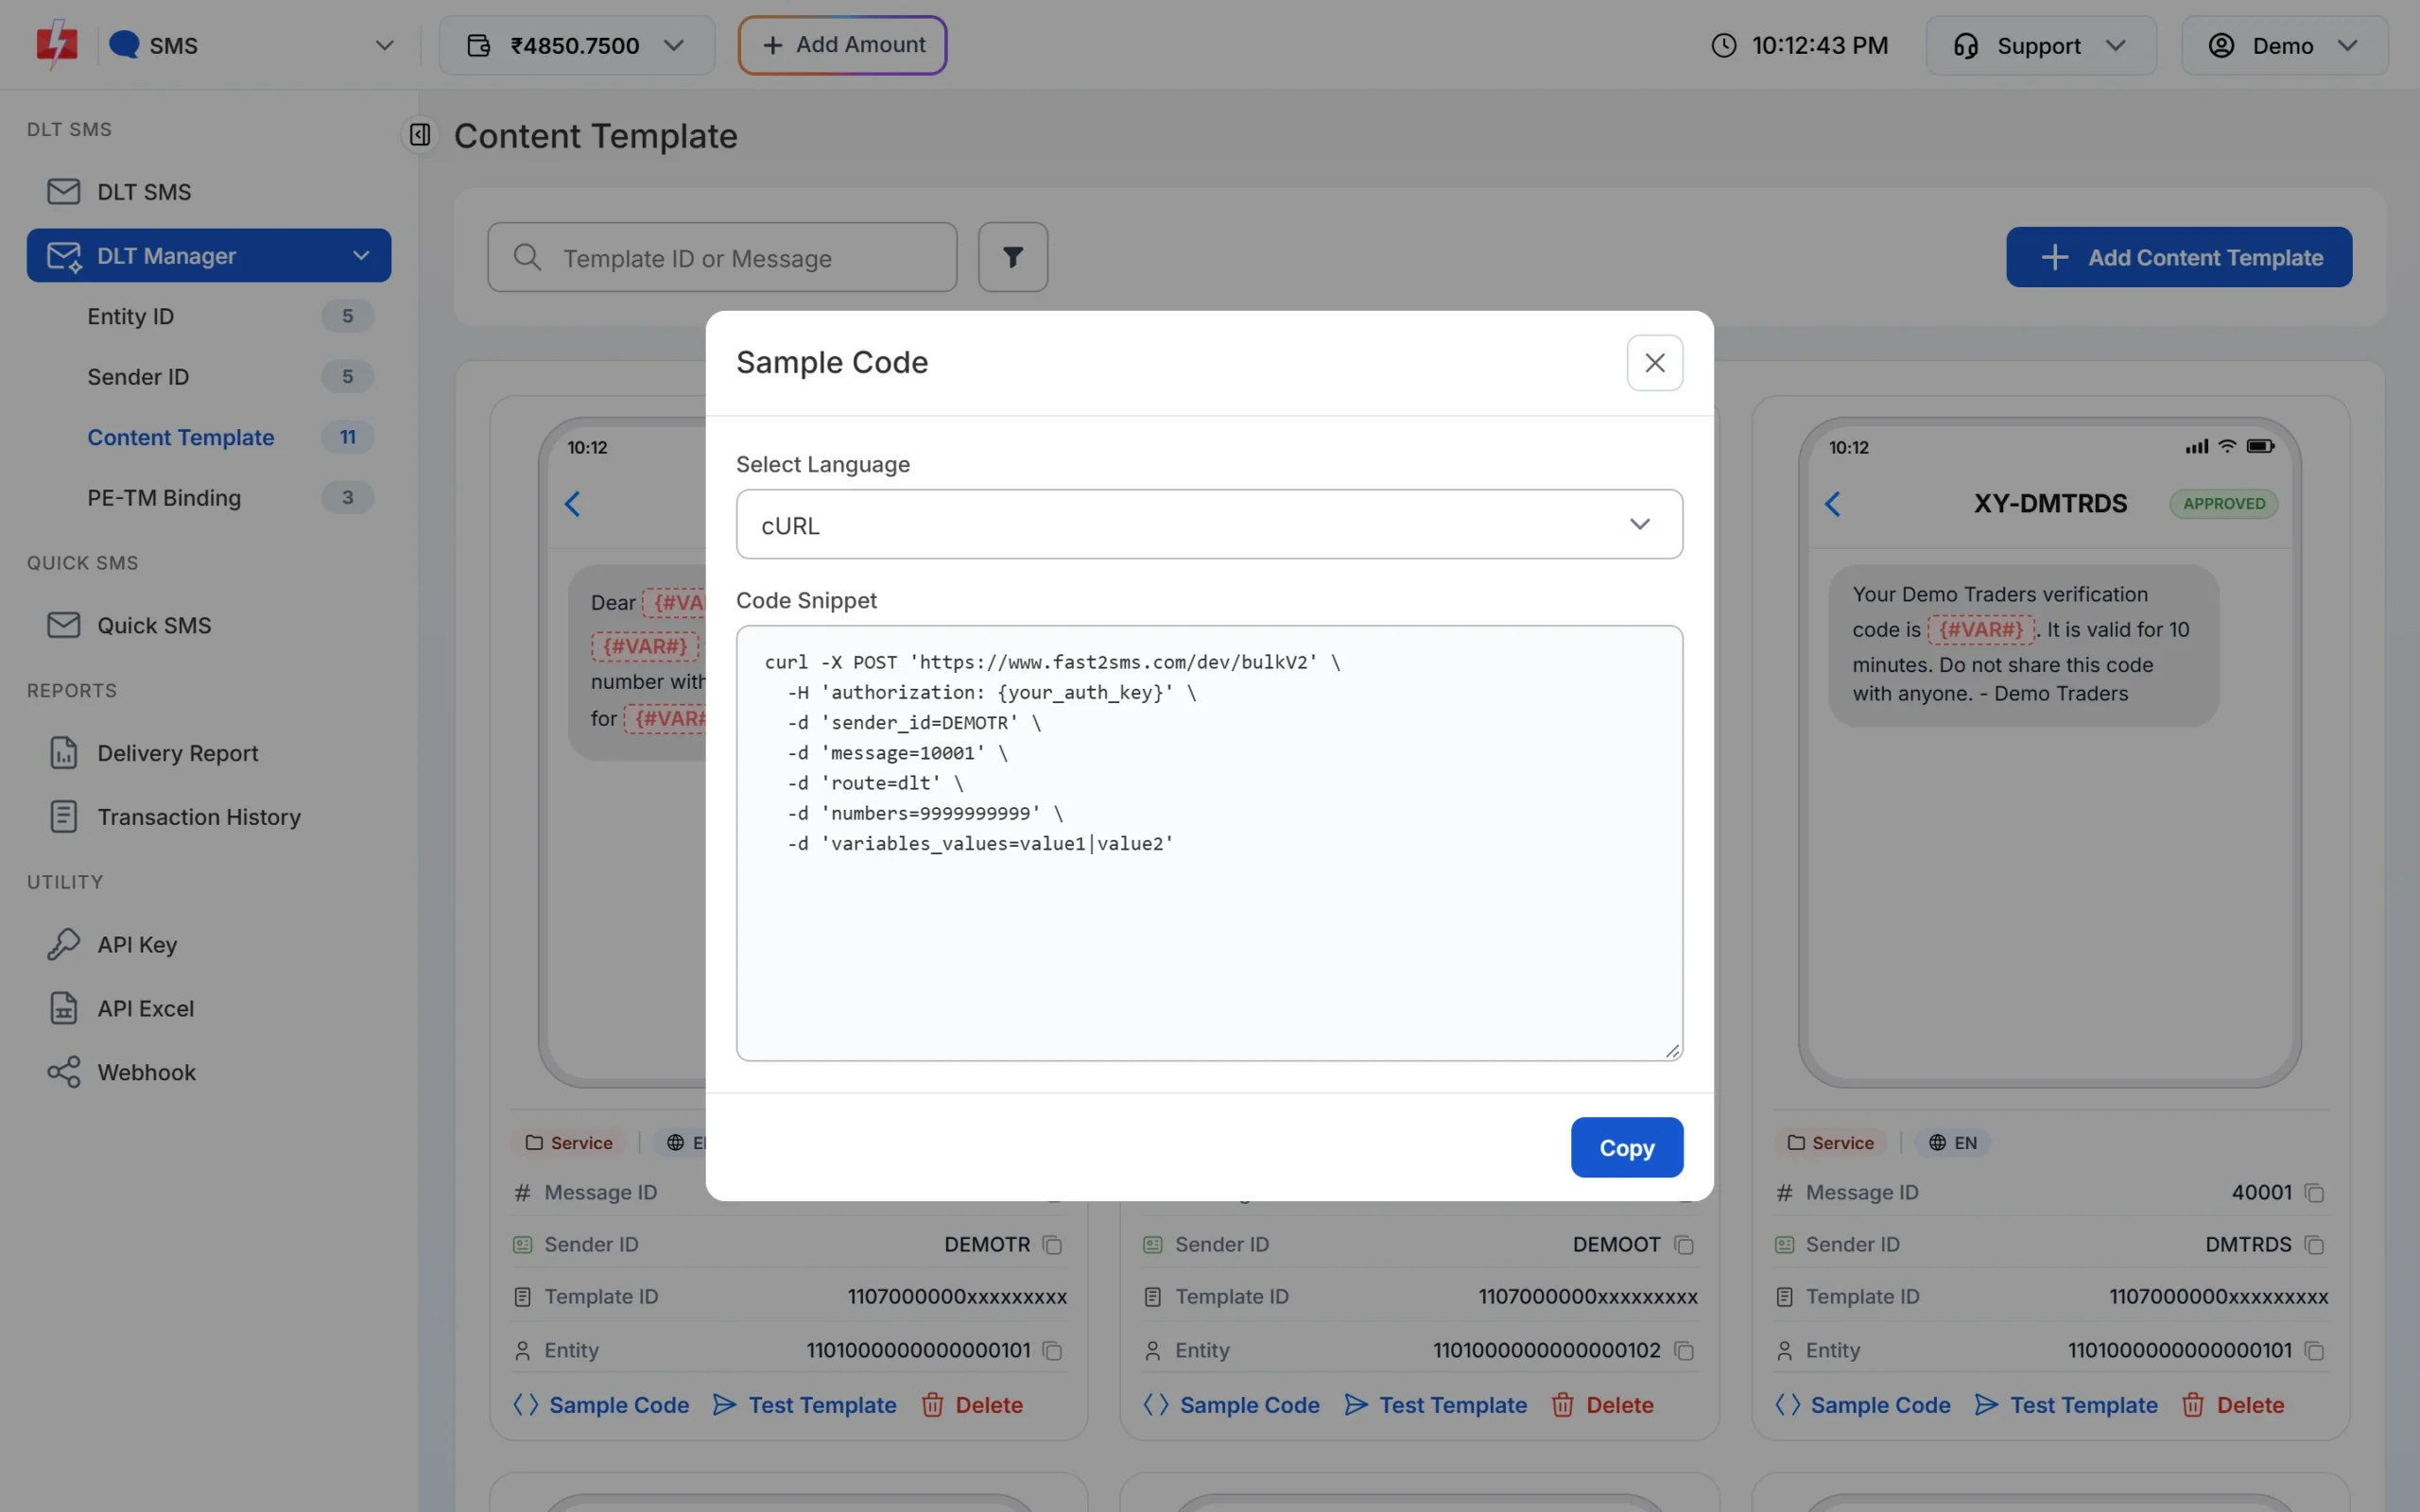
Click Sample Code on a template card to get a ready request for that template in cURL, PHP, Node.js or Python. The request goes to https://www.fast2sms.com/dev/bulkV2 with route=dlt, your sender_id, the template’s Message ID as message, the numbers, and the variable values joined with a pipe, like value1|value2. Click Copy and replace the API key placeholder with your own key.
What Approved, Pending and Rejected mean
| Status | What it means | What to do |
|---|---|---|
| Approved | The item is checked and ready to use. Entities found on the DLT platform are approved instantly. | Nothing. Approved senders show on the DLT SMS page and approved templates show in the template picker. |
| Pending | Waiting for a manual check by Fast2SMS. All new Sender IDs and templates start here, and entities that could not be verified automatically. | Wait for the check. Make sure the screenshot clearly shows the ID and its approved status. |
| Rejected | The check failed. The reason is shown in red under the status (or on the template card). | Fix the problem in the reason, delete the rejected row if you like, and add it again with the right details or a clearer screenshot. |
Search and filter your DLT records
Each tab has a search box and a filter button:
- Entity ID: search by Entity ID or name, filter by Status.
- Sender ID: search by Sender ID or Entity ID, filter by Status and Entity ID.
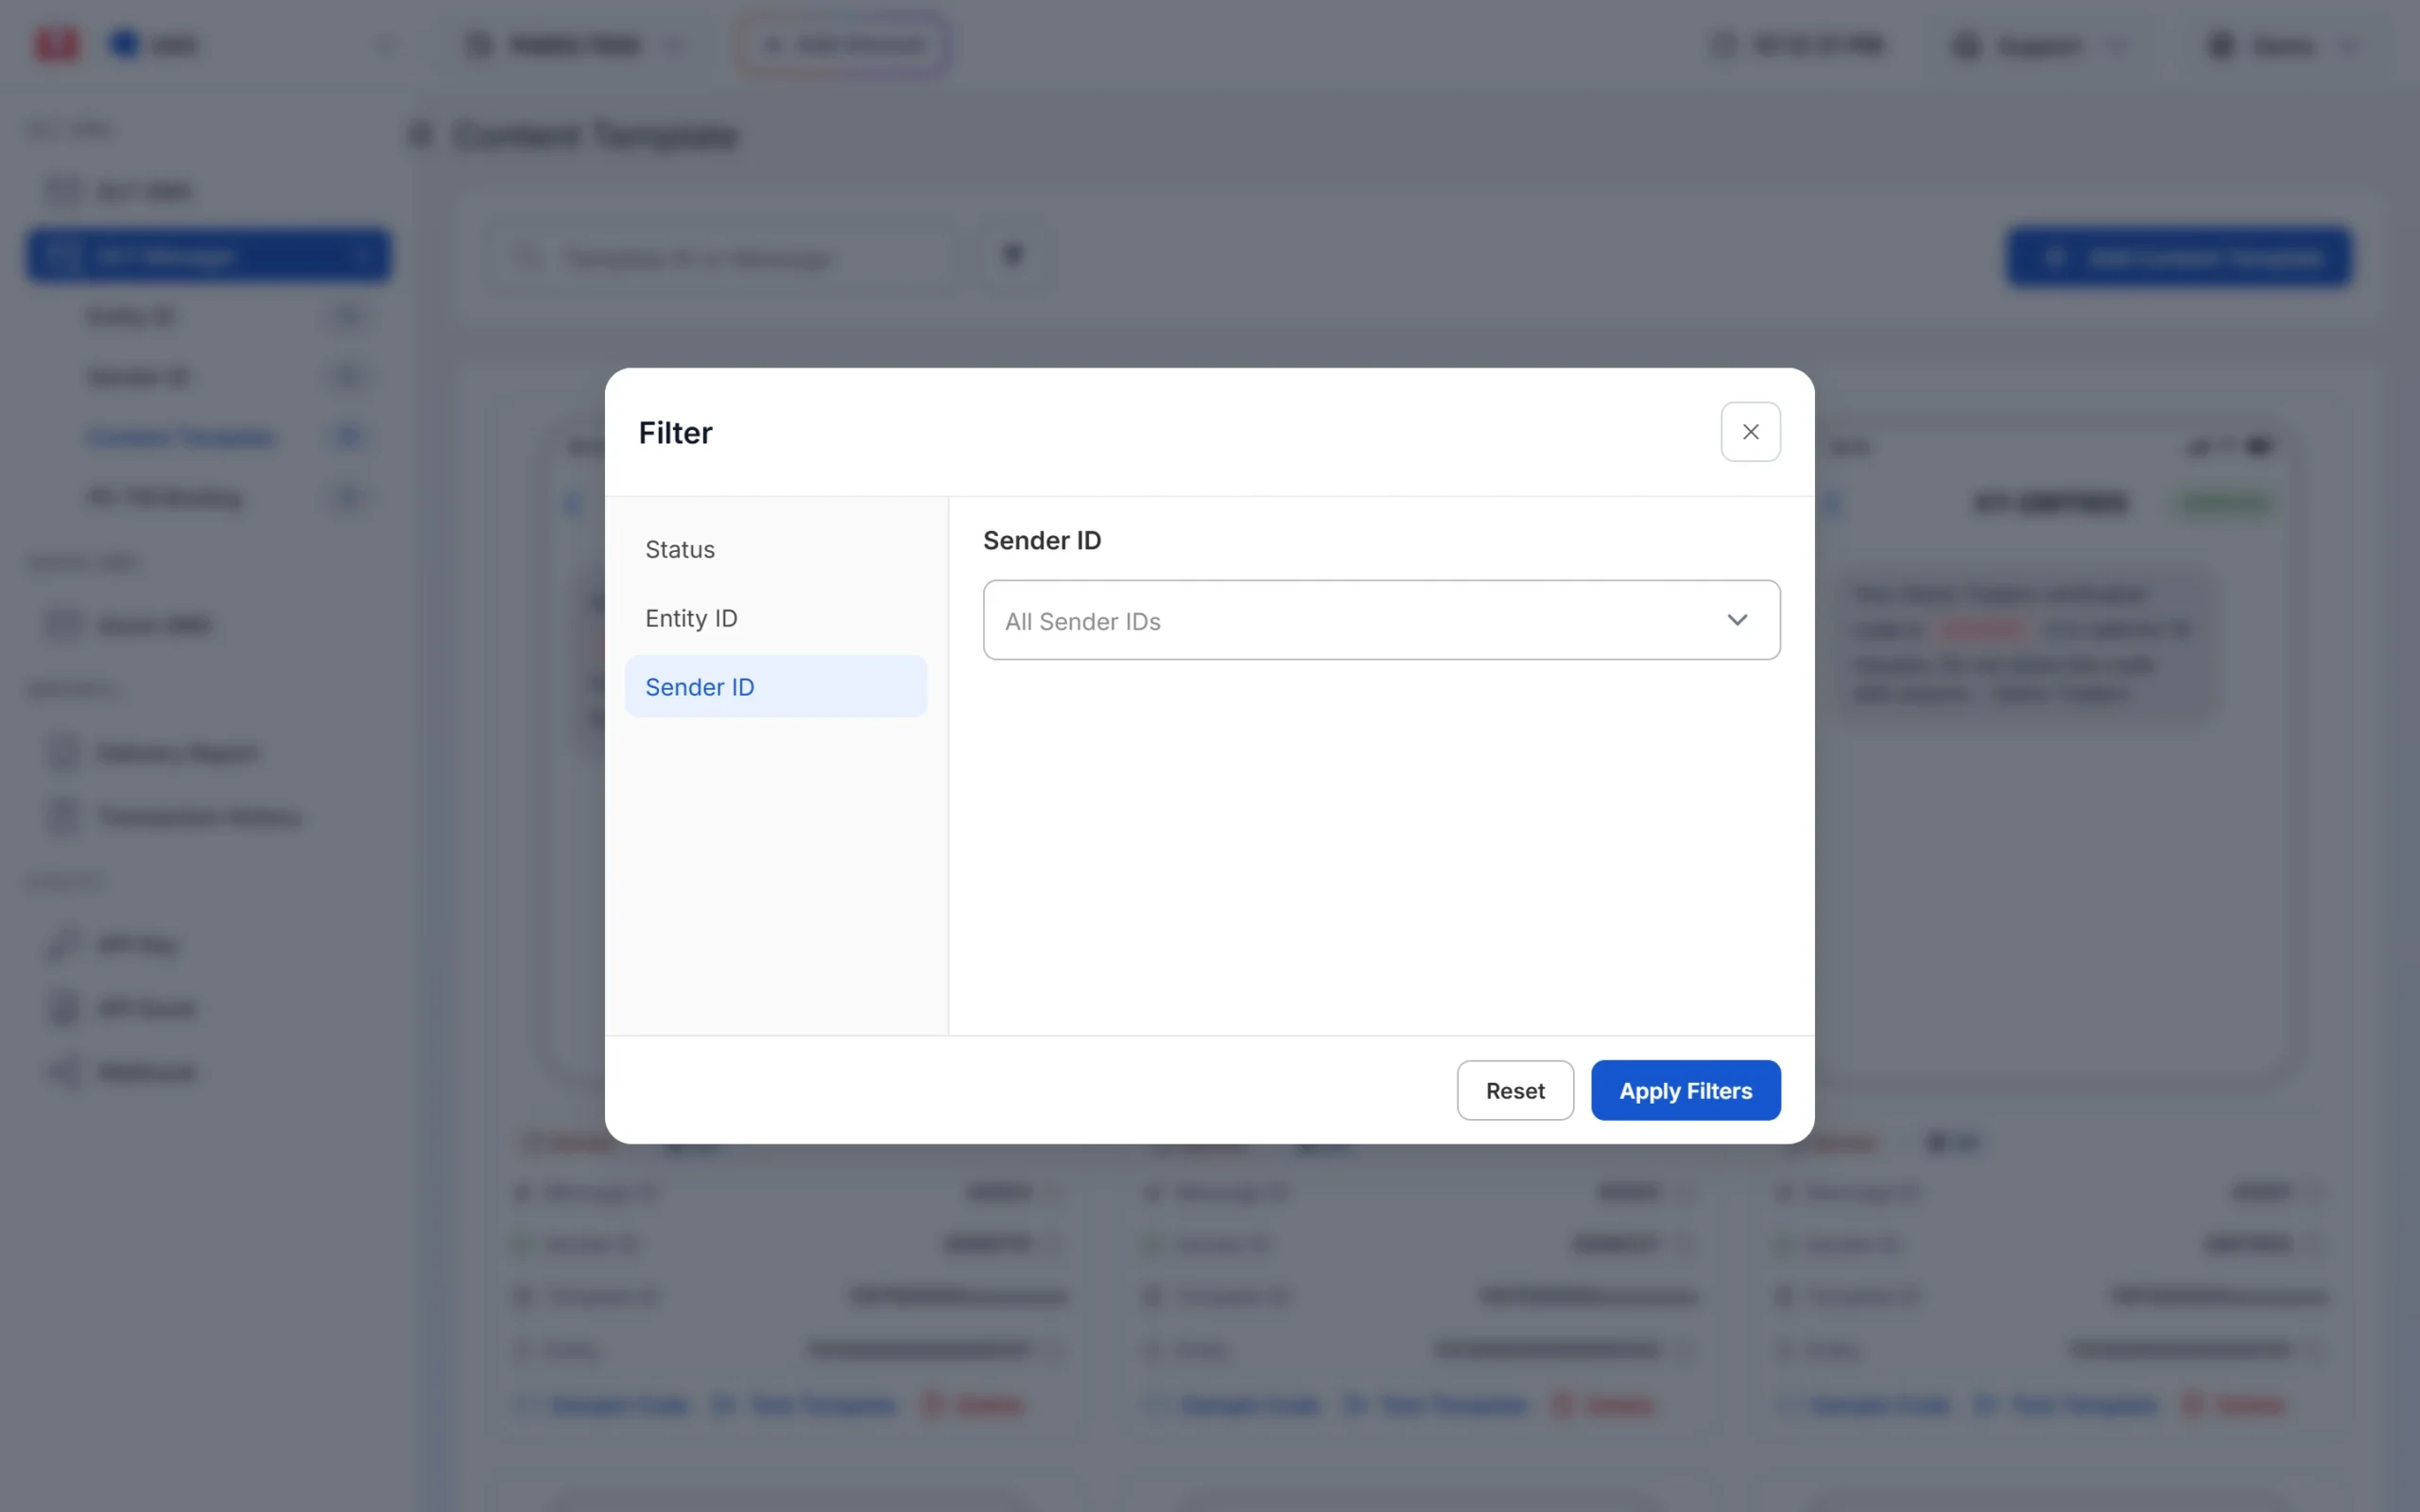
- Content Template: search by Template ID or message text, filter by Status, Entity ID and Sender ID.
Click Apply Filters, or Reset to clear them.
Delete an entity, Sender ID or template
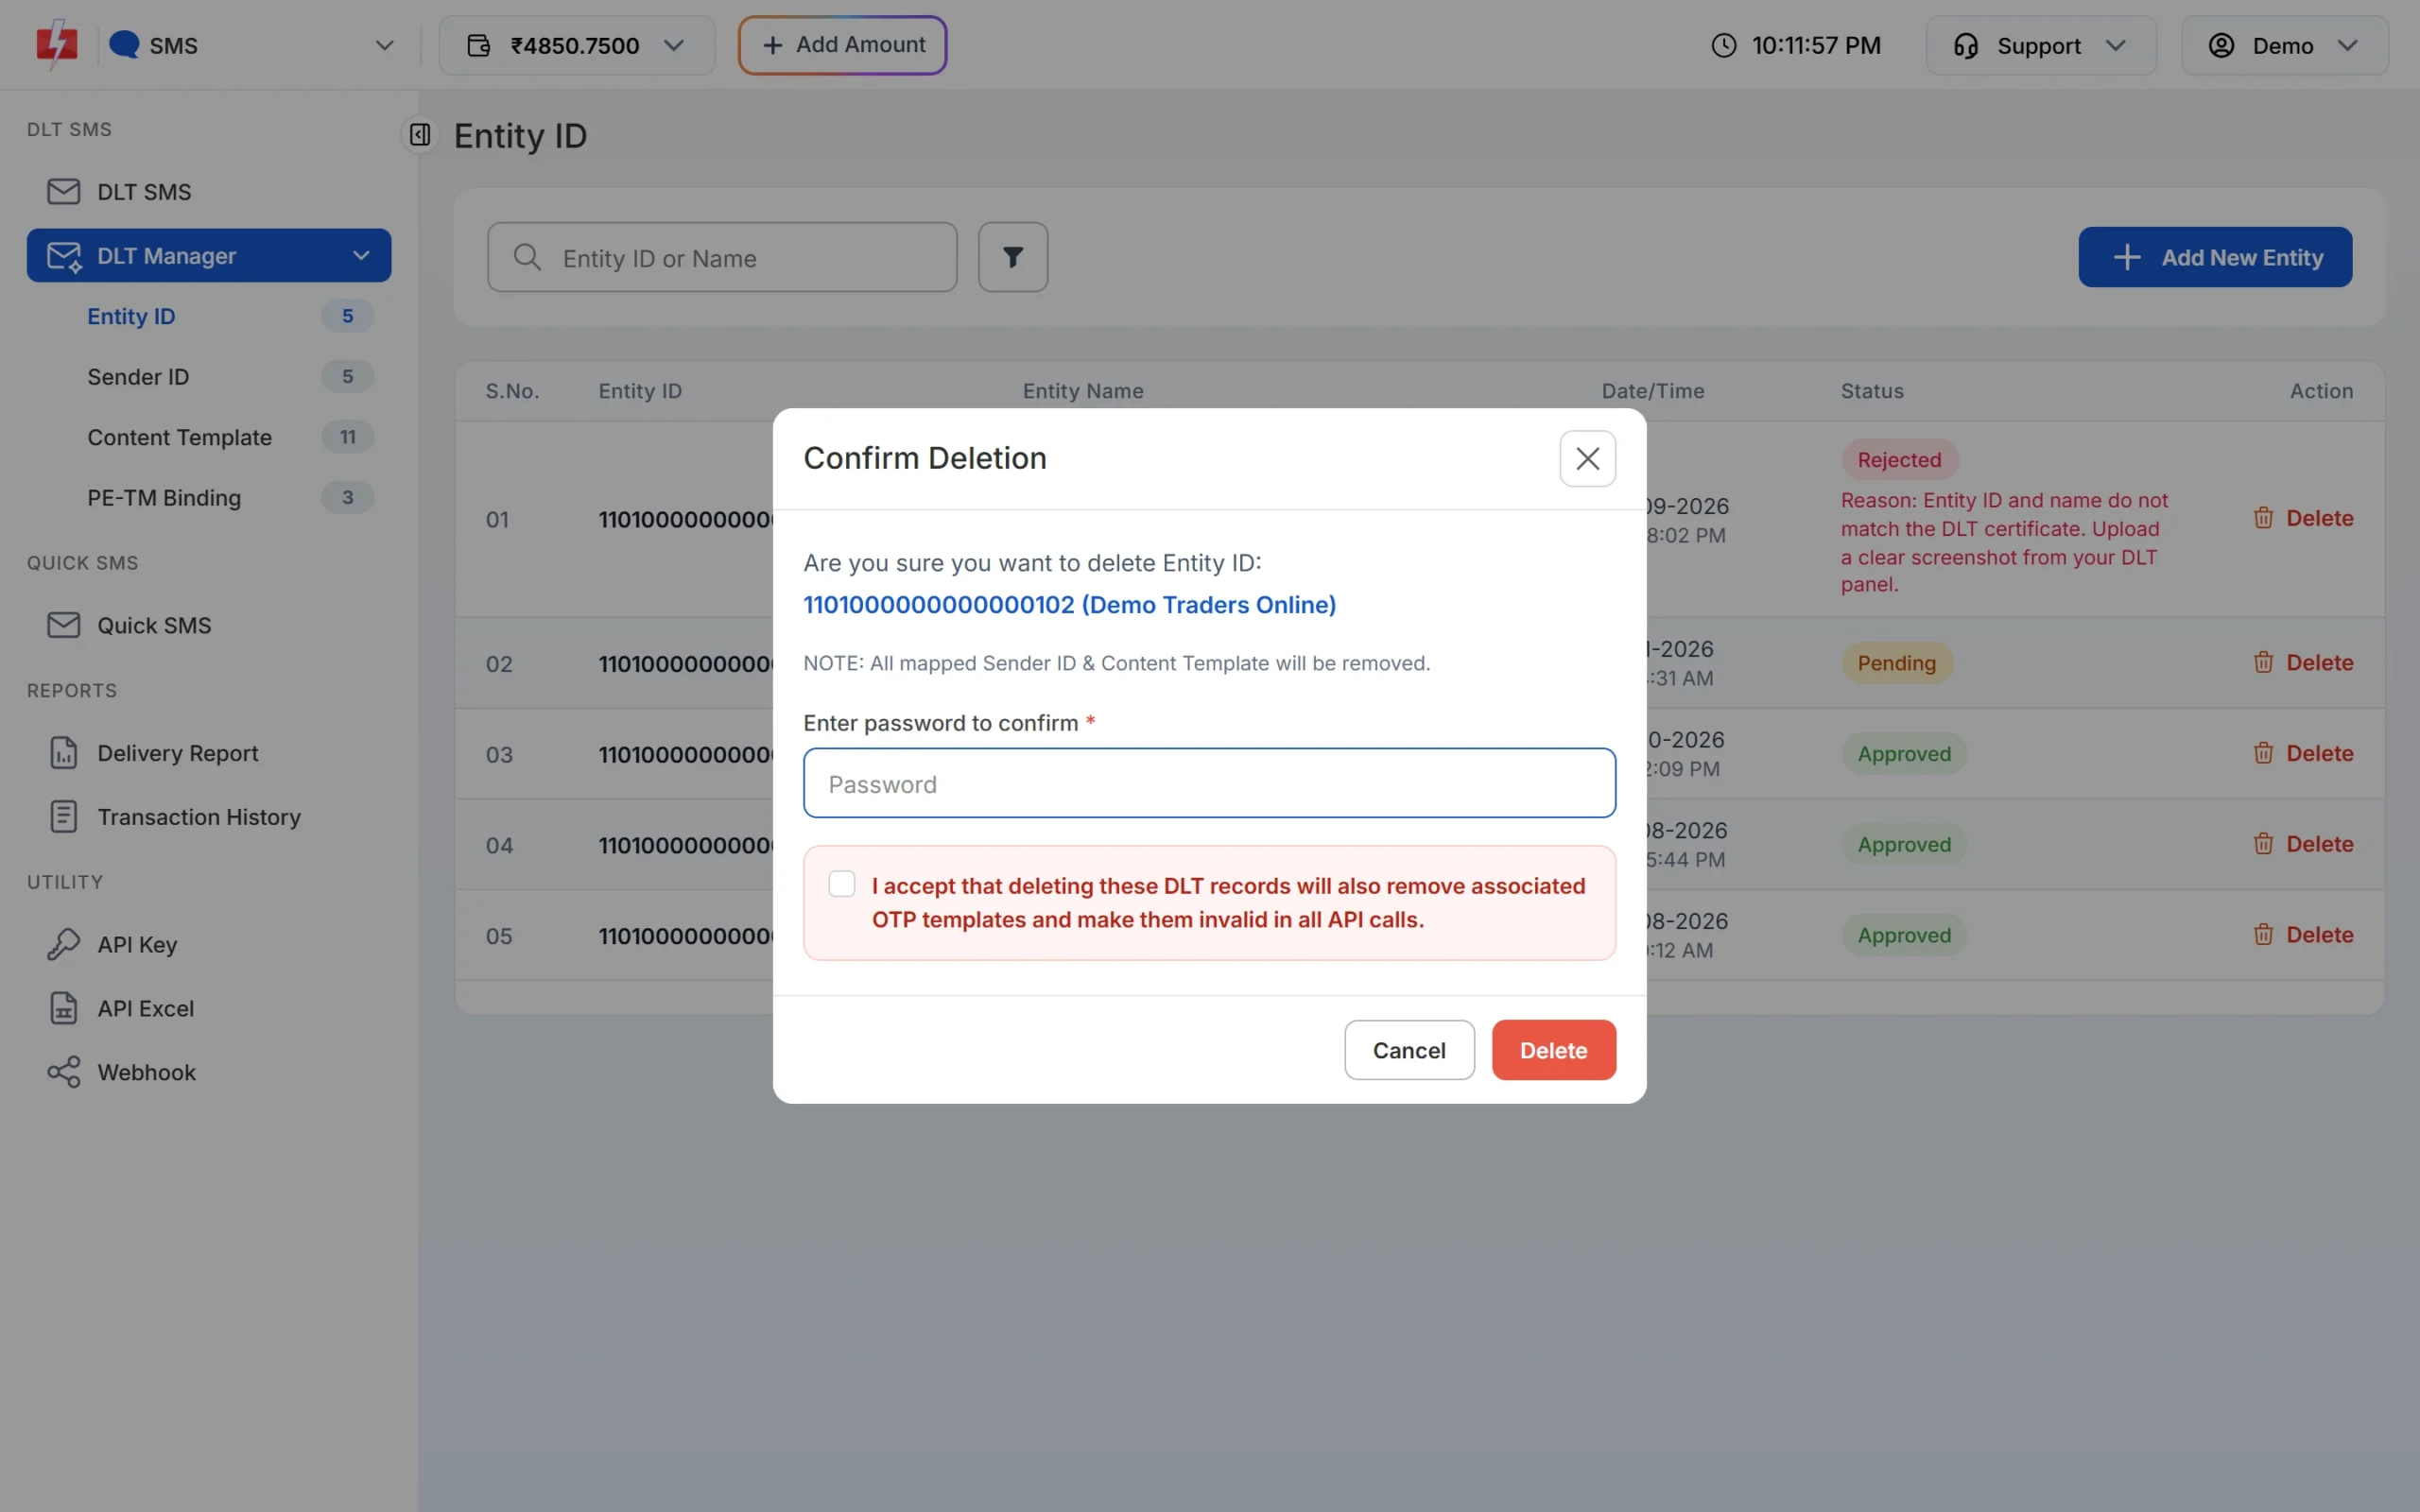
Click Delete on the row or card. In Confirm Deletion, enter your account password, tick the confirmation box and click Delete.
Common problems and fixes
| Message or problem | Why it happens | Fix |
|---|---|---|
| Invalid Entity ID | The ID is too short or has letters or spaces. | Copy the full Entity ID from your DLT portal, digits only. |
| Entity already approved / already pending in your account | You added this Entity ID before. | Use the existing row. Check it with the search box. |
| No entity in the Select Entity list | Only approved entities are listed. | Wait for the entity to be approved, or fix the rejection reason. |
| Sender ID blocked, contact Fast2SMS support | The header is on a block list. | Contact support. If your header is active on DLT, say so in your message. |
| Please upload valid DLT excel file | Wrong file type (for example .xls) or not a DLT export. | Download the export again from the DLT portal and save it as .xlsx or .csv. |
| At least one sender ID is required. | No header ticked in the template form. | Tick the Sender ID(s) the template is approved for. |
| Template not showing when sending SMS | The template is not approved yet, or it is not linked to the Sender ID you picked. | Check the template card: status must be APPROVED and the right Sender ID must be listed. |
Frequently asked questions
Where do I find my Entity ID?
It is on your DLT portal profile and on your DLT registration certificate. It is a long number, often called PE ID.
How long does approval take in Fast2SMS?
Entities found on the DLT platform are approved instantly. Sender IDs, templates and unverified entities wait for a manual check. A clear screenshot that shows the approved status helps the check go quickly.
Can one template use more than one Sender ID?
Yes. Tick all the Sender IDs of that entity that the template is approved for on DLT. The template then shows up for each of those senders.
Should I choose Service Implicit or Service Explicit?
Choose the same category the template has on your DLT portal. OTPs, order, payment and service updates are usually Service Implicit. Offers and marketing messages are Service Explicit or Promotional.
What is the difference between Message ID and Template ID?
The Template ID is your DLT template number. The Message ID is a short Fast2SMS number for the same template, which you pass as message in the API.
Does Test Template cost money?
The test sends a real DLT SMS through the normal sending route, so treat it like any other SMS from your wallet.